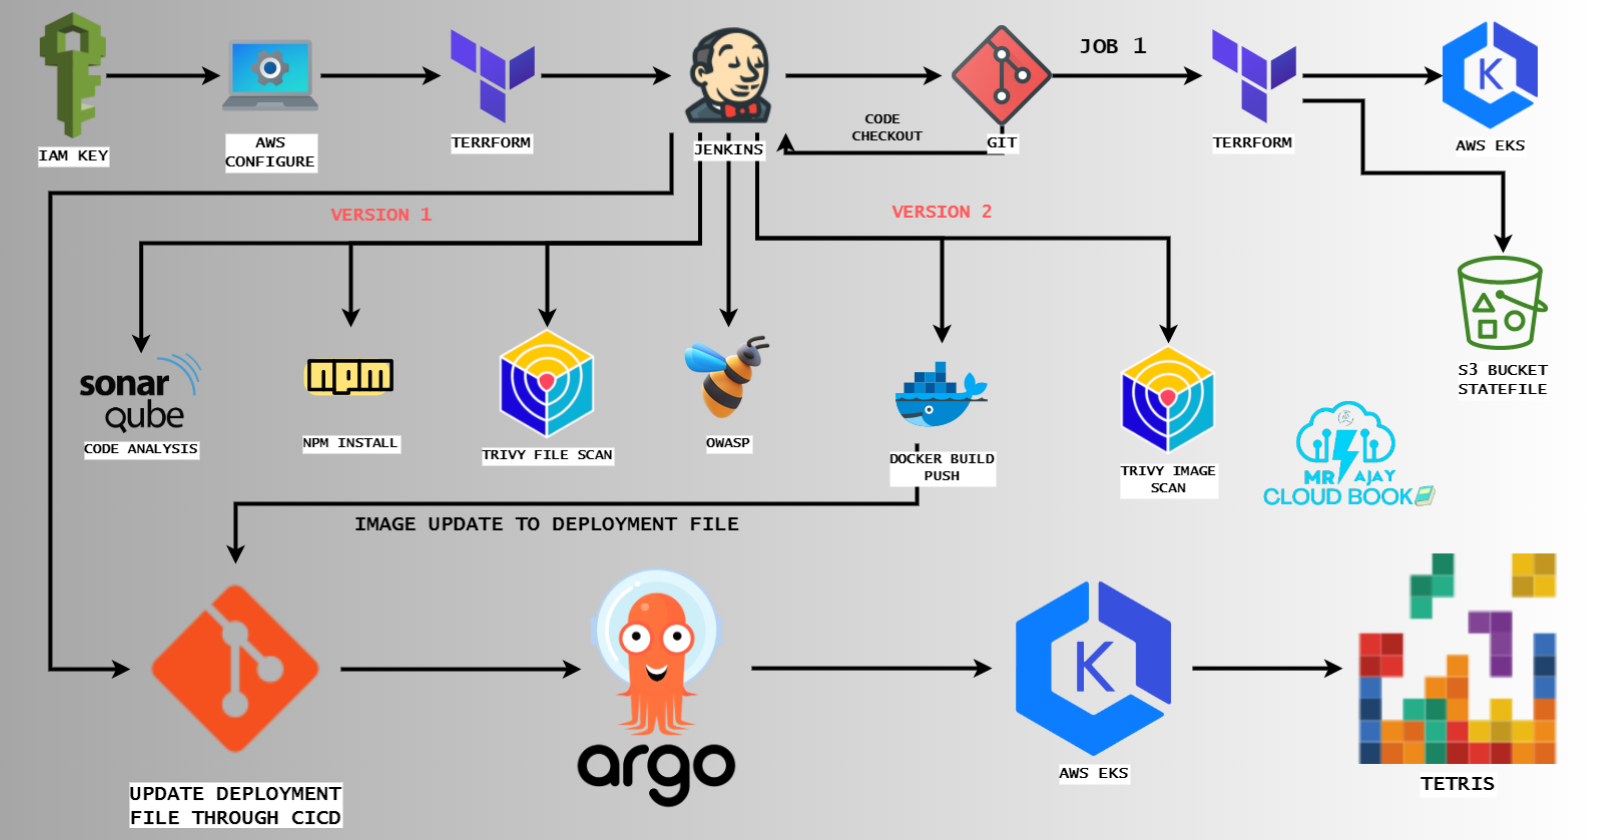
Welcome to the world of DevSecOps automation, where cutting-edge technologies merge to streamline the deployment of one of the most beloved classic games, Tetris. In this blog, we’ll embark on a fascinating journey that unveils the power of ArgoCD, Terraform, and Jenkins in orchestrating a seamless and secure deployment pipeline for not one, but two distinct versions of the Tetris game. Imagine a scenario where your Tetris application effortlessly transitions through various stages of development, from infrastructure provisioning to continuous integration and delivery, all while maintaining the highest standards of security. Join us as we delve into the details of how these sophisticated tools work together to create an automated, efficient, and foolproof DevOps workflow, capable of handling multiple game versions, designed to impress even the most discerning tech enthusiasts.
GitHub REPOSITORIES
TETRIS-VERSION1
https://github.com/Aj7Ay/Tetris-V1.git
TETRIS-VERSION2
https://github.com/Aj7Ay/Tetris-V2.git
TETRIS_MANIFEST
https://github.com/Aj7Ay/Tetris-manifest.git
Prerequisites:
- AWS Account: To get started, you’ll need an active AWS account. Ensure that you have access and permission to create and manage AWS resources.
- AWS CLI: Install the AWS Command Line Interface (CLI) on your local machine and configure it with your AWS credentials. This is essential for managing your AWS resources.
- IAM User and Key Pair: Create an IAM (Identity and Access Management) user with the necessary permissions to provision resources on AWS. Additionally, generate an IAM Access Key and Secret Access Key for programmatic access. Ensure that you securely manage these credentials.
- S3 Bucket: Set up an S3 bucket to store your Terraform state files. This bucket is crucial for maintaining the state of your infrastructure and enabling collaboration.
- Terraform: Install Terraform on your local machine. Terraform is used for provisioning infrastructure as code and managing AWS resources. Make sure to configure Terraform to work with your AWS credentials and your S3 bucket for state storage.

Step1: How to install and setup Terraform on Windows
Download Terraform:
Visit the official Terraform website: terraform.io/downloads.html

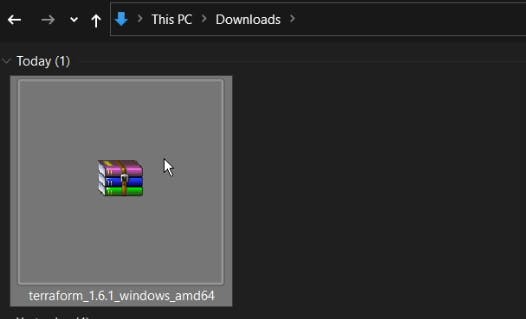
Extract the ZIP Archive:
Once the download is complete, extract the contents of the ZIP archive to a directory on your computer. You can use a tool like 7-Zip or the built-in Windows extraction tool. Ensure that you extract it to a directory that’s part of your system’s PATH.

Remember that I created a Terraform Directory in C drive


Extracted to C drive

Copy the path

Add Terraform to Your System’s PATH:
To make Terraform easily accessible from the command prompt, add the directory where Terraform is extracted to your system’s PATH environment variable. Follow these steps:
Search for “Environment Variables” in your Windows search bar and click “Edit the system environment variables.”

In the “System Properties” window, click the “Environment Variables” button.

Under “User variables for Admin,” find the “Path” variable and click “Edit.”

Click on New paste the copied path and click on OK

Under “System variables,” find the “Path” variable and click “Edit.”

Click “New” and add the path to the directory where you extracted Terraform (e.g., C:\path\to\terraform).

Click “OK” to close the Environment Variables windows.
Click “OK” again to close the System Properties window.
Verify the Installation:
Open a new Command Prompt or PowerShell window.
Type terraform –version and press Enter. This command should display the Terraform version, confirming that Terraform is installed and in your PATH.

Your Terraform installation is now complete, and you can start using Terraform to manage your infrastructure as code.
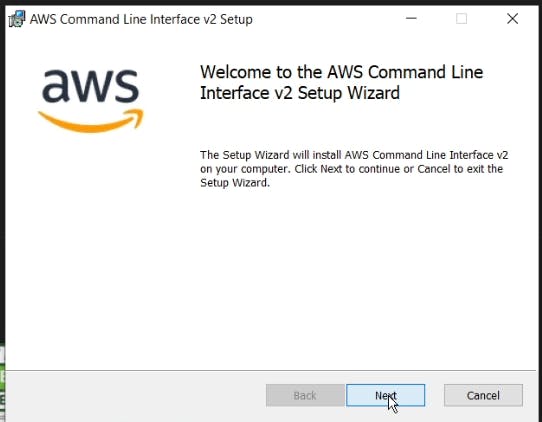
Step2: Download the AWS CLI Installer:
Visit the AWS CLI Downloads page: aws.amazon.com/cli
Under “Install the AWS CLI,” click on the “64-bit” link to download the AWS CLI installer for Windows.

Run the Installer:
Locate the downloaded installer executable (e.g., AWSCLIV2.exe) and double-click it to run the installer.

Click on Next
Agree to the terms and click on Next

Click Next

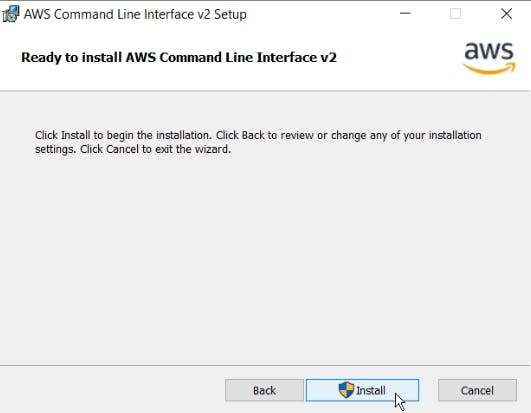
Click on install
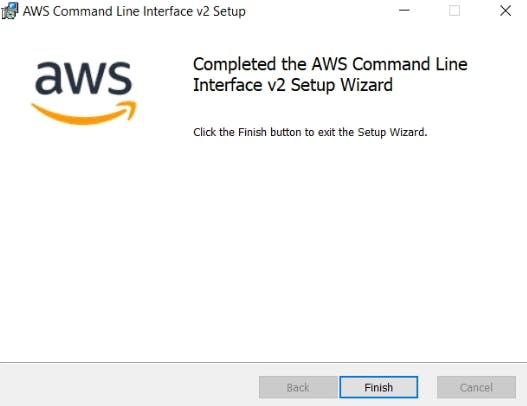
Click Finish Aws cli is installed
Verify the Installation:
Open a Command Prompt or PowerShell window.
Type aws –version and press Enter. This command should display the AWS CLI version, confirming that the installation was successful.

Step3: create an IAM user
Navigate to the AWS console
Click the “Search” field.

Search for IAM

Click “Users”

Click “Add users”

Click the “User name” field.

Type “Terraform” or as you wish about the name
Click Next

Click “Attach policies directly”

Click this checkbox with Administrator access

Click “Next”

Click “Create user”

Click newly created user in my case Ajay

Click “Security credentials”

Click “Create access key”

Click this radio button with the CLI

Agree to terms

Click Next

Click “Create access key”

Download .csv file

Step4: Aws Configure
Go to vs code or Cmd your wish
aws configureProvide your Aws Access key and Secret Access key

Step5: Terraform files and Provision
CHANGE YOUR S3 BUCKET NAME IN THE BACKEND.TF
Clone the repository to your local file explorer
https://github.com/Aj7Ay/Tetris-V1.git
cd Tetris-V1
cd Jenkins-terraform
ls #to see files
Now you can see the terraform files to provision the AWS Ec2 with Jenkins installed,sonarqube container and Trivy, Aws cli,Kubectl and terraform
Shell script
#!/bin/bash
sudo apt update -y
wget -O - https://packages.adoptium.net/artifactory/api/gpg/key/public | tee /etc/apt/keyrings/adoptium.asc
echo "deb [signed-by=/etc/apt/keyrings/adoptium.asc] https://packages.adoptium.net/artifactory/deb $(awk -F= '/^VERSION_CODENAME/{print$2}' /etc/os-release) main" | tee /etc/apt/sources.list.d/adoptium.list
sudo apt update -y
sudo apt install temurin-17-jdk -y
/usr/bin/java --version
curl -fsSL https://pkg.jenkins.io/debian-stable/jenkins.io-2023.key | sudo tee /usr/share/keyrings/jenkins-keyring.asc > /dev/null
echo deb [signed-by=/usr/share/keyrings/jenkins-keyring.asc] https://pkg.jenkins.io/debian-stable binary/ | sudo tee /etc/apt/sources.list.d/jenkins.list > /dev/null
sudo apt-get update -y
sudo apt-get install jenkins -y
sudo systemctl start jenkins
sudo systemctl status jenkins

#install docker
sudo apt-get update
sudo apt-get install docker.io -y
sudo usermod -aG docker ubuntu
newgrp docker
sudo chmod 777 /var/run/docker.sock
docker run -d --name sonar -p 9000:9000 sonarqube:lts-community

# install trivy
sudo apt-get install wget apt-transport-https gnupg lsb-release -y
wget -qO - https://aquasecurity.github.io/trivy-repo/deb/public.key | gpg --dearmor | sudo tee /usr/share/keyrings/trivy.gpg > /dev/null
echo "deb [signed-by=/usr/share/keyrings/trivy.gpg] https://aquasecurity.github.io/trivy-repo/deb $(lsb_release -sc) main" | sudo tee -a /etc/apt/sources.list.d/trivy.list
sudo apt-get update
sudo apt-get install trivy -y

#install terraform
sudo apt install wget -y
wget -O- https://apt.releases.hashicorp.com/gpg | sudo gpg --dearmor -o /usr/share/keyrings/hashicorp-archive-keyring.gpg
echo "deb [signed-by=/usr/share/keyrings/hashicorp-archive-keyring.gpg] https://apt.releases.hashicorp.com $(lsb_release -cs) main" | sudo tee /etc/apt/sources.list.d/hashicorp.list
sudo apt update && sudo apt install terraform
#install Kubectl on Jenkins
sudo apt update
sudo apt install curl -y
curl -LO https://dl.k8s.io/release/$(curl -L -s https://dl.k8s.io/release/stable.txt)/bin/linux/amd64/kubectl
sudo install -o root -g root -m 0755 kubectl /usr/local/bin/kubectl
kubectl version --client

#install Aws cli
curl "https://awscli.amazonaws.com/awscli-exe-linux-x86_64.zip" -o "awscliv2.zip"
sudo apt-get install unzip -y
unzip awscliv2.zip
sudo ./aws/install
Now inside the Jenkins-terraform directory
Open the terminal and provide the below commands
terraform init
Now validate the code to see any issues in Terraform files
terraform validate
Now see the plan for resources
terraform plan
After the plan Apply to provision resources
terraform apply --auto-approve

Apply completed you can see Ec2 is created in the Aws console

Now copy the public IP address of ec2 and paste it into the browser
<Ec2-ip:8080> #you will Jenkins login page
Connect your Instance to Putty or Mobaxtreme and provide the below command for the Administrator password
sudo cat /var/lib/jenkins/secrets/initialAdminPassword
Now, install the suggested plugins.

Jenkins will now get installed and install all the libraries.
Create an admin user

Click on save and continue.
Jenkins Dashboard

Now Copy the public IP again and paste it into a new tab in the browser with 9000
<ec2-ip:9000> #runs sonar container
Enter username and password, click on login and change password
username admin
password admin
Update New password, This is Sonar Dashboard.

Now go to Putty and see whether it’s installed Trivy, Terraform, Aws cli, Kubectl or not.
trivy --version
aws --version
terraform --version
kubectl version
That is done now go to Jenkins and add a terraform plugin to provision the AWS EKS using the Pipeline Job.
Go to Jenkins dashboard –> Manage Jenkins –> Plugins
Available Plugins, Search for Terraform and install it.

Go to Putty and use the below command
let’s find the path to our Terraform (we will use it in the tools section of Terraform)
which terraform
Now come back to Manage Jenkins –> Tools
Add the terraform in Tools

Apply and save.
CHANGE YOUR S3 BUCKET NAME IN THE BACKEND.TF
Now create a new job for the Eks provision

I want to do this with build parameters to apply and destroy while building only.
you have to add this inside job like the below image

Let’s add a pipeline
pipeline{
    agent any
    stages {
        stage('Checkout from Git'){
            steps{
                git branch: 'main', url: 'https://github.com/Aj7Ay/Tetris-V1.git'
            }
        }
        stage('Terraform version'){
             steps{
                 sh 'terraform --version'
             }
        }
        stage('Terraform init'){
             steps{
                 dir('Eks-terraform') {
                      sh 'terraform init'
                   }
             }
        }
        stage('Terraform validate'){
             steps{
                 dir('Eks-terraform') {
                      sh 'terraform validate'
                   }
             }
        }
        stage('Terraform plan'){
             steps{
                 dir('Eks-terraform') {
                      sh 'terraform plan'
                   }
             }
        }
        stage('Terraform apply/destroy'){
             steps{
                 dir('Eks-terraform') {
                      sh 'terraform ${action} --auto-approve'
                   }
             }
        }
    }
}
Let’s apply and save and Build with parameters and select action as apply

Stage view it will take max 10mins to provision

Check in Your Aws console whether it created EKS or not.

Ec2 instance is created for the Node group

Now let’s build Tetris version 1
We need some plugins to complete this process
Go to Jenkins dashboard
Manage Jenkins –> Plugins –> Available Plugins
Search for the Below Plugins
Eclipse Temurin installer
Sonarqube Scanner
NodeJs
Owasp Dependency-Check
Docker
Docker Commons
Docker Pipeline
Docker API
Docker-build-step


Configure in Global Tool Configuration
Goto Manage Jenkins → Tools → Install JDK(17) and NodeJs(16)→ Click on Apply and Save


For Sonarqube use the latest version

For Owasp use the 6.5.1 version

Use the latest version of Docker
Click apply and save.
Configure Sonar Server in Manage Jenkins
Grab the Public IP Address of your EC2 Instance, Sonarqube works on Port 9000, so <Public IP>:9000. Goto your Sonarqube Server. Click on Administration → Security → Users → Click on Tokens and Update Token → Give it a name → and click on Generate Token

click on update Token

Create a token with a name and generate

copy Token
Goto Jenkins Dashboard → Manage Jenkins → Credentials → Add Secret Text. It should look like this

You will this page once you click on create

Now, go to Dashboard → Manage Jenkins → System and Add like the below image.

Click on Apply and Save
In the Sonarqube Dashboard add a quality gate also
Administration–> Configuration–>Webhooks

Click on Create

Add details
#in url section of quality gate
<http://jenkins-public-ip:8080>/sonarqube-webhook/
Now add Docker credentials to the Jenkins to log in and push the image
Manage Jenkins –> Credentials –> global –> add credential
Add DockerHub Username and Password under Global Credentials

Create.
Version 1.0
Now let’s create a new job for our pipeline

Add this to Pipeline
pipeline{
    agent any
    tools{
        jdk 'jdk17'
        nodejs 'node16'
    }
    environment {
        SCANNER_HOME=tool 'sonar-scanner'
    }
    stages {
        stage('clean workspace'){
            steps{
                cleanWs()
            }
        }
        stage('Checkout from Git'){
            steps{
                git branch: 'main', url: 'https://github.com/Aj7Ay/Tetris-V1.git'
            }
        }
        stage("Sonarqube Analysis "){
            steps{
                withSonarQubeEnv('sonar-server') {
                    sh ''' $SCANNER_HOME/bin/sonar-scanner -Dsonar.projectName=TetrisVersion1.0 \
                    -Dsonar.projectKey=TetrisVersion1.0 '''
                }
            }
        }
        stage("quality gate"){
           steps {
                script {
                    waitForQualityGate abortPipeline: false, credentialsId: 'Sonar-token'
                }
            }
        }
        stage('Install Dependencies') {
            steps {
                sh "npm install"
            }
        }
        stage('OWASP FS SCAN') {
            steps {
                dependencyCheck additionalArguments: '--scan ./ --disableYarnAudit --disableNodeAudit', odcInstallation: 'DP-Check'
                dependencyCheckPublisher pattern: '**/dependency-check-report.xml'
            }
        }
        stage('TRIVY FS SCAN') {
            steps {
                sh "trivy fs . > trivyfs.txt"
            }
        }
        stage("Docker Build & Push"){
            steps{
                script{
                   withDockerRegistry(credentialsId: 'docker', toolName: 'docker'){
                       sh "docker build -t tetrisv1 ."
                       sh "docker tag tetrisv1 sevenajay/tetrisv1:latest "
                       sh "docker push sevenajay/tetrisv1:latest "
                    }
                }
            }
        }
        stage("TRIVY"){
            steps{
                sh "trivy image sevenajay/tetrisv1:latest > trivyimage.txt"
            }
        }
    }
}
Click on Apply and save.
Build now
Stage view

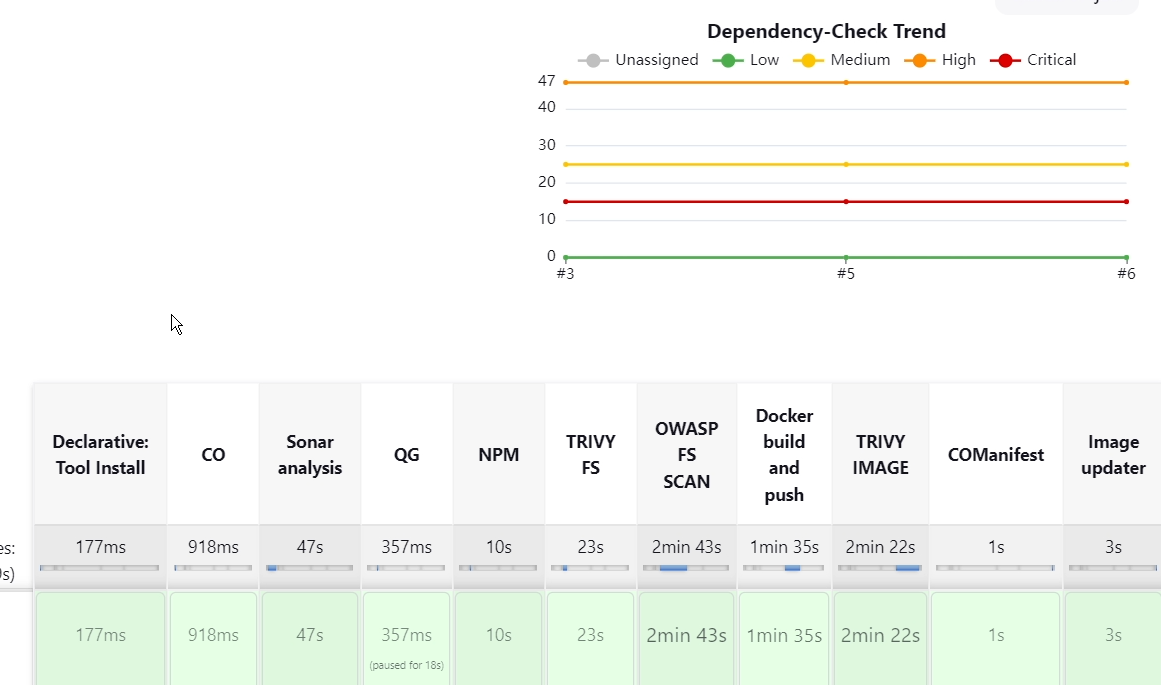
To see the report, you can go to Sonarqube Server and go to Projects.

You can see the report has been generated and the status shows as passed. You can see that there are 1.2k lines it scanned. To see a detailed report, you can go to issues.
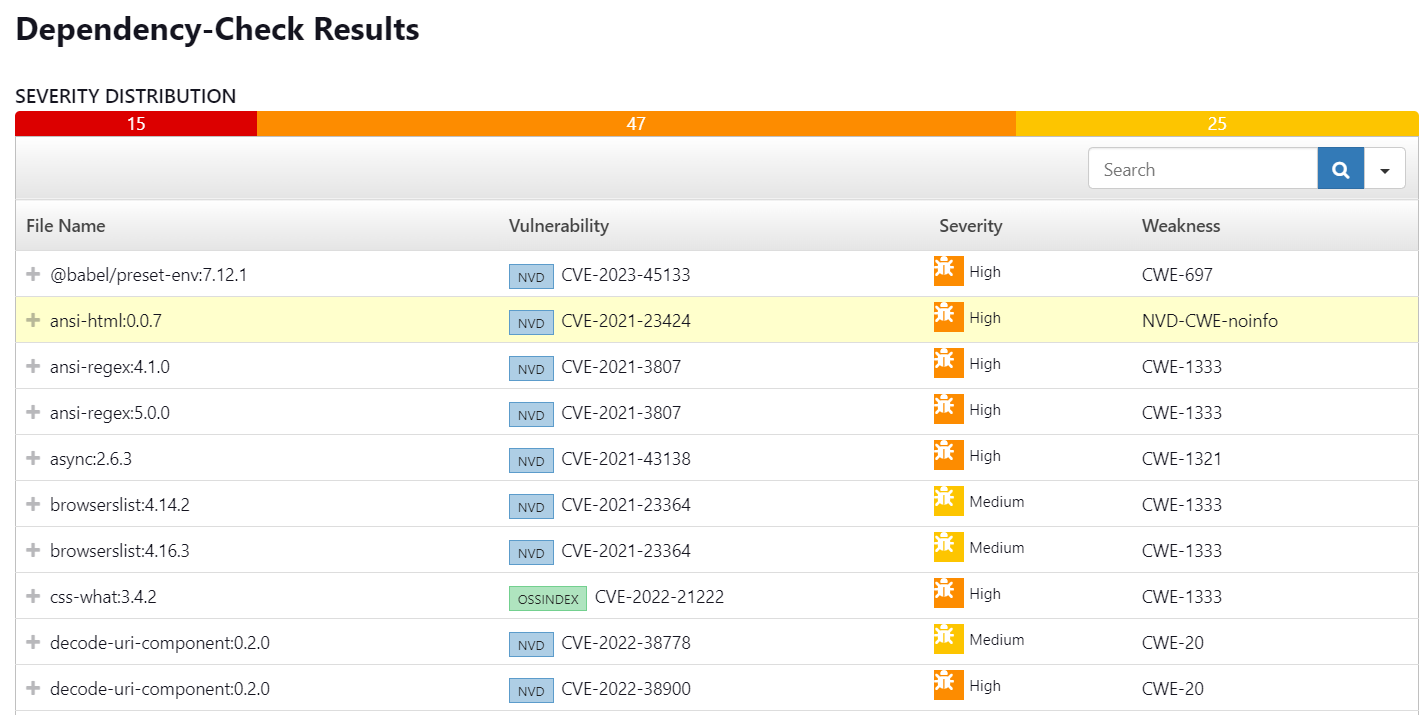
OWASP, You will see that in status, a graph will also be generated and Vulnerabilities.

When you log in to Dockerhub, you will see a new image is created

Let’s create a GitHub Token. Go to GitHub
Click on Your Profile on the top right

Now click on Settings

Now go down and search for Developer settings and click on it

Now click on Personal Access tokens

Click on Tokens (Classic)

Click on Generate New token –> Generate new token (classic)

Now it asks for access provide your GitHub password

Now provide a name for the token

Click on all check box

Now click on Generate token

Now copy the token

Now go to the Jenkins dashboard
Manage Jenkins –> credentials –> Global
Add credential

Let’s add the Image Updater stage to the Pipeline
#add inside environment
 environment {
    GIT_REPO_NAME = "Tetris-manifest"
    GIT_USER_NAME = "Aj7Ay"      # change your  Github Username here
  }
# add these stages after trivy image scan
        stage('Checkout Code') {
            steps {
                git branch: 'main', url: 'https://github.com/Aj7Ay/Tetris-manifest.git'
            }
        }
        stage('Update Deployment File') {
            steps {
                script {
                    withCredentials([string(credentialsId: 'github', variable: 'GITHUB_TOKEN')]) {
                       NEW_IMAGE_NAME = "sevenajay/tetrisv1:latest"   #update your image here
                       sh "sed -i 's|image: .*|image: $NEW_IMAGE_NAME|' deployment.yml"
                       sh 'git add deployment.yml'
                       sh "git commit -m 'Update deployment image to $NEW_IMAGE_NAME'"
                       sh "git push https://${GITHUB_TOKEN}@github.com/${GIT_USER_NAME}/${GIT_REPO_NAME} HEAD:main"
                    }
                }
            }
        }
Complete Pipeline
pipeline{
    agent any
    tools{
        jdk 'jdk17'
        nodejs 'node16'
    }
    environment {
        SCANNER_HOME=tool 'sonar-scanner'
        GIT_REPO_NAME = "Tetris-manifest"
        GIT_USER_NAME = "Aj7Ay"      # change your Github Username here
    }
    stages {
        stage('clean workspace'){
            steps{
                cleanWs()
            }
        }
        stage('Checkout from Git'){
            steps{
                git branch: 'main', url: 'https://github.com/Aj7Ay/Tetris-V1.git'
            }
        }
        stage("Sonarqube Analysis "){
            steps{
                withSonarQubeEnv('sonar-server') {
                    sh ''' $SCANNER_HOME/bin/sonar-scanner -Dsonar.projectName=TetrisVersion1.0 \
                    -Dsonar.projectKey=TetrisVersion1.0 '''
                }
            }
        }
        stage("quality gate"){
           steps {
                script {
                    waitForQualityGate abortPipeline: false, credentialsId: 'Sonar-token'
                }
            }
        }
        stage('Install Dependencies') {
            steps {
                sh "npm install"
            }
        }
        stage('OWASP FS SCAN') {
            steps {
                dependencyCheck additionalArguments: '--scan ./ --disableYarnAudit --disableNodeAudit', odcInstallation: 'DP-Check'
                dependencyCheckPublisher pattern: '**/dependency-check-report.xml'
            }
        }
        stage('TRIVY FS SCAN') {
            steps {
                sh "trivy fs . > trivyfs.txt"
            }
        }
        stage("Docker Build & Push"){
            steps{
                script{
                   withDockerRegistry(credentialsId: 'docker', toolName: 'docker'){
                       sh "docker build -t tetrisv1 ."
                       sh "docker tag tetrisv1 sevenajay/tetrisv1:latest "
                       sh "docker push sevenajay/tetrisv1:latest "
                    }
                }
            }
        }
        stage("TRIVY"){
            steps{
                sh "trivy image sevenajay/tetrisv1:latest > trivyimage.txt"
            }
        }
        stage('Checkout Code') {
            steps {
                git branch: 'main', url: 'https://github.com/Aj7Ay/Tetris-manifest.git'
            }
        }
        stage('Update Deployment File') {
            steps {
                script {
                    withCredentials([string(credentialsId: 'github', variable: 'GITHUB_TOKEN')]) {
                       NEW_IMAGE_NAME = "sevenajay/tetrisv1:latest"   #update your image here
                       sh "sed -i 's|image: .*|image: $NEW_IMAGE_NAME|' deployment.yml"
                       sh 'git add deployment.yml'
                       sh "git commit -m 'Update deployment image to $NEW_IMAGE_NAME'"
                       sh "git push https://${GITHUB_TOKEN}@github.com/${GIT_USER_NAME}/${GIT_REPO_NAME} HEAD:main"
                    }
                }
            }
        }
    }
}
Click on Apply and save
Now click on Build and you can see no image inside the deployment file

Stage view

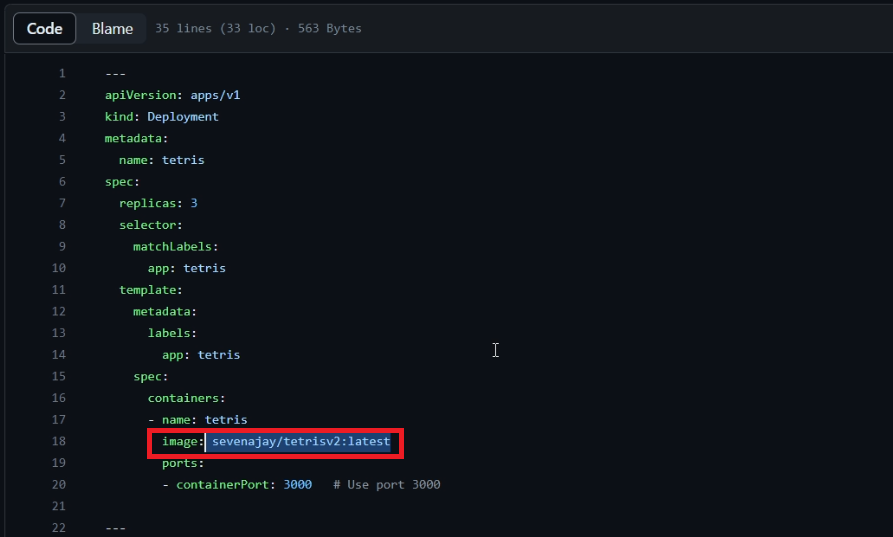
Now if you see the deployment file in the Tetris manifest repo
The image is automatically updated after the build

Let’s Update the kubeconfig
Go to Putty of your Jenkins instance SSH and enter the below command
aws eks update-kubeconfig --name <CLUSTER NAME> --region <CLUSTER REGION>
aws eks update-kubeconfig --name EKS_CLOUD --region ap-south-1
Let’s see the nodes
kubectl get nodes
ARGO CD SETUP
Let’s install ArgoCD
You will redirected to this page

All those components could be installed using a manifest provided by the Argo Project: use the below commands
kubectl create namespace argocd
kubectl apply -n argocd -f https://raw.githubusercontent.com/argoproj/argo-cd/v2.4.7/manifests/install.yaml
By default, argocd-server is not publicly exposed. For this project, we will use a Load Balancer to make it usable:
kubectl patch svc argocd-server -n argocd -p '{"spec": {"type": "LoadBalancer"}}'
One load balancer will created in the AWS

Wait about 2 minutes for the LoadBalancer creation
sudo apt install jq -yexport ARGOCD_SERVER=`kubectl get svc argocd-server -n argocd -o json | jq --raw-output '.status.loadBalancer.ingress[0].hostname'`when you run this command, it will export the hostname of the ArgoCD server’s load balancer and store it in the ARGOCD_SERVER environment variable, which you can then use in other commands or scripts to interact with the ArgoCD server. This can be useful when you need to access the ArgoCD web UI or interact with the server programmatically.

If run this command you will get the load balancer external IP
echo $ARGOCD_SERVER
Login
The command you provided is used to extract the password for the initial admin user of ArgoCD, decode it from base64 encoding, and store it in an environment variable named ARGO_PWD.
export ARGO_PWD=`kubectl -n argocd get secret argocd-initial-admin-secret -o jsonpath="{.data.password}" | base64 -d`
If you want to see your password provide the below command
echo $ARGO_PWD
Now copy the load balancer IP and paste it into the browser
echo $ARGOCD_SERVER
Now you will see this page. if you get an error click on advanced and click on proceed.

Now you will see this page and log in to ArgoCD

Username is admin
For the password, you have to provide the below command and copy it
echo $ARGO_PWD
Click on Sign in and you will see this page.

Now click on the Setting gear icon in the left side panel

Click on Repositories

Now click on Connect Repo Using HTTPS

Add Github details, Type as git, Project as default and provide the GitHub URL of this manifest and click on connect

You will get Connection Status as Successful

Click on Manage Your application

You will see this page and click on New App

Now provide the following details as in the image


Click on Create.
You can see our app is created in Argo-cd

Click on tetris and it will create another load balancer in AWS

Now click on three dots beside tetris-service and click on the details

Now copy the hostname address

Paste it in a browser you will see this page

If you don’t get the output
Go to Jenkins machine SSH Putty and provide the below the command
kubectl get all
Open the port that you get like on the above page for the Node group Ec2 instance.

You have to open whatever port you get on The Node group EC2 instance security group
Then you can play the version 1 game

Version 2.0

Let’s Build version 2.0 Tetris game
Add this pipeline to the Job
pipeline{
    agent any
    tools{
        jdk 'jdk17'
        nodejs 'node16'
    }
    environment {
        SCANNER_HOME=tool 'sonar-scanner'
        GIT_REPO_NAME = "Tetris-manifest"
        GIT_USER_NAME = "Aj7Ay"      # change your Github Username here
    }
    stages {
        stage('clean workspace'){
            steps{
                cleanWs()
            }
        }
        stage('Checkout from Git'){
            steps{
                git branch: 'main', url: 'https://github.com/Aj7Ay/Tetris-V2.git'
            }
        }
        stage("Sonarqube Analysis "){
            steps{
                withSonarQubeEnv('sonar-server') {
                    sh ''' $SCANNER_HOME/bin/sonar-scanner -Dsonar.projectName=TetrisVersion2.0 \
                    -Dsonar.projectKey=TetrisVersion2.0 '''
                }
            }
        }
        stage("quality gate"){
           steps {
                script {
                    waitForQualityGate abortPipeline: false, credentialsId: 'Sonar-token'
                }
            }
        }
        stage('Install Dependencies') {
            steps {
                sh "npm install"
            }
        }
        stage('OWASP FS SCAN') {
            steps {
                dependencyCheck additionalArguments: '--scan ./ --disableYarnAudit --disableNodeAudit', odcInstallation: 'DP-Check'
                dependencyCheckPublisher pattern: '**/dependency-check-report.xml'
            }
        }
        stage('TRIVY FS SCAN') {
            steps {
                sh "trivy fs . > trivyfs.txt"
            }
        }
        stage("Docker Build & Push"){
            steps{
                script{
                   withDockerRegistry(credentialsId: 'docker', toolName: 'docker'){
                       sh "docker build -t tetrisv2 ."
                       sh "docker tag tetrisv2 sevenajay/tetrisv2:latest "
                       sh "docker push sevenajay/tetrisv2:latest "
                    }
                }
            }
        }
        stage("TRIVY"){
            steps{
                sh "trivy image sevenajay/tetrisv2:latest > trivyimage.txt"
            }
        }
        stage('Checkout Code') {
            steps {
                git branch: 'main', url: 'https://github.com/Aj7Ay/Tetris-manifest.git'
            }
        }
        stage('Update Deployment File') {
            steps {
                script {
                    withCredentials([string(credentialsId: 'github', variable: 'GITHUB_TOKEN')]) {
                       NEW_IMAGE_NAME = "sevenajay/tetrisv2:latest"   #update your image here
                       sh "sed -i 's|image: .*|image: $NEW_IMAGE_NAME|' deployment.yml"
                       sh 'git add deployment.yml'
                       sh "git commit -m 'Update deployment image to $NEW_IMAGE_NAME'"
                       sh "git push https://${GITHUB_TOKEN}@github.com/${GIT_USER_NAME}/${GIT_REPO_NAME} HEAD:main"
                    }
                }
            }
        }
    }
}
Click on Apply and build
Stage view
To see the report, you can go to Sonarqube Server and go to Projects

You can see the report has been generated and the status shows as passed. You can see that there are 1k lines it scanned. To see a detailed report, you can go to issues.
OWASP, You will see that in status, a graph will also be generated and Vulnerabilities.
When you log in to Dockerhub, you will see a new image is created

Now if you go to GitHub Tetris manifest image is updated automatically


If you go to Argo CD Now it will automatically update the image and you can play the version 2 game

You can play version 2 in the browser now. Just refresh the old link


YOUTUBE VERSION OF SECOND TETRIS USED TRIGGER JOB
create a job for manifest (I mean image updater)

Add the below pipeline
pipeline{
    agent any
    environment {
        GIT_REPO_NAME = "Tetris-manifest"
        GIT_USER_NAME = "Aj7Ay"      # change your Github Username here
    }
    stages {
        stage('Checkout Code') {
            steps {
                git branch: 'main', url: 'https://github.com/Aj7Ay/Tetris-manifest.git'
            }
        }
        stage('Update Deployment File') {
            steps {
                script {
                    withCredentials([string(credentialsId: 'github', variable: 'GITHUB_TOKEN')]) {
                       NEW_IMAGE_NAME = "sevenajay/tetrisv2:latest"   #update your image here
                       sh "sed -i 's|image: .*|image: $NEW_IMAGE_NAME|' deployment.yml"
                       sh 'git add deployment.yml'
                       sh "git commit -m 'Update deployment image to $NEW_IMAGE_NAME'"
                       sh "git push https://${GITHUB_TOKEN}@github.com/${GIT_USER_NAME}/${GIT_REPO_NAME} HEAD:main"
                    }
                }
            }
        }
    }
}
Click on Apply and save
In the Tetris Job Use the below pipeline
pipeline{
    agent any
    tools{
        jdk 'jdk17'
        nodejs 'node16'
    }
    environment {
        SCANNER_HOME=tool 'sonar-scanner'
    }
    stages {
        stage('clean workspace'){
            steps{
                cleanWs()
            }
        }
        stage('Checkout from Git'){
            steps{
                git branch: 'main', url: 'https://github.com/Aj7Ay/Tetris-V2.git'
            }
        }
        stage("Sonarqube Analysis "){
            steps{
                withSonarQubeEnv('sonar-server') {
                    sh ''' $SCANNER_HOME/bin/sonar-scanner -Dsonar.projectName=TetrisVersion2.0 \
                    -Dsonar.projectKey=TetrisVersion2.0 '''
                }
            }
        }
        stage("quality gate"){
           steps {
                script {
                    waitForQualityGate abortPipeline: false, credentialsId: 'Sonar-token'
                }
            }
        }
        stage('Install Dependencies') {
            steps {
                sh "npm install"
            }
        }
        stage('OWASP FS SCAN') {
            steps {
                dependencyCheck additionalArguments: '--scan ./ --disableYarnAudit --disableNodeAudit', odcInstallation: 'DP-Check'
                dependencyCheckPublisher pattern: '**/dependency-check-report.xml'
            }
        }
        stage('TRIVY FS SCAN') {
            steps {
                sh "trivy fs . > trivyfs.txt"
            }
        }
        stage("Docker Build & Push"){
            steps{
                script{
                   withDockerRegistry(credentialsId: 'docker', toolName: 'docker'){
                       sh "docker build -t tetrisv2 ."
                       sh "docker tag tetrisv2 sevenajay/tetrisv2:latest "
                       sh "docker push sevenajay/tetrisv2:latest "
                    }
                }
            }
        }
        stage("TRIVY"){
            steps{
                sh "trivy image sevenajay/tetrisv2:latest > trivyimage.txt"
            }
        }
        stage('Trigger manifest') {
            steps {
                build job: 'manifest', wait:true #paste your pipeline name of image updater job
            }
        }
    }
}
The last stage will trigger the Above manifest job and it will update the deployment file and update the latest image

Manifest stage view

Tetris stage view

Image updated
Play Game in the browser

DESTRUCTION OF RESOURCES
First, delete the app in ARGO CD
Go to Argo CD and click on Tetris App
Click on Delete

Now Provide the app name and click on OK

The app is deleted now

Now go to Putty and Remove Argo CD Service
kubectl delete svc argocd-server -n argocd
Now you can see in the Aws console that load balancers will be deleted.

Now Go to Jenkins Dashboard and click on Terraform-Eks job
And build with parameters and destroy action
It will delete the EKS cluster that provisioned

After 10 minutes cluster will delete and wait for it. Don’t remove ec2 instance till that time.

Cluster deleted

Now go to Visual Studio code and delete the Ec2 instance
terraform destroy --auto-approve

Every resource is deleted.
In this journey through the world of DevSecOps and automated deployments, we’ve explored the remarkable capabilities of ArgoCD, Terraform, and Jenkins. From the initial infrastructure setup to deploying not one but two versions of the beloved Tetris game, we’ve witnessed how these tools can work harmoniously to create a streamlined and secure DevOps pipeline.
The power of automation is not just a convenience; it’s a necessity in today’s fast-paced development landscape. With the right tools and practices, you can save time, reduce errors, and ensure the highest standards of security in your deployments. This blog has been a testament to the incredible possibilities that arise when you combine the art of DevOps with the precision of modern cloud-native technologies.
As you embark on your own DevSecOps journey, we hope the insights shared here inspire you to explore, innovate, and continually strive for excellence in your deployment workflows. Remember that the world of technology is ever-evolving, and your willingness to adapt and embrace automation will be a key driver of your success.
Thank you for joining us on this adventure. If you found this blog valuable, please share it with your fellow tech enthusiasts, and stay tuned for more exciting content. Until next time, happy automating and deploying!
Leave a Reply