Starting with AWS can seem daunting, but the registration process is straightforward. Below, each image you provided is used to explain every step in detail so you get a clear understanding of how to create a new AWS account and choose a plan.
Accessing the AWS Website
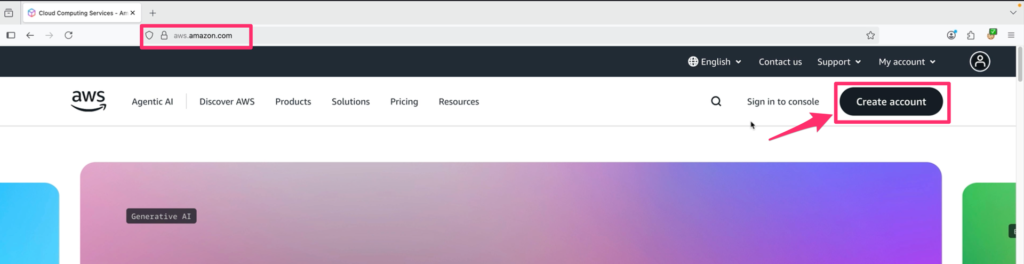
The first step is visiting the official AWS website. Here, you’ll notice the top navigation bar with various sections like Agentic AI, Products, Solutions, Pricing, and Resources. You can also change your language, contact support, or access your account options from the top right.
Key Actions:
- Ensure you’re on the correct website (aws.amazon.com).
- Click on Create account to begin your registration.
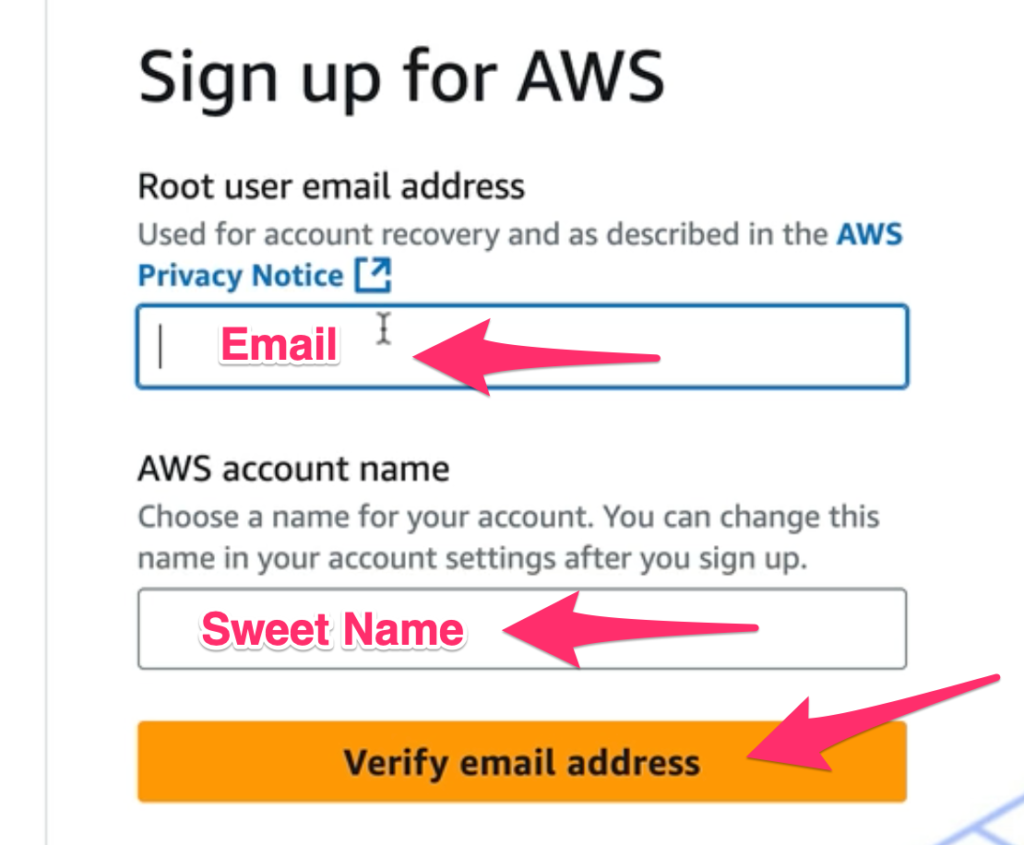
Once you click “Create account,” you’re redirected to a sign-up page. AWS asks for your root user email address, which will be used for critical account recovery and notifications. You’ll also choose an account name – this can be changed later if needed.
Key Actions:
- Enter your email address.
- Choose a memorable AWS account name.
- Click Verify email address to proceed.
Secure Password Setup – Safeguarding Your AWS Root Account
At this stage of the AWS registration process, you’ve verified your email address and are prompted to create a password for your root account. This is a pivotal moment: the root user holds sweeping permissions, making password security a top priority.
Professional Best Practices for Password Creation
- Choose a strong, unique password: Use a mix of uppercase and lowercase letters, numbers, and special characters. Avoid common words, personal names, or passwords reused from other accounts.
- Confirm accurately: Enter the exact password twice to ensure you do not lock yourself out due to a typo.
- Consider a password manager: Storing your AWS root password in a secure password manager reduces the risk of loss and keeps your credentials safe.
- Do not share your password: The root account should only be accessible by authorized personnel responsible for account administration.

After verifying your email, AWS will prompt you to select between a Free and a Paid account plan:
Key Actions:
- For experimentation and learning, choose the Free plan.
- If you need full production features, select the Paid plan.
- You can always upgrade later.
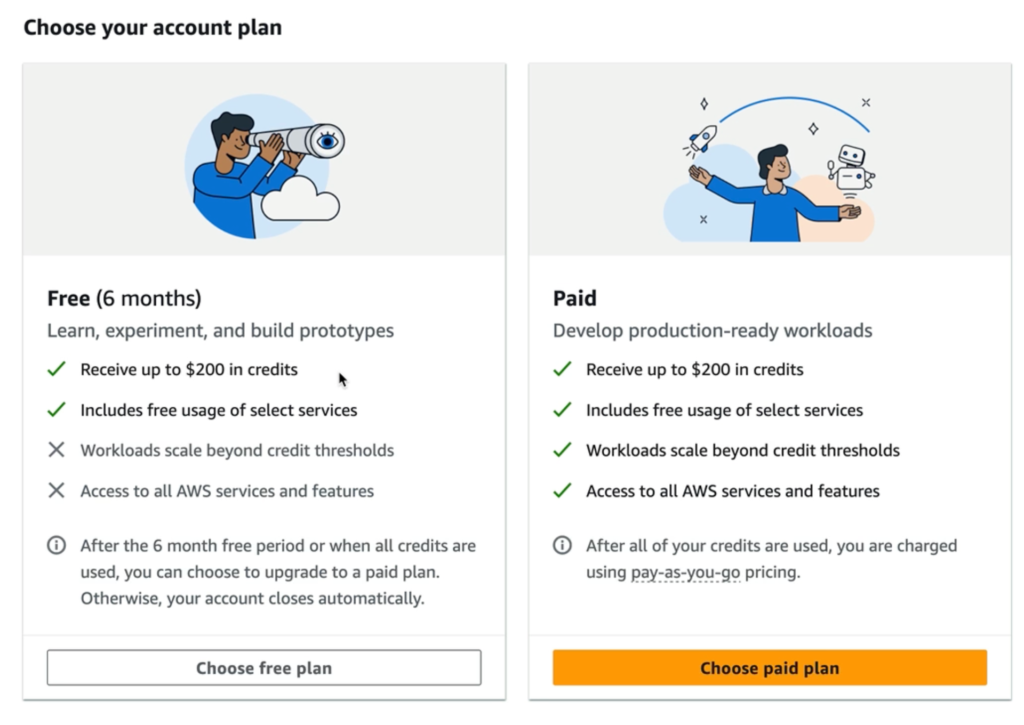
| Free (6 months) | Paid |
|---|---|
| Learn, experiment, and build prototypes | Develop production-ready workloads |
| Receive up to $200 in credits | Receive up to $200 in credits |
| Includes free usage of select services | Includes free usage of select services |
| Limited access to some services | Access to all AWS services |
| Account closes automatically after 6 months or credits are exhausted | Pay-as-you-go after credits are used |
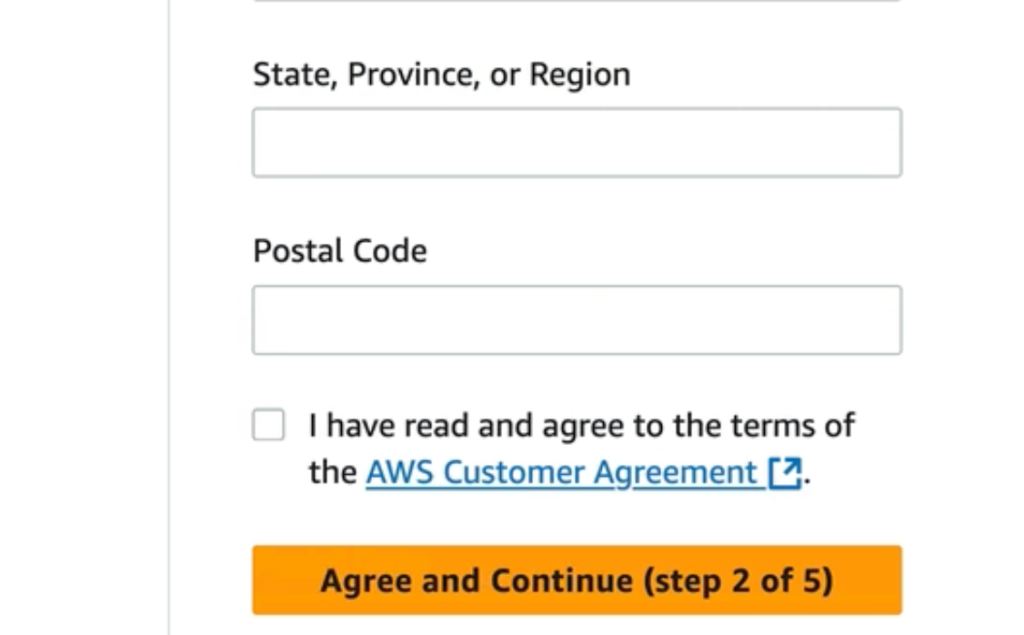
Accepting the AWS Customer Agreement and Providing Location Details
AWS requests fundamental address information—including your state, province, or region, and postal code. Completing these fields aids AWS in regulatory compliance and service localization.

A mandatory checkbox prompts you to confirm that you have read and agreed to the terms of the AWS Customer Agreement. This legal step ensures that you acknowledge AWS’s operational policies, acceptable usage, and liability standards before proceeding.
Best Practices:* Ensure the address matches your billing and legal records.
- Carefully read the agreement; these terms outline account responsibilities.
You’ll be asked for further contact details, including full name and phone number. At this point, AWS distinguishes whether your account will serve business or personal purposes. Accurate entry of your contact details enables smooth resolution for account recovery and future support needs.
Business vs. Personal Use:* Business accounts unlock features for team management, consolidated billing, and organizational security controls.
- Personal accounts are ideal for learning, experimentation, and individual use.
Tip: The accuracy of this data is crucial. AWS often uses contact information for notifications related to account security, billing alerts, and AWS credits.
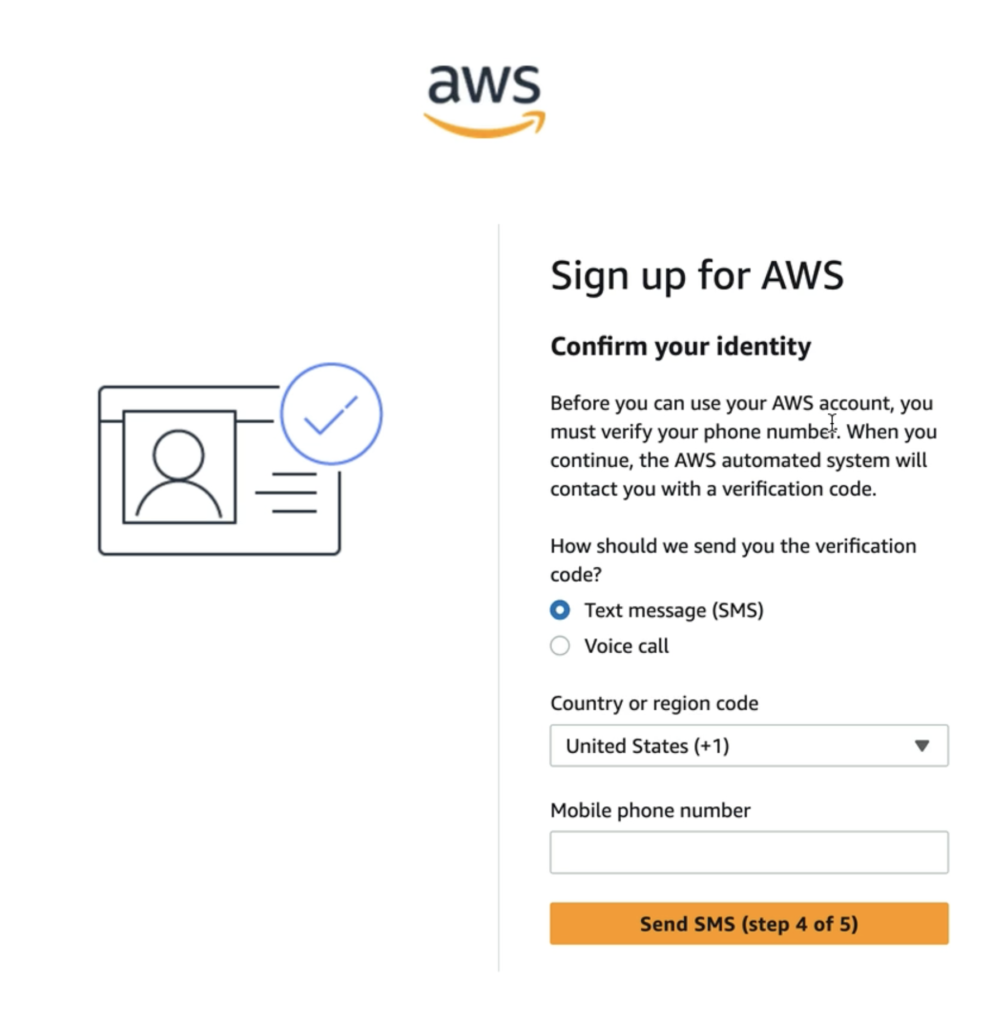
To combat fraud and protect your cloud resources, AWS enforces phone verification. Choose your verification method (SMS or voice call), select your region, and input your mobile phone number. AWS will send a one-time verification code for you to enter on the next page.
Benefits of Phone Verification:* Increases account security.
- Enables critical alerting features.
- Prevents unauthorized account creation.
Professional Tip: Use a verified and accessible mobile number, as it will be central for future login recovery and urgent alerts.
Billing details are required, even for free-tier accounts, as part of AWS’s identity and fraud prevention procedures. Your billing country determines available payment options and compliance with local regulations. All major credit and debit cards are accepted.
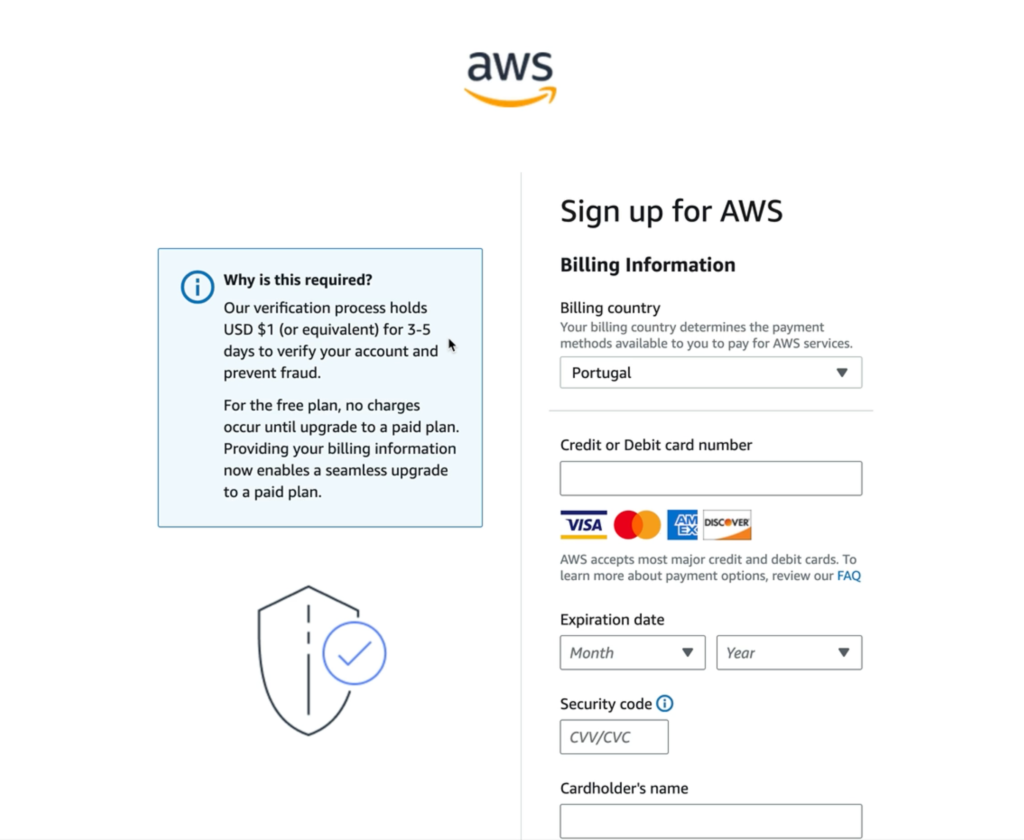
During this step:
- AWS temporarily holds $1 (or equivalent) for 3–5 days to validate your account.
- No charges occur for free accounts until you explicitly upgrade to a paid plan.
Professional Guidance:* Ensure billing details match your payment records to avoid failed payments.
- This step is crucial for seamless future upgrades.
- Review all provided information before submission to align with regulatory records.
By carefully completing each step—address verification, agreement acknowledgment, providing accurate contact details, phone verification, and secure billing entry—you lay the groundwork for a robust, secure, and compliant AWS environment. Each page in this process is designed to weed out fraud, ensure regulatory adherence, and set you up for operational success, whether personal or enterprise.
Support Plan Selection, Sign-in Options, and Account Activation
After completing account verification and billing authorization, your AWS onboarding moves into its last set of steps. The following pages round out your secure and professional AWS registration journey.
Selecting a Support Plan
AWS provides several support tiers tailored to different user needs:
- Basic Support (Free):
Ideal for new users and those just starting with AWS. Includes 24×7 self-service access to resources, personal health dashboard, and Trusted Advisor. Support is limited to account and billing issues. - Developer Support (from $29/month):
Suited to developers needing email-based AWS support during business hours. Offers 12-business-hour response time. - Business Support (from $100/month):
Designed for production workloads with 24×7 access to technical support via email, chat, and phone. Features 1-hour response times and comprehensive Trusted Advisor recommendations. - Enterprise Support (from $15,000/month):
Concierge experience with a dedicated Technical Account Manager and 15-minute response times for critical cases.
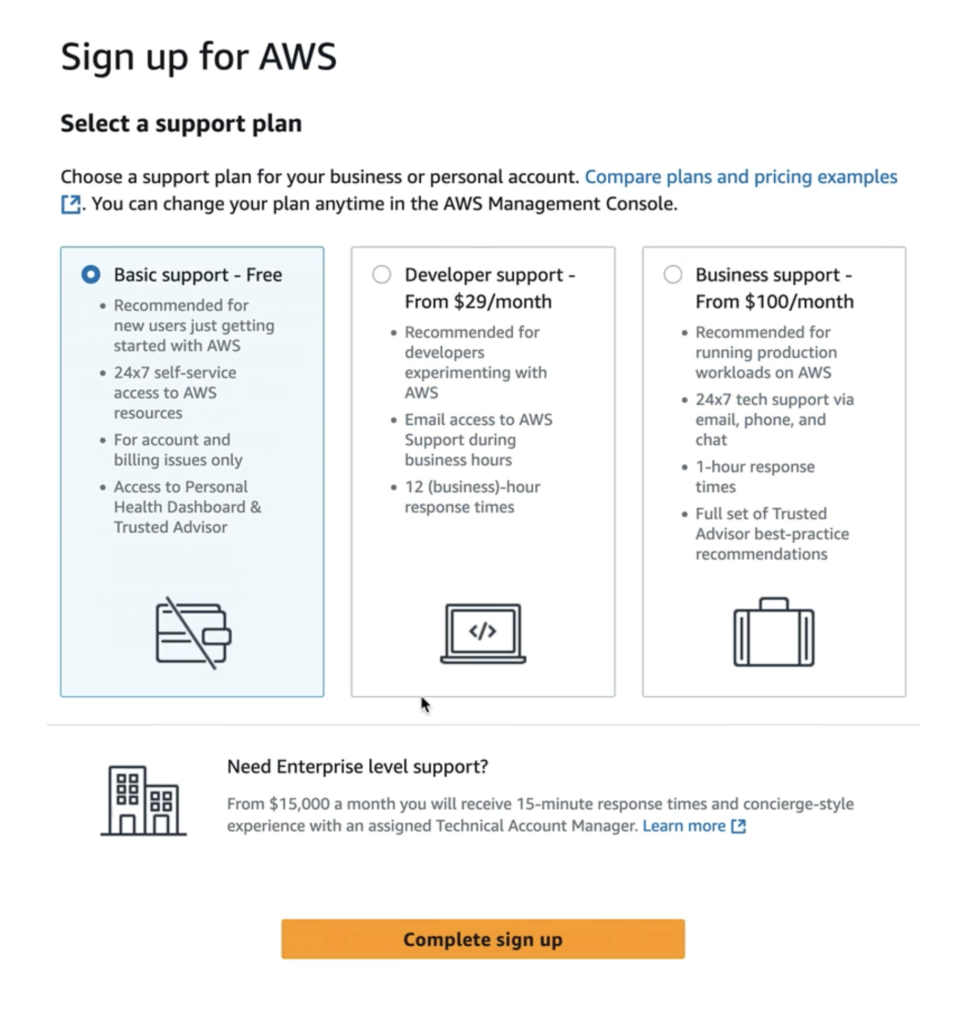
Choose the plan most aligned with your organization’s risk profile, operational needs, and budget. You can always upgrade your level of support later as your AWS environment grows.
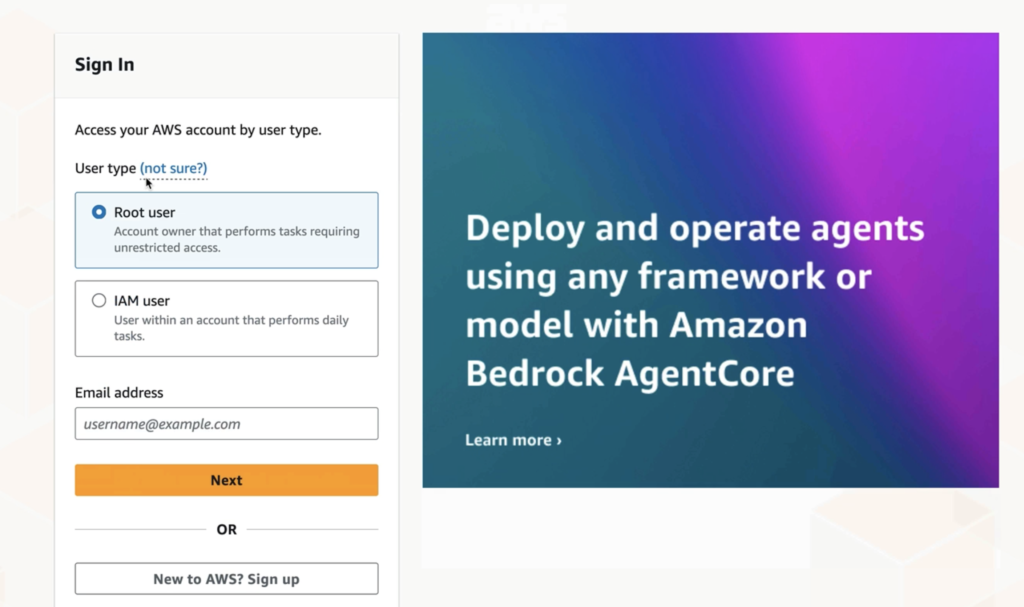
Once your account is activated, AWS offers multiple sign-in methods:
- IAM User Sign-in:
For team members working under specific permissions—use your account ID/alias, IAM username, and password. - Root User Sign-in:
Reserved for owners or administrators performing unrestricted actions, using the root email and password.
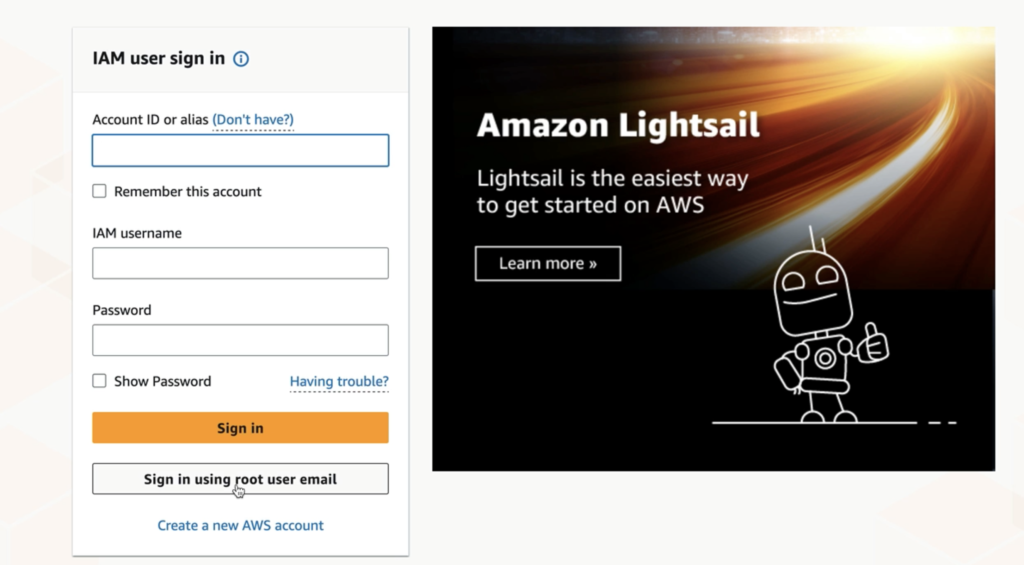
Proper role distinction ensures best-practice security: use IAM users for daily operations and limit root access to administrative tasks (e.g., billing updates, closing the account).
IAM and root user access forms are clear, with password visibility options and account memory features for frequent users.
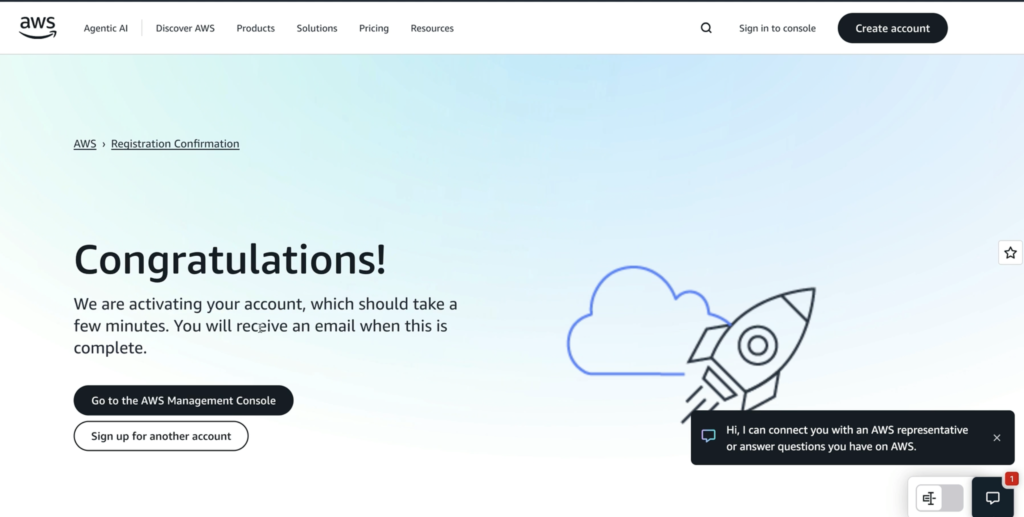
Finally, you’ll see the registration confirmation and account activation screen. AWS notifies you that your account is being activated and encourages you to access the AWS Management Console. The process may take a few minutes, after which you’ll receive an email verification.
This marks the official start of your AWS journey: you can now provision resources, set up security configurations, and deploy workloads across AWS’s global infrastructure.
Enabling Multi-Factor Authentication (MFA) for AWS: A Professional Guide
Securing your AWS root account is essential for the safe management of your cloud resources. AWS now requires MFA for root credentials, adding an extra layer of protection to your account by requiring a second form of verification beyond just your password. Here’s how to enable MFA and the options available.
Why MFA?
A warning highlights that registering MFA for root credentials will be mandatory within 35 days. MFA dramatically reduces the risk of unauthorized access, helping to prevent data breaches and account takeovers.
Step 1: Specify Your MFA Device
Begin by entering a meaningful device name, which will help you identify this authentication method in your AWS account. You may use up to 128 alphanumeric characters and symbols.
Step 2: Choose Your MFA Method
AWS supports several MFA device types:
- Passkey or Security Key:
Use biometrics (fingerprint, face) or physical devices compatible with FIDO2 standards for high-security use cases. - Authenticator App:
Most popular choice. Authenticator apps on your smartphone or computer generate time-based one-time passwords (TOTP). - Hardware TOTP Token:
Use dedicated hardware devices that generate TOTP codes, ideal for organizations with strict security requirements.
Select the method that best aligns with your workflow and organizational policies.
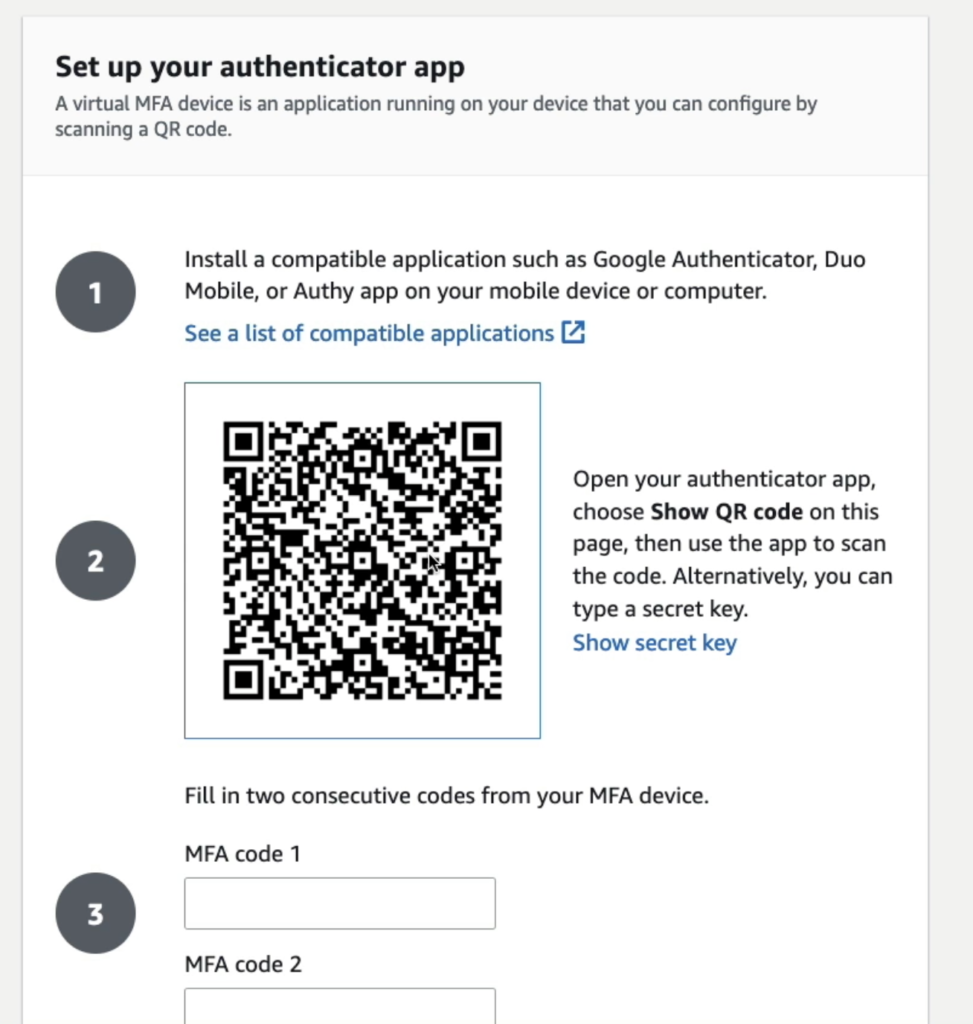
Step 3: Setup Using an Authenticator App
If using an authenticator app, follow these steps:
- Scan the QR Code:
Open your authenticator app and scan the QR code displayed on the AWS screen. Most apps support this straightforward process. - Enter Two Consecutive Codes:
Generate and enter two consecutive codes from your authenticator app to link the device with your AWS account.
Step 4: Supported Authenticator Apps
You have multiple options for authenticator apps on both Android and iOS. Recommended apps include:
- Twilio Authy Authenticator
- Duo Mobile
- LastPass Authenticator
- Microsoft Authenticator
- Google Authenticator
- Symantec VIP
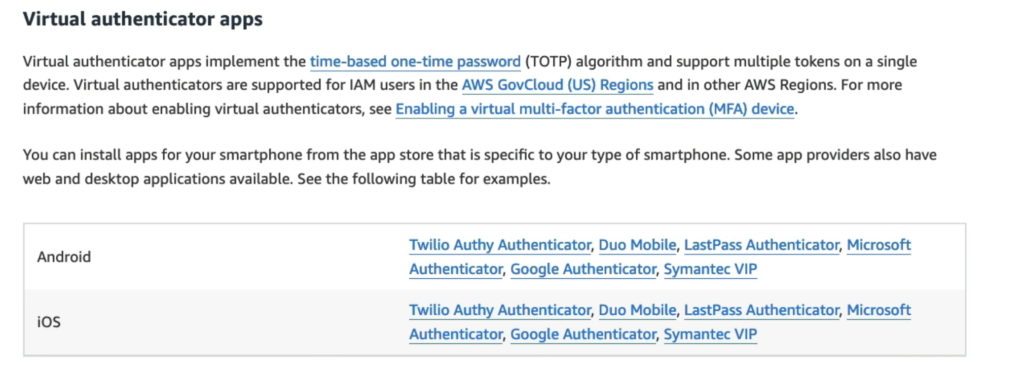
Download a reputable app from your smartphone’s app store. Many provide desktop and web versions for added flexibility.
Professional Security Recommendations
- Register MFA immediately, even before the mandatory window, to reduce exposure.
- Use strong, trusted authenticator apps—prefer providers with robust security reputations.
- Label devices clearly to avoid confusion, especially in environments with multiple administrators or users.
- Periodically review and update registered MFA devices for ongoing account integrity.
By enabling and properly configuring MFA, you ensure that your AWS environment is protected by industry-leading identity security standards—mitigating risks, achieving compliance, and safeguarding your organization’s cloud assets.
Building a Secure Foundation for Your Cloud Journey
In this stage of your AWS setup, you transition from using the highly privileged root user to a daily workflow anchored by strong access control, budget safeguards, and a clear understanding of the AWS Free Tier. Here’s how to professionally establish security and accountability from Day 1.
Create Your IAM Admin User and Admin Group
AWS best practice dictates never using the root user for everyday operations. Instead, you create an Admin group with full administrative permissions and then a dedicated IAM user to handle daily tasks.
How to Set Up:
- Navigate to IAM → User groups → Create group.
- Name the group Administrators.
- Attach the AdministratorAccess managed policy to this group. This grants full AWS permissions in a controlled way.
- Next, go to IAM → Users → Create user.
- Enable console access for the user.
- On the permissions screen, choose Add user to group and select Administrators.
- Save key credentials: download the user’s sign-in URL, username, and password (CSV file) for future login and recovery.
This step creates a formal separation between account administration and daily operation, reducing risk and enabling better audit controls.
Step 4: Switch to Your IAM User
It’s time to begin working as your newly created IAM admin user.
- While still logged in as root, go to Account Settings.
- Locate the option to enable IAM User Billing Access—this is essential so your new IAM user can monitor costs, control billing, and prevent surprise charges.
- Activate this setting, then log out of your root user session.
- Log back in using your IAM user’s credentials from your saved CSV.
- Always keep your sign-in URL, username, and password securely stored.
You now have a safe, daily working account—a huge step for operational security and governance.
Step 5: Set Up a Budget Alert
Financial control starts from day one. Protect yourself from unexpected expenses:
- Go to Billing → Budgets.
- In the AWS Billing dashboard, click Budget in the sidebar.
- Use a Monthly Cost Budget template and set a threshold (e.g., $5).
- Add your email address to receive alerts.
- AWS will notify you if your cloud spend exceeds this limit.
Early budget setup can prevent cost overruns, allowing you to iterate in the cloud without financial anxiety.
Understanding and Maximizing the AWS Free Tier — A Detailed Guide
The AWS Free Tier is designed to help new users confidently explore cloud computing without financial risk. It provides a sandbox environment where you can experiment, learn, and build practical skills with a generous set of resource allowances.
Here’s a detailed breakdown of what the Free Tier offers and how you can leverage it to maximize learning and minimize costs:
What is the AWS Free Tier?
- Duration:
You get 6 months of Free Tier benefits after creating your account. - Credits:
AWS provides $100 in credits to spend on a wide variety of services. These credits enable you to access paid features or higher usage limits beyond the always-free resources. - Always-Free Resources:
Beyond the 6-month period, AWS offers certain services with always-free usage tiers like 100 GB of monthly data transfer, qualifying EC2 instance hours, or S3 storage.
Key Benefits and Features
- No Charges When Within Limits:
As long as your usage stays within Free Tier limits and credits, you won’t be billed. If you exceed the limits or credits, standard pay-as-you-go pricing applies. - Safe Experimentation:
This tier allows you to:- Launch and test virtual servers with EC2.
- Store objects and files in S3 with a free quota.
- Use managed databases and AI/ML services within limits.
- Practice deployment, networking, and security configurations.
- Data Transfer:
You get a free monthly allowance of 100 GB data transfer—helpful especially when running projects involving data movement. - Account Auto-Closure After 6 Months:
Once your 6-month Free Tier period ends, if you haven’t moved to a paid plan or used more than the free limits, AWS will close your account automatically.- However, your data is not lost immediately. AWS maintains stored data for 90 days after closure, giving you ample opportunity to download or migrate it.
How to Use the Free Tier Optimally
- Monitor Usage:
Track your usage through the AWS Billing dashboard and enable budget alerts to receive notifications before you hit limits. - Focus on Eligible Services:
Prioritize services that are part of the Free Tier like EC2 small instances, S3 buckets, Lambda function executions, and DynamoDB. - Clean Up Resources:
Regularly delete unused resources like instances, volumes, or snapshots to avoid unexpected charges. - Learn Cost Management:
Use AWS Cost Explorer and Budgets tools to understand how resources contribute to your bill and optimize accordingly.
Why the Free Tier Matters for Beginners
For new AWS users, the Free Tier serves as a risk-free playground:
- Build confidence before deploying real-world production workloads.
- Understand cloud concepts like virtual machines, storage, networking, and identity and access management.
- Experiment with scripts, APIs, and automation tools without worrying about cost.
- Develop foundational skills that translate directly into career growth and cloud certification readiness.
Final Thoughts
The AWS Free Tier is a robust platform to jumpstart your cloud learning journey with financial peace of mind. Treat it as your lab environment—a place where trials, errors, and innovations coexist safely. Fully understanding its capabilities and constraints empowers you to make informed decisions as you scale up your cloud infrastructure beyond the Free Tier.
By embracing the Free Tier wisely, you set the stage for scalable, responsible, and cost-effective cloud adoption.
Leave a Reply