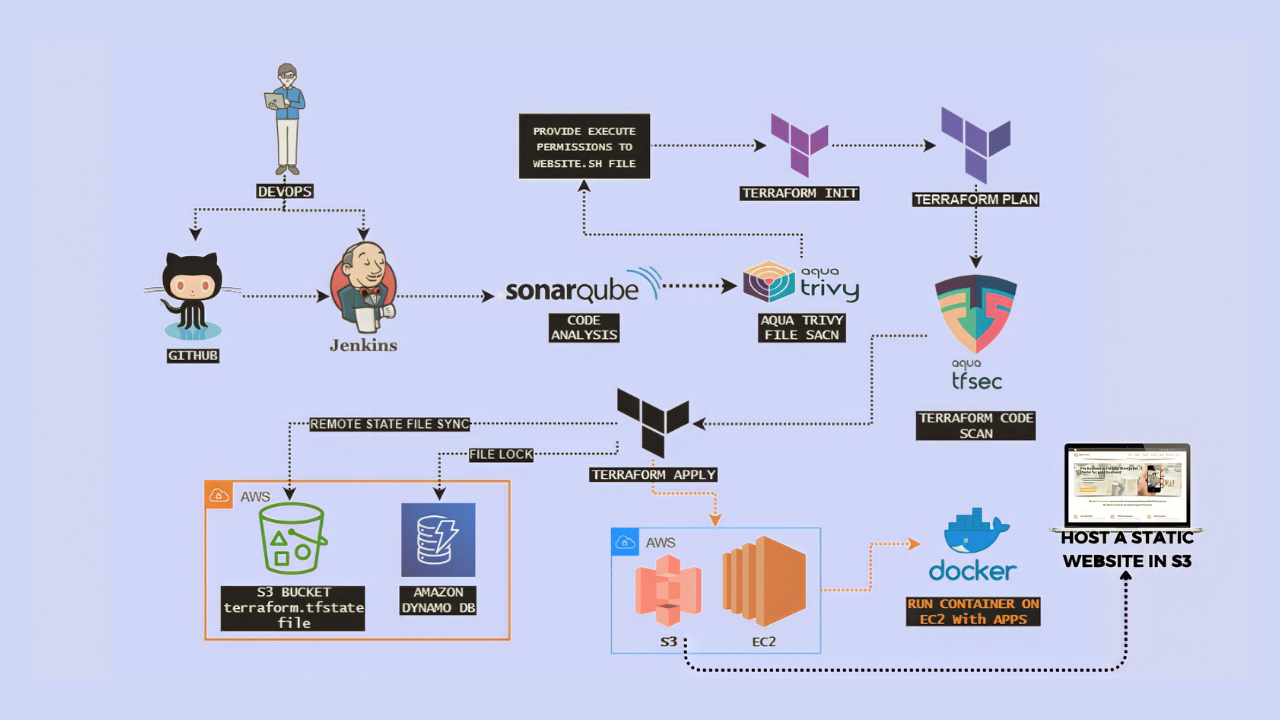
STATIC WEBSITE USING S3 FROM TERRAFORM

In today’s fast-paced world of cloud computing, the ability to rapidly and efficiently provision infrastructure is a game-changer. This is where Infrastructure as Code (IaC) comes into play, allowing us to define and manage our infrastructure in a code-based manner. In this blog post, we will explore how to harness the power of IaC by using two essential tools: Terraform and Jenkins, in conjunction with Amazon Web Services (AWS).
Terraform is an open-source IaC tool that enables us to define, create, and manage our infrastructure using declarative configuration files. Jenkins, on the other hand, is a widely adopted automation server that helps streamline the software development and deployment process.
Our journey will encompass several key objectives:
- Setting up Terraform and Jenkins: We’ll start by ensuring you have all the prerequisites in place, including an AWS account, Terraform, Jenkins, and Docker. We’ll walk you through the installation and configuration of these essential tools.
- Creating the Terraform Scripts: We’ll delve into the heart of IaC by crafting Terraform scripts to provision AWS resources. Along the way, we’ll introduce the concept of user data, a powerful feature that allows us to automate tasks like launching containers within our instances.
- Running Two Application Containers with User Data: To demonstrate the practical application of user data, we’ll guide you through launching not just one but two application containers within your AWS instances. This step showcases the versatility and automation capabilities of IaC.
- DevOps project we will be using Terraform and AWS Cloud to set up static website hosting fully automated in seconds. This Terraform project will help beginners understand the concept and working of Terraform with AWS and how you can create a one-click automated solution using Terraform in DevOps
- Setting up Infrastructure State Management:
S3 Bucket for Terraform State: We’ll create an AWS S3 bucket dedicated to securely storing your Terraform state files. This is essential for maintaining the state of your infrastructure in a central location.
6. DynamoDB Table for Locking: In addition to the S3 bucket, we’ll set up an AWS DynamoDB table to enable locking capabilities. This ensures that your infrastructure remains in a consistent state when multiple users are working concurrently.
7. Integrating Jenkins and Terraform: To tie it all together, we’ll demonstrate how to integrate Jenkins with Terraform. This integration will empower you to automate the provisioning process, enhance the efficiency of your infrastructure management, and ensure that your Terraform state is securely stored and locked when needed.
Prerequisites:
Before you embark on the journey of provisioning AWS resources using Terraform and Jenkins, it’s crucial to ensure that you have all the necessary components and configurations in place. Here are the prerequisites you should have before starting this tutorial:
- AWS Account: You must have an active AWS account with administrative privileges or the necessary permissions to create and manage AWS resources.
- S3 Bucket for Terraform State:
Purpose: To securely store your Terraform state files remotely.
3. Steps:
Log in to your AWS Management Console.
4. Navigate to the S3 service.
5. Create an S3 bucket with a unique name in the desired AWS region.
6. Note down the bucket name as you’ll use it in your Terraform scripts.
7. DynamoDB Table for Locking Capability:
Purpose: To enable locking for Terraform state management.
8. Steps:
Access the AWS Management Console.
9. Go to the DynamoDB service.
10. Create a DynamoDB table with a unique name and primary key.
11. Configure the table’s read and write capacity settings as needed.
12. Note down the table name for reference.
13. Jenkins Setup:
Ensure that Jenkins is up and running in your environment.
14. Configure Jenkins with the necessary plugins for AWS and Terraform integration.
15. Terraform Installation in Jenkins:
Terraform should be installed on the Jenkins server to execute Terraform scripts as part of your CI/CD pipeline.
16. Terraform Files in Source Code Management (SCM):
Your Terraform configuration files should already be available in your Source Code Management system (e.g., Git). Make sure you have the necessary access rights to the repository.
17. IAM Role for Jenkins EC2 Instance:
Purpose: To grant the Jenkins EC2 instance the necessary permissions to interact with AWS resources.
18. Steps:
Create an IAM role in AWS.
19. Attach the appropriate policy that grants permissions for AWS resource provisioning, DynamoDB access, S3 bucket operations, and any other required permissions.
20. Associate the IAM role with the Jenkins EC2 instance.
21. GitHub Repository (Optional):
If you’re using a public repository as an example, you can fork the repository and start making changes in your own forked repository. Ensure that you have the necessary access to the repository.
With these prerequisites in place, you’ll be well-prepared to dive into the tutorial and learn how to leverage Terraform, Jenkins, AWS S3, and DynamoDB to automate the provisioning and state management of your AWS resources. These foundational components are key to a successful IaC implementation and CI/CD pipeline for infrastructure.
Launch an Ubuntu(22.04) T2 Large Instance
Launch an AWS T2 Large Instance. Use the image as Ubuntu. You can create a new key pair or use an existing one. Enable HTTP and HTTPS settings in the Security Group and open all ports (not best case to open all ports but just for learning purposes it’s okay).

Install Jenkins, Docker and Trivy
To Install Jenkins
Connect to your console, and enter these commands to Install Jenkins
vi jenkins.sh
#!/bin/bash
sudo apt update -y
wget -O - https://packages.adoptium.net/artifactory/api/gpg/key/public | tee /etc/apt/keyrings/adoptium.asc
echo "deb [signed-by=/etc/apt/keyrings/adoptium.asc] https://packages.adoptium.net/artifactory/deb $(awk -F= '/^VERSION_CODENAME/{print$2}' /etc/os-release) main" | tee /etc/apt/sources.list.d/adoptium.list
sudo apt update -y
sudo apt install temurin-17-jdk -y
/usr/bin/java --version
curl -fsSL https://pkg.jenkins.io/debian-stable/jenkins.io-2023.key | sudo tee \
                  /usr/share/keyrings/jenkins-keyring.asc > /dev/null
echo deb [signed-by=/usr/share/keyrings/jenkins-keyring.asc] \
                  https://pkg.jenkins.io/debian-stable binary/ | sudo tee \
                              /etc/apt/sources.list.d/jenkins.list > /dev/null
sudo apt-get update -y
sudo apt-get install jenkins -y
sudo systemctl start jenkins
sudo systemctl status jenkins
sudo chmod 777 jenkins.sh
./jenkins.sh    # this will installl jenkins
Once Jenkins is installed, you will need to go to your AWS EC2 Security Group and open Inbound Port 8080, since Jenkins works on Port 8080.
Now, grab your Public IP Address
sudo cat /var/lib/jenkins/secrets/initialAdminPassword
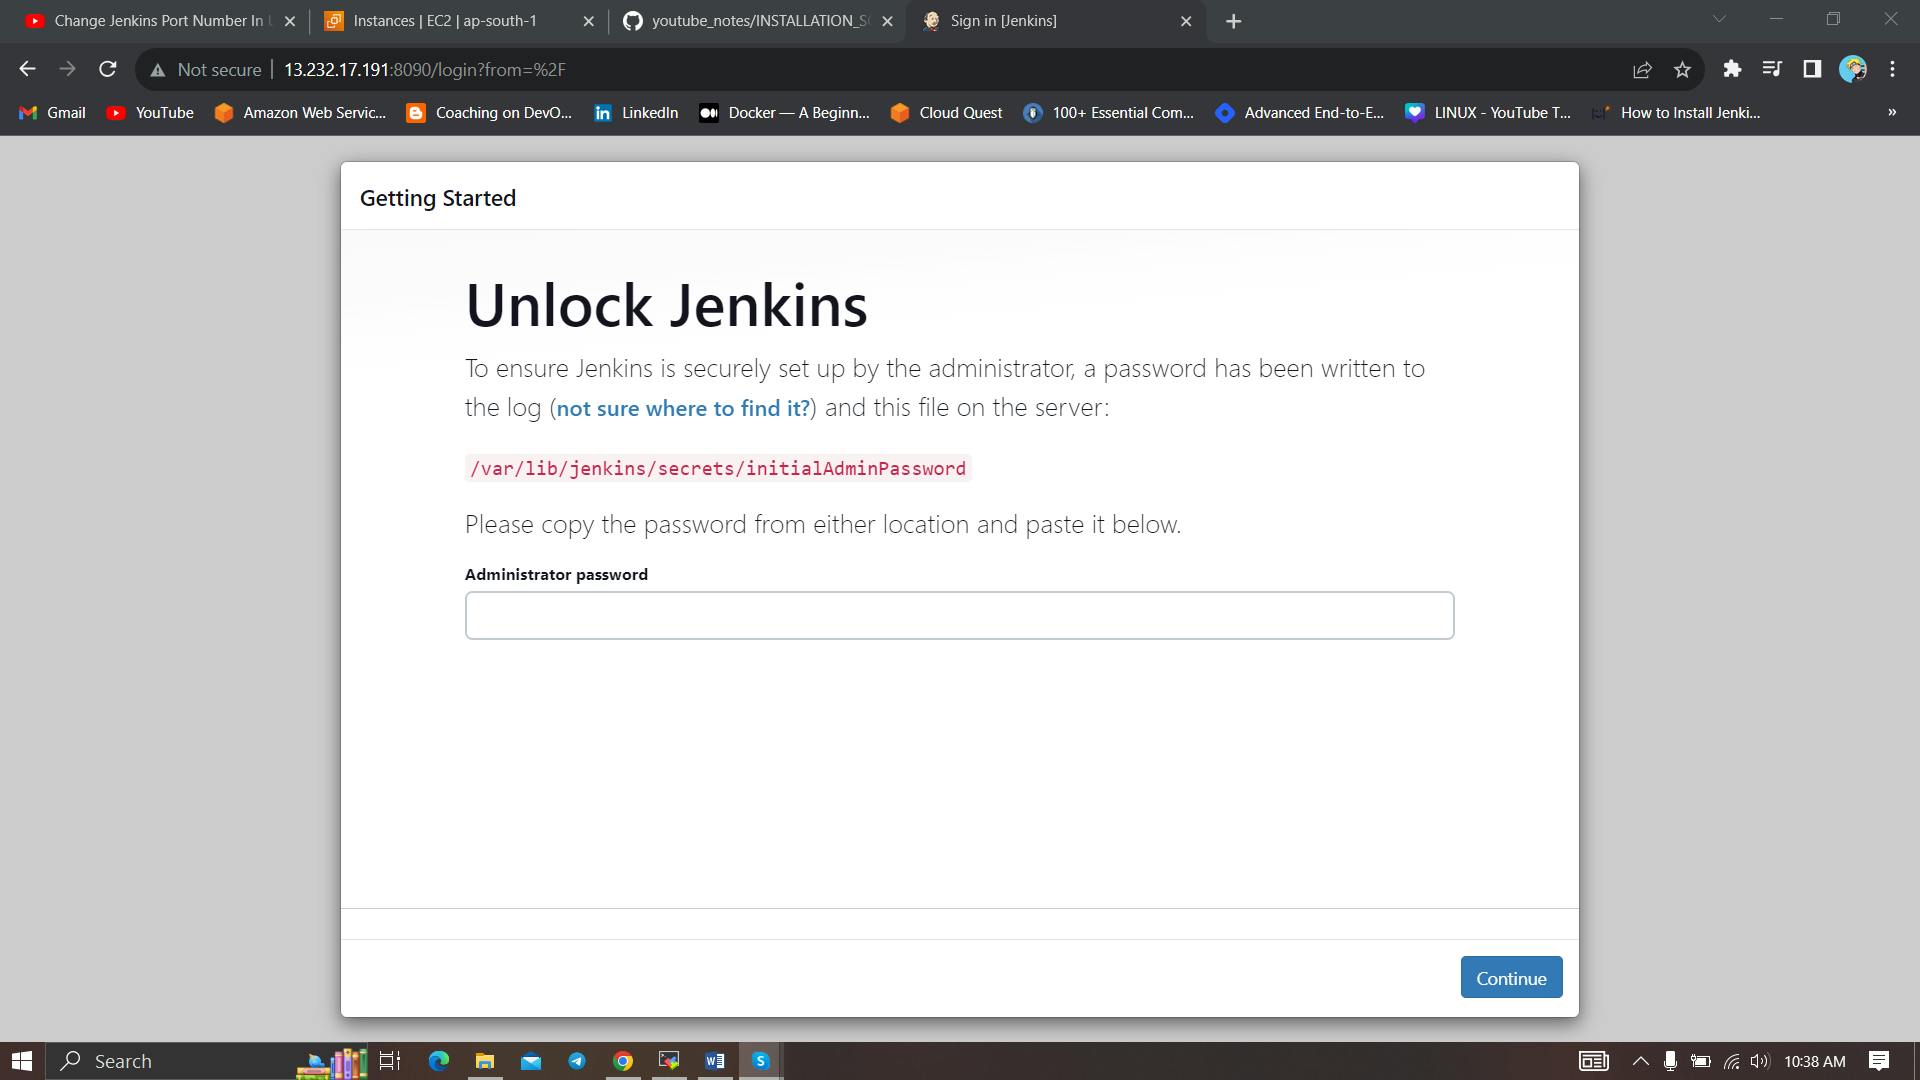
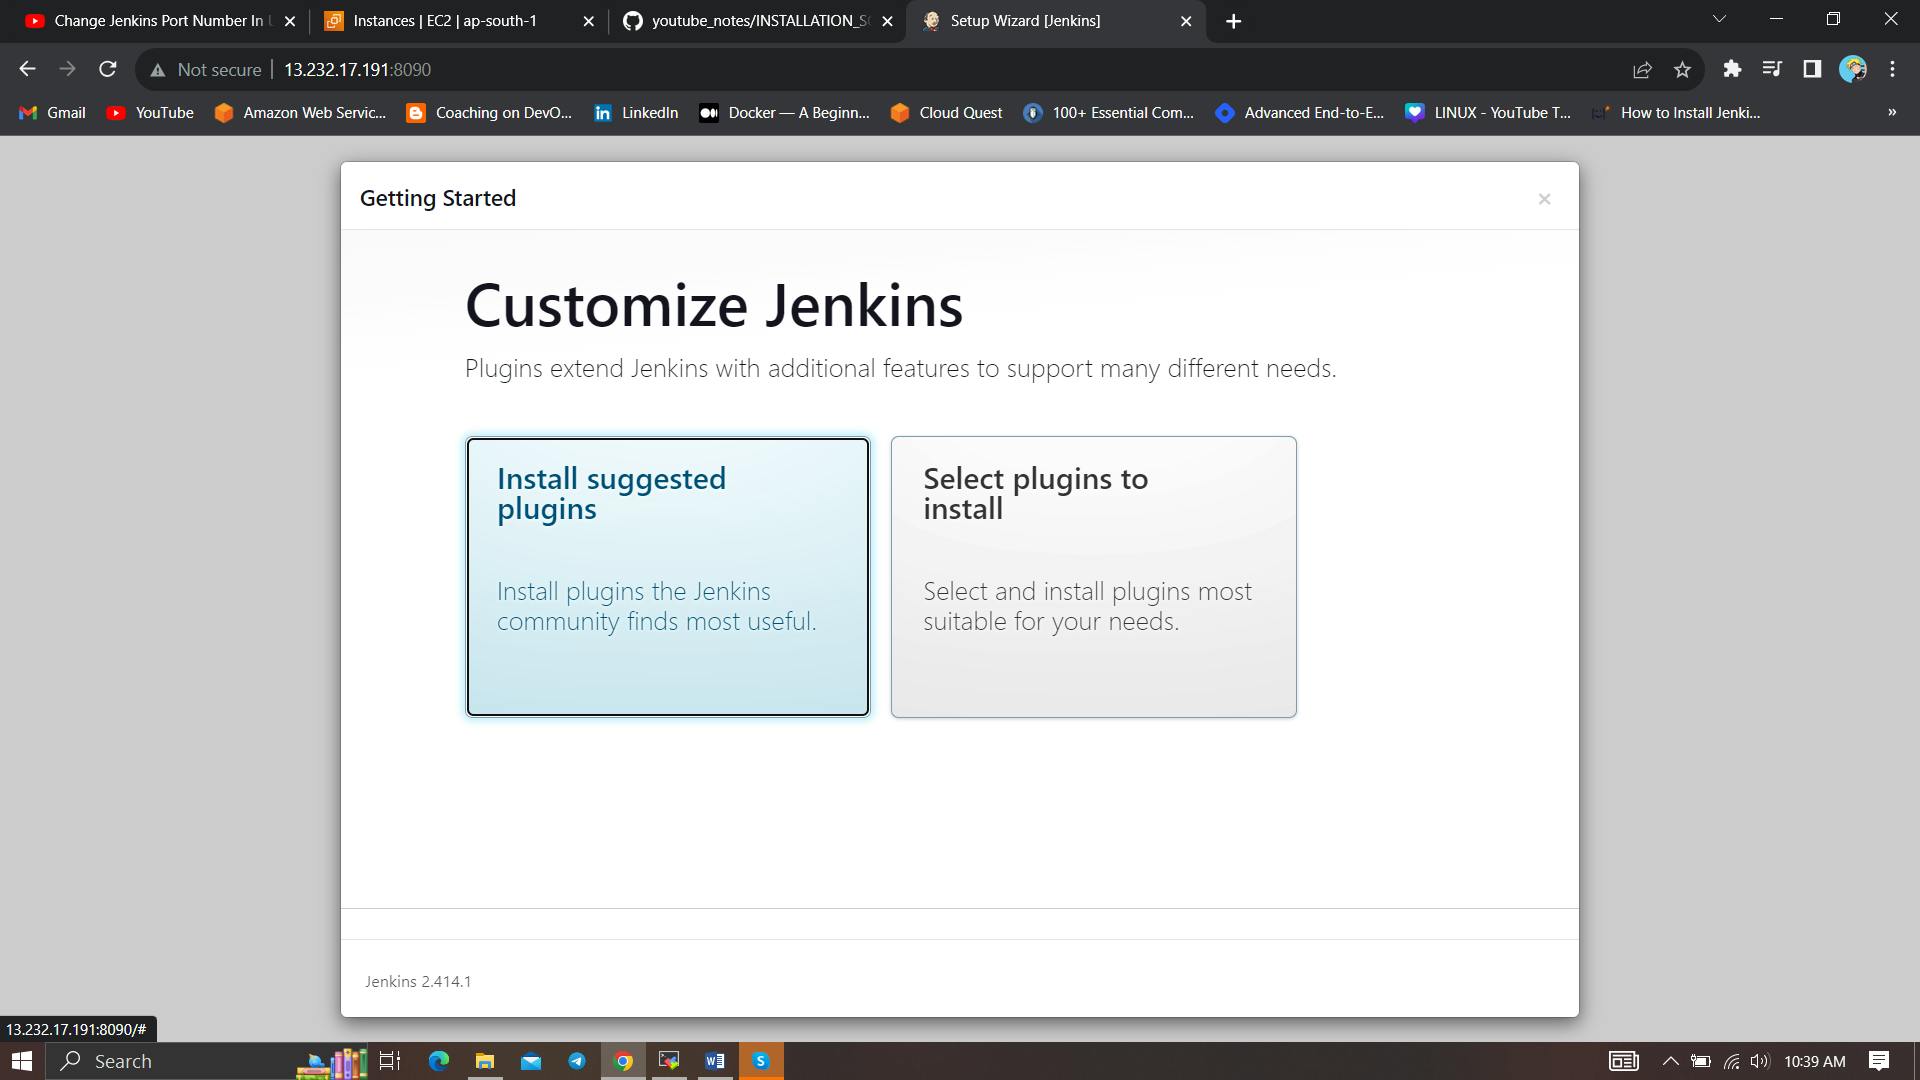
Unlock Jenkins using an administrative password and install the suggested plugins.
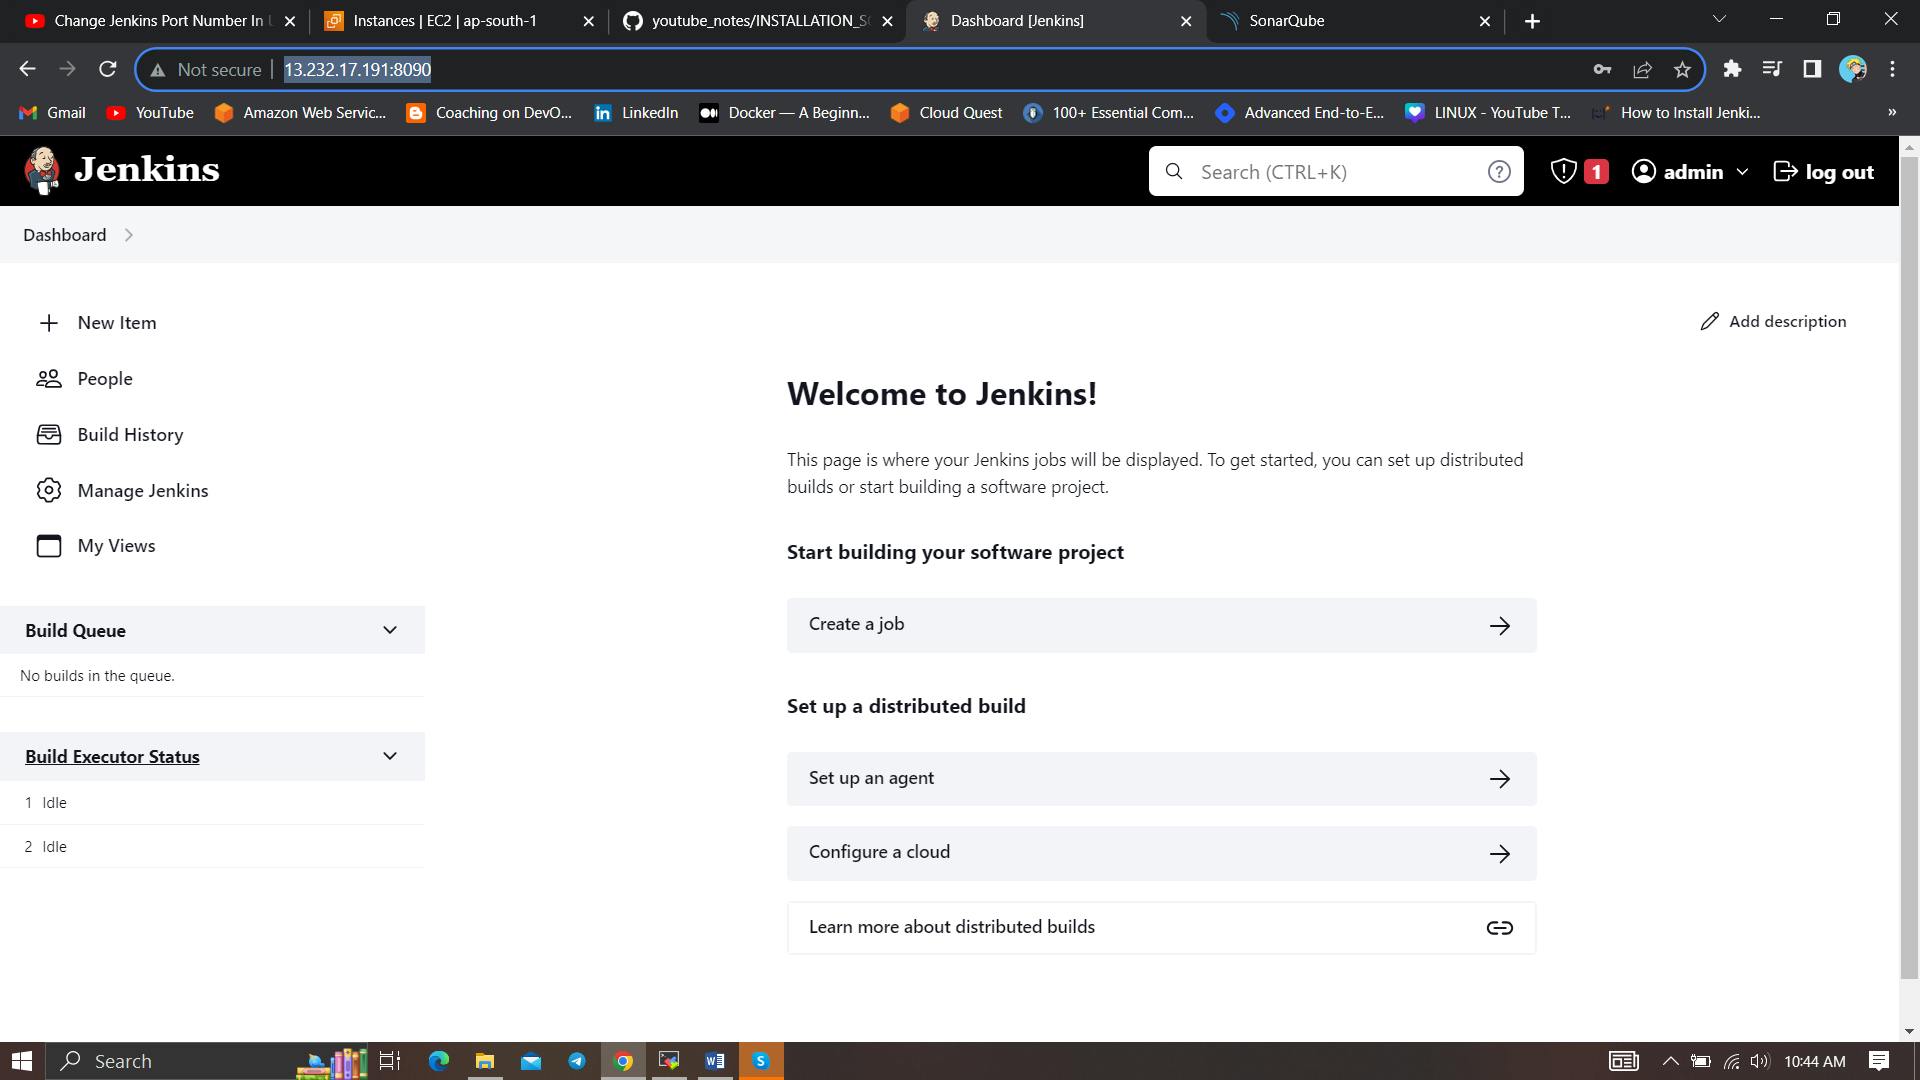
Jenkins will now get installed and install all the libraries.
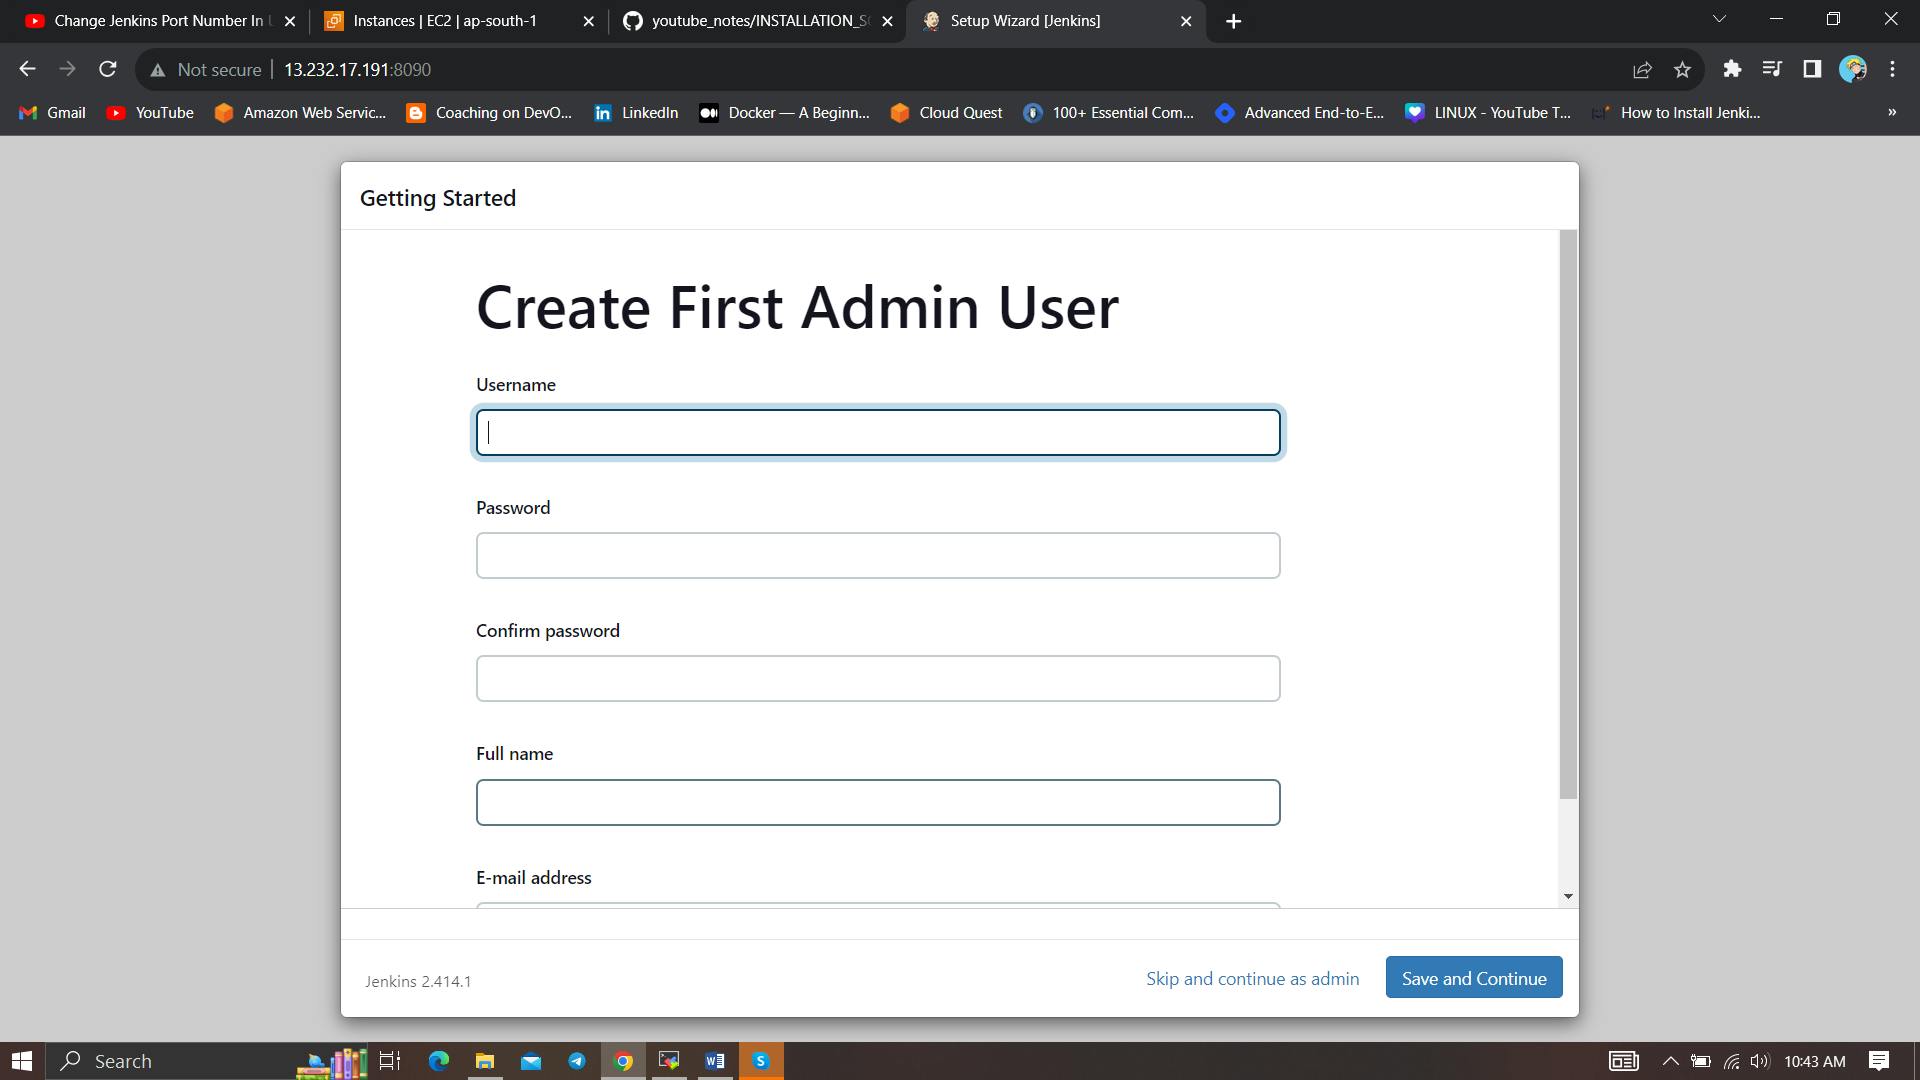
Create a user click on save and continue.
Jenkins Getting Started Screen.
Install Docker
sudo apt-get update
sudo apt-get install docker.io -y
sudo usermod -aG docker $USER   #my case is ubuntu
newgrp docker
sudo chmod 777 /var/run/docker.sock
After the docker installation, we create a sonarqube container (Remember to add 9000 ports in the security group).
docker run -d --name sonar -p 9000:9000 sonarqube:lts-community
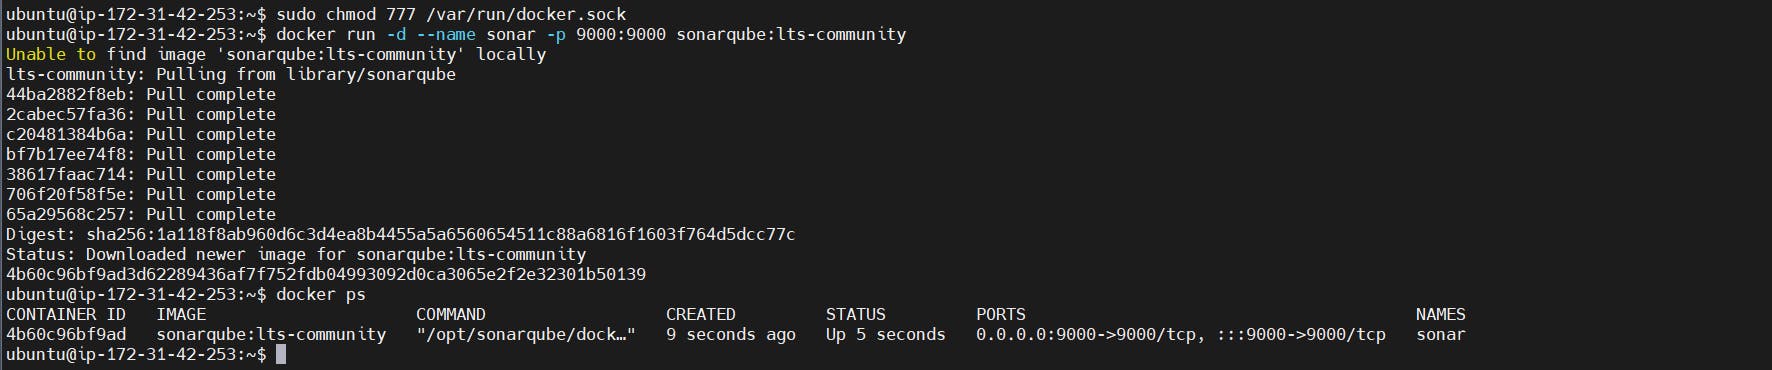
Now our sonarqube is up and running

Enter username and password, click on login and change password
username admin
password admin
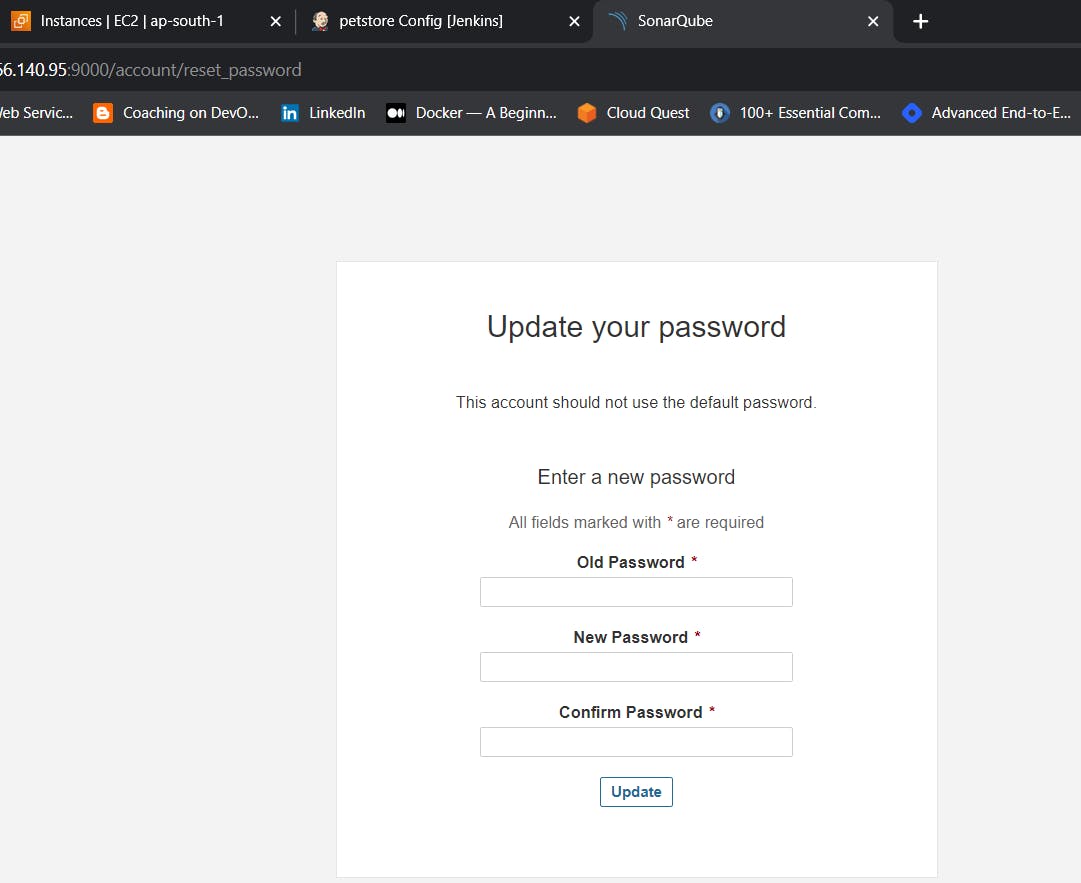
Update New password, This is Sonar Dashboard.
2C - Install Trivy
vi trivy.sh
sudo apt-get install wget apt-transport-https gnupg lsb-release -y
wget -qO - https://aquasecurity.github.io/trivy-repo/deb/public.key | gpg --dearmor | sudo tee /usr/share/keyrings/trivy.gpg > /dev/null
echo "deb [signed-by=/usr/share/keyrings/trivy.gpg] https://aquasecurity.github.io/trivy-repo/deb $(lsb_release -sc) main" | sudo tee -a /etc/apt/sources.list.d/trivy.list
sudo apt-get update
sudo apt-get install trivy -y
Next, we will log in to Jenkins and start to configure our Pipeline in Jenkins
Install Plugins like JDK, Sonarqube Scanner,Terraform
Install Plugin
Goto Manage Jenkins →Plugins → Available Plugins →
Install below plugins
1 → Eclipse Temurin Installer (Install without restart)
2 → SonarQube Scanner (Install without restart)
3 → Terraform


let’s install Terraform on our Jenkins machine
wget -O- https://apt.releases.hashicorp.com/gpg | sudo gpg --dearmor -o /usr/share/keyrings/hashicorp-archive-keyring.gpg
echo "deb [signed-by=/usr/share/keyrings/hashicorp-archive-keyring.gpg] https://apt.releases.hashicorp.com $(lsb_release -cs) main" | sudo tee /etc/apt/sources.list.d/hashicorp.list
sudo apt update && sudo apt install terraform

check terraform version
terraform --version
let’s find the path to our terraform (we will use it in the tools section of Terraform)
which terraform

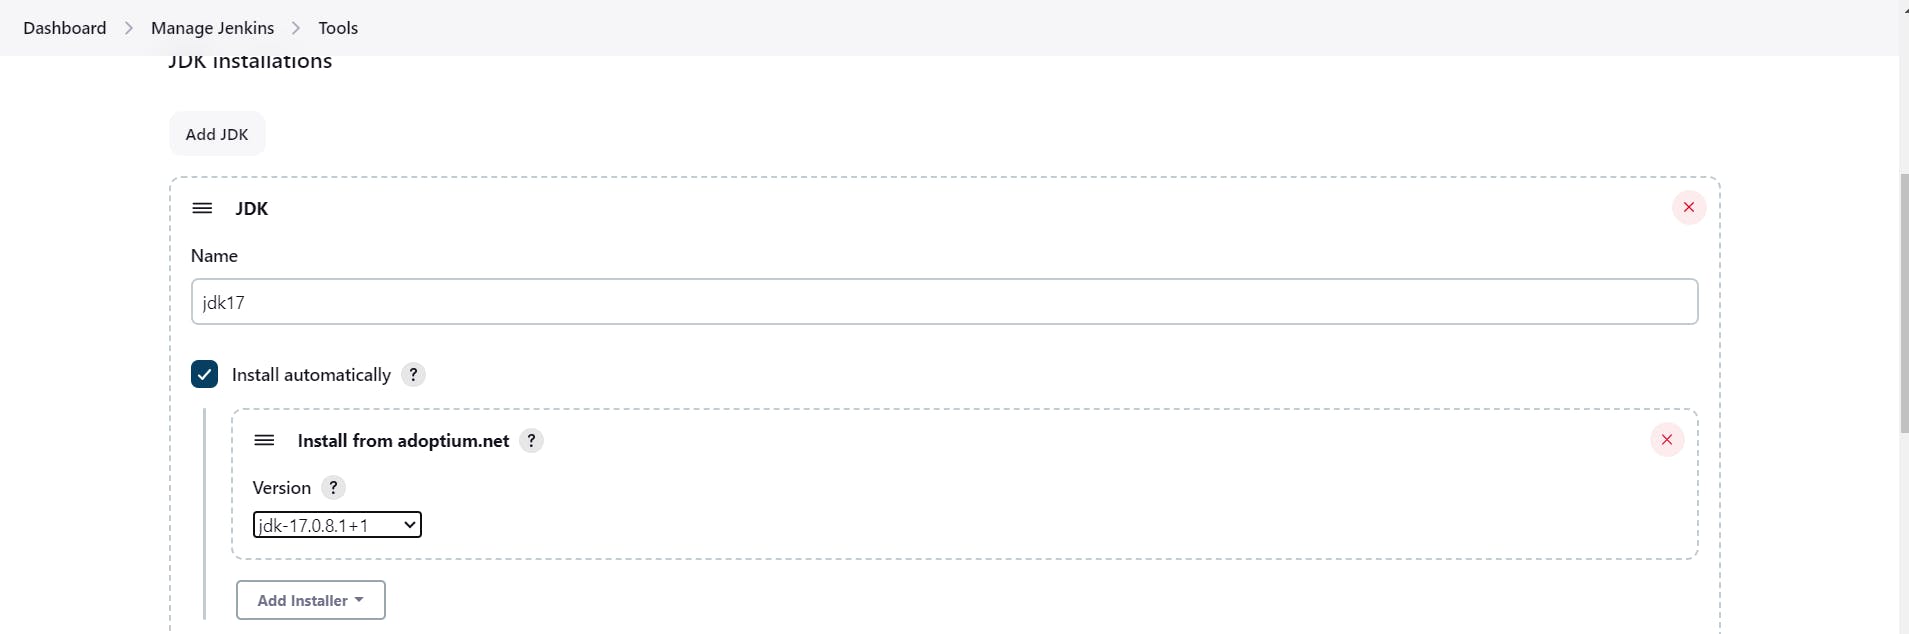
Configure Java and Terraform in Global Tool Configuration
Goto Manage Jenkins → Tools → Install JDK(17) → Click on Apply and Save
Tools --> Terraform

Apply and save.
Configure Sonar Server in Manage Jenkins
Grab the Public IP Address of your EC2 Instance, Sonarqube works on Port 9000, so
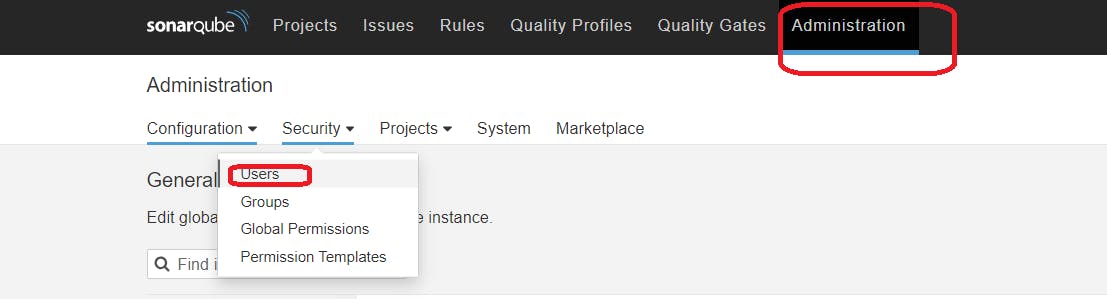
click on update Token

Create a token with a name and generate
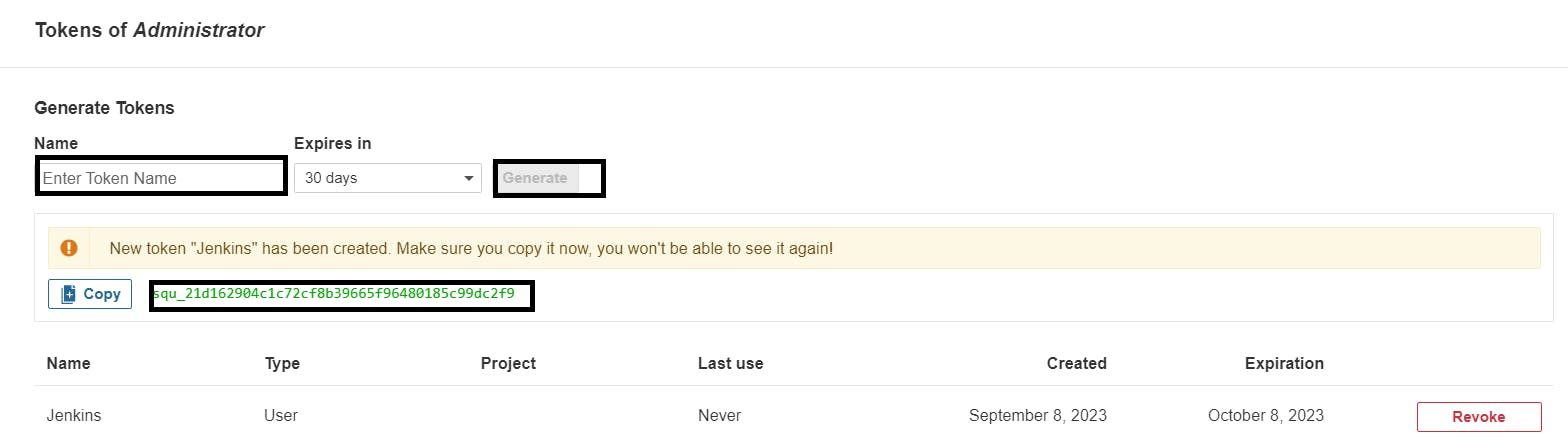
copy Token
Goto Jenkins Dashboard → Manage Jenkins → Credentials → Add Secret Text. It should look like this
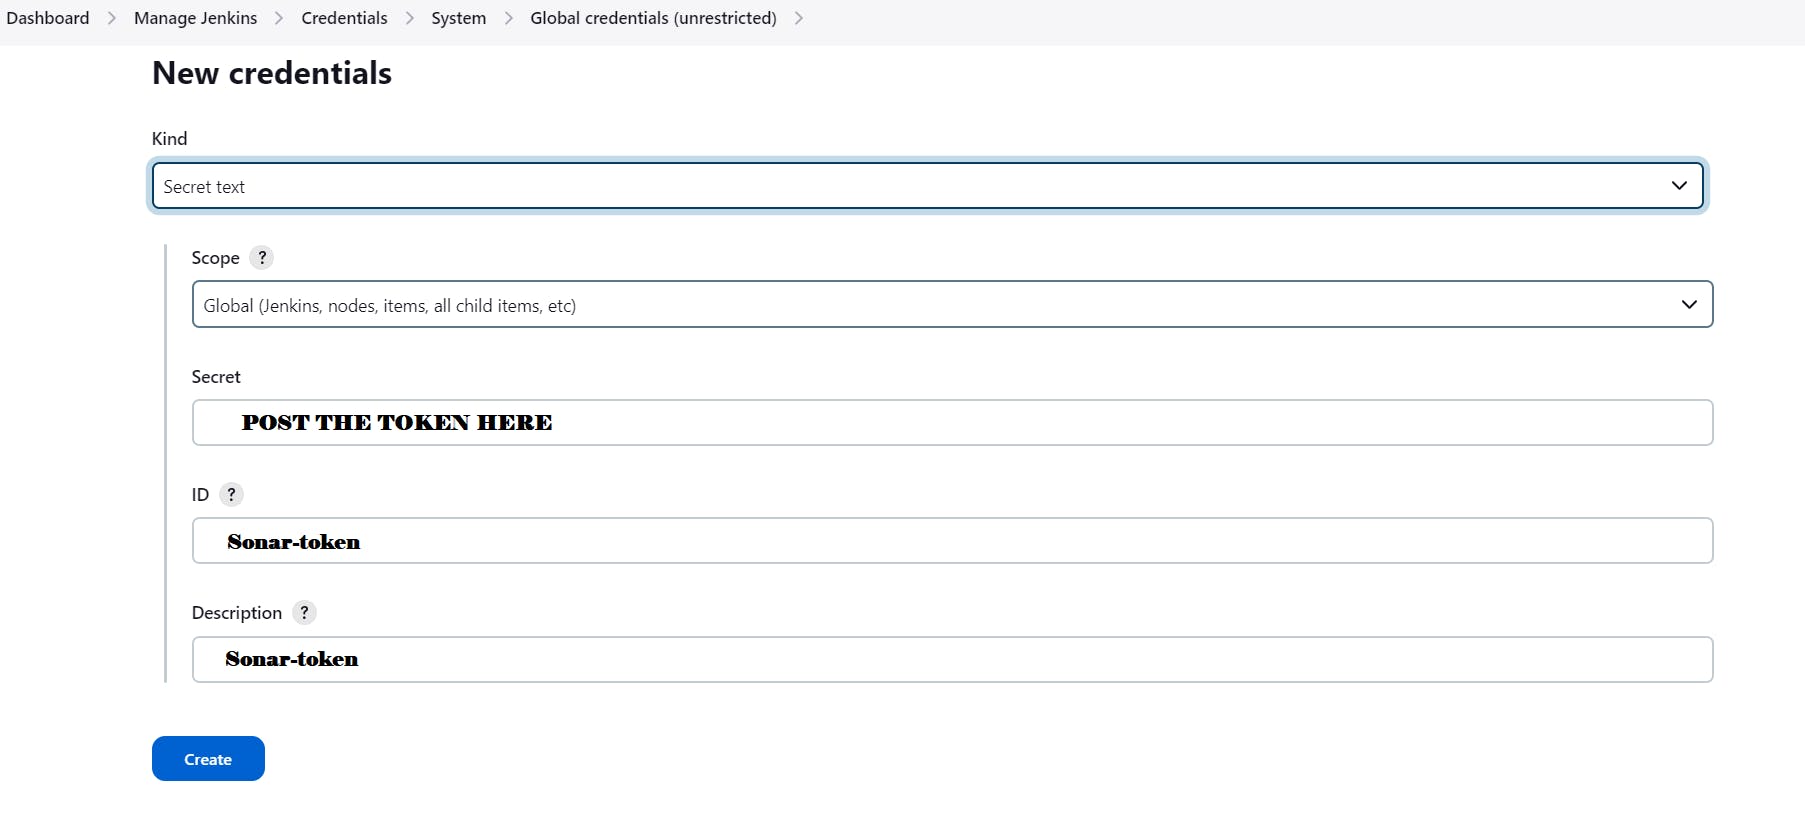
You will this page once you click on create

Now, go to Dashboard → Manage Jenkins → System and Add like the below image.
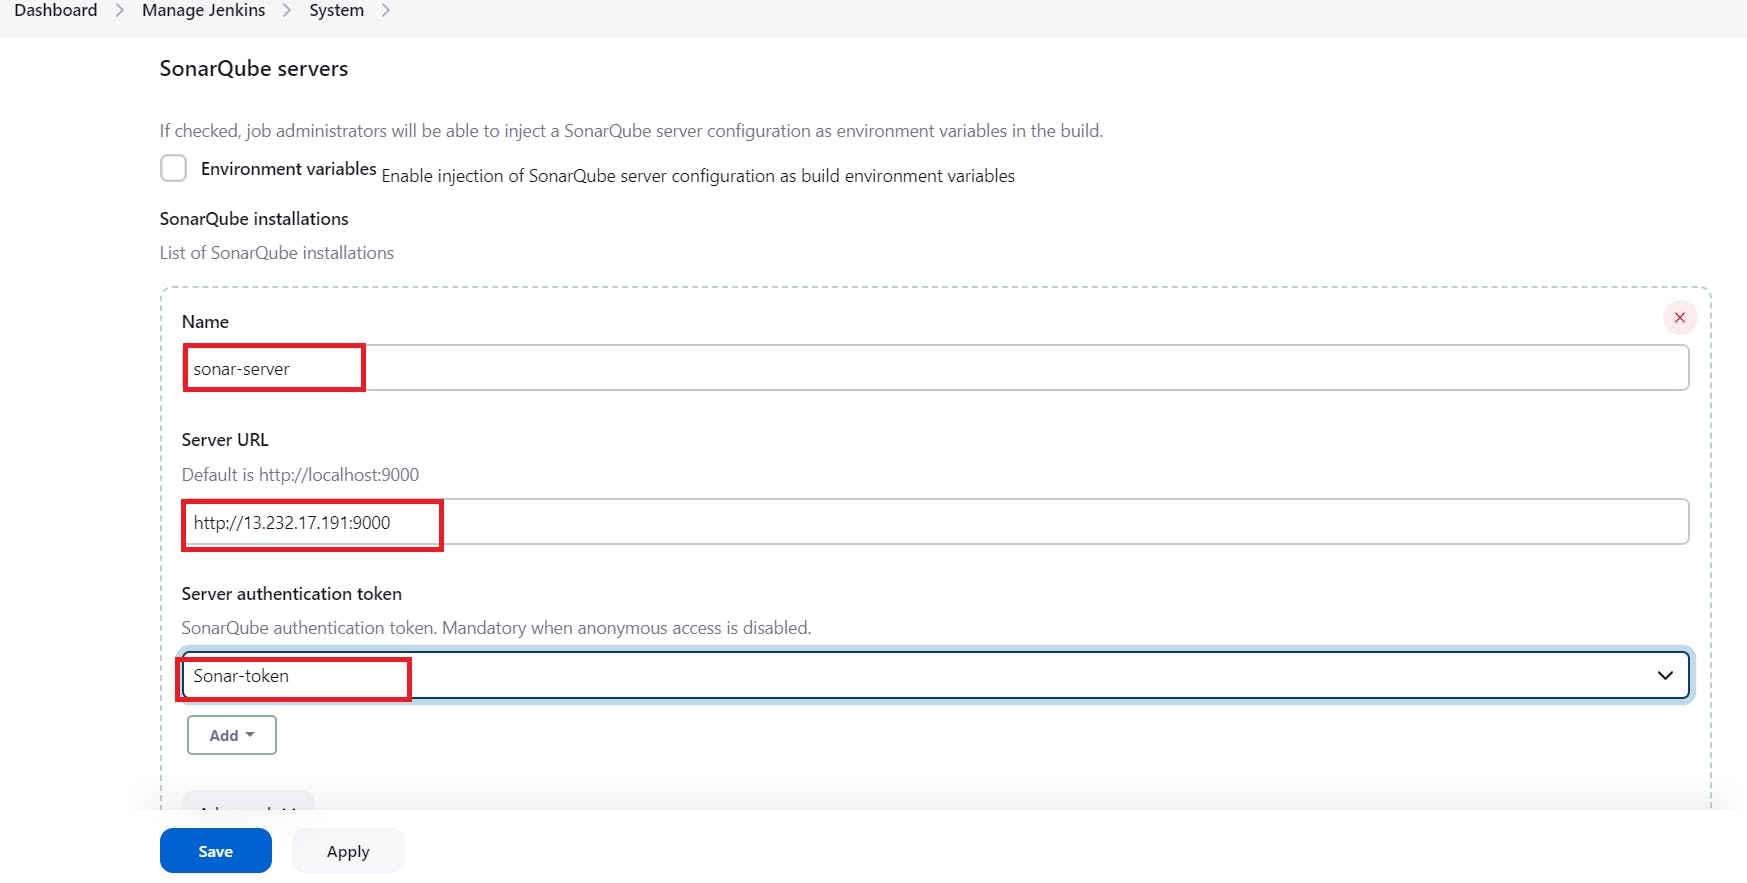
Click on Apply and Save
The Configure System option is used in Jenkins to configure different server
Global Tool Configuration is used to configure different tools that we install using Plugins
We will install a sonar scanner in the tools.

In the Sonarqube Dashboard add a quality gate also
Administration--> Configuration-->Webhooks

Click on Create

Add details
#in url section of quality gate
/sonarqube-webhook/

Create an IAM, S3 bucket and Dynamo DB table.
Navigate to AWS CONSOLE
Click the “Search” field.

Type “IAM enter“
Click “Roles”
Click “Create role”

Click “AWS service”
Click “Choose a service or use case”

Click “EC2”
Click “Next”

Click the “Search” field.
Add permissions policies
AmazonEC2FullAccess

Click the “Search” field.
AmazonS3FullAccess

Search
AmazonDynamoDBFullAccess

click Next
Click the “Role name” field.
Type “Jenkins-cicd”
Click “Create role”

Click “EC2”
go to the Jenkins instance and add this role to the Ec2 instance.
select Jenkins instance --> Actions --> Security --> Modify IAM role
Add a newly created Role and click on Update IAM role.

Search for S3 in console
Click “Create bucket”

Click the “Bucket name” field.

Nothing to change, keep the remaining default.
Click “Create bucket”, Bucket will be created.

Click the “Search” field. Search for DynamoDB and click on it.

Click “Create table”

Click the “Table name” field. enter “dynamodb_table = “mrcloudbook-dynamo-db-table”“
Click the “Enter the partition key name” field.
Type “LockID”

Click “Create table”

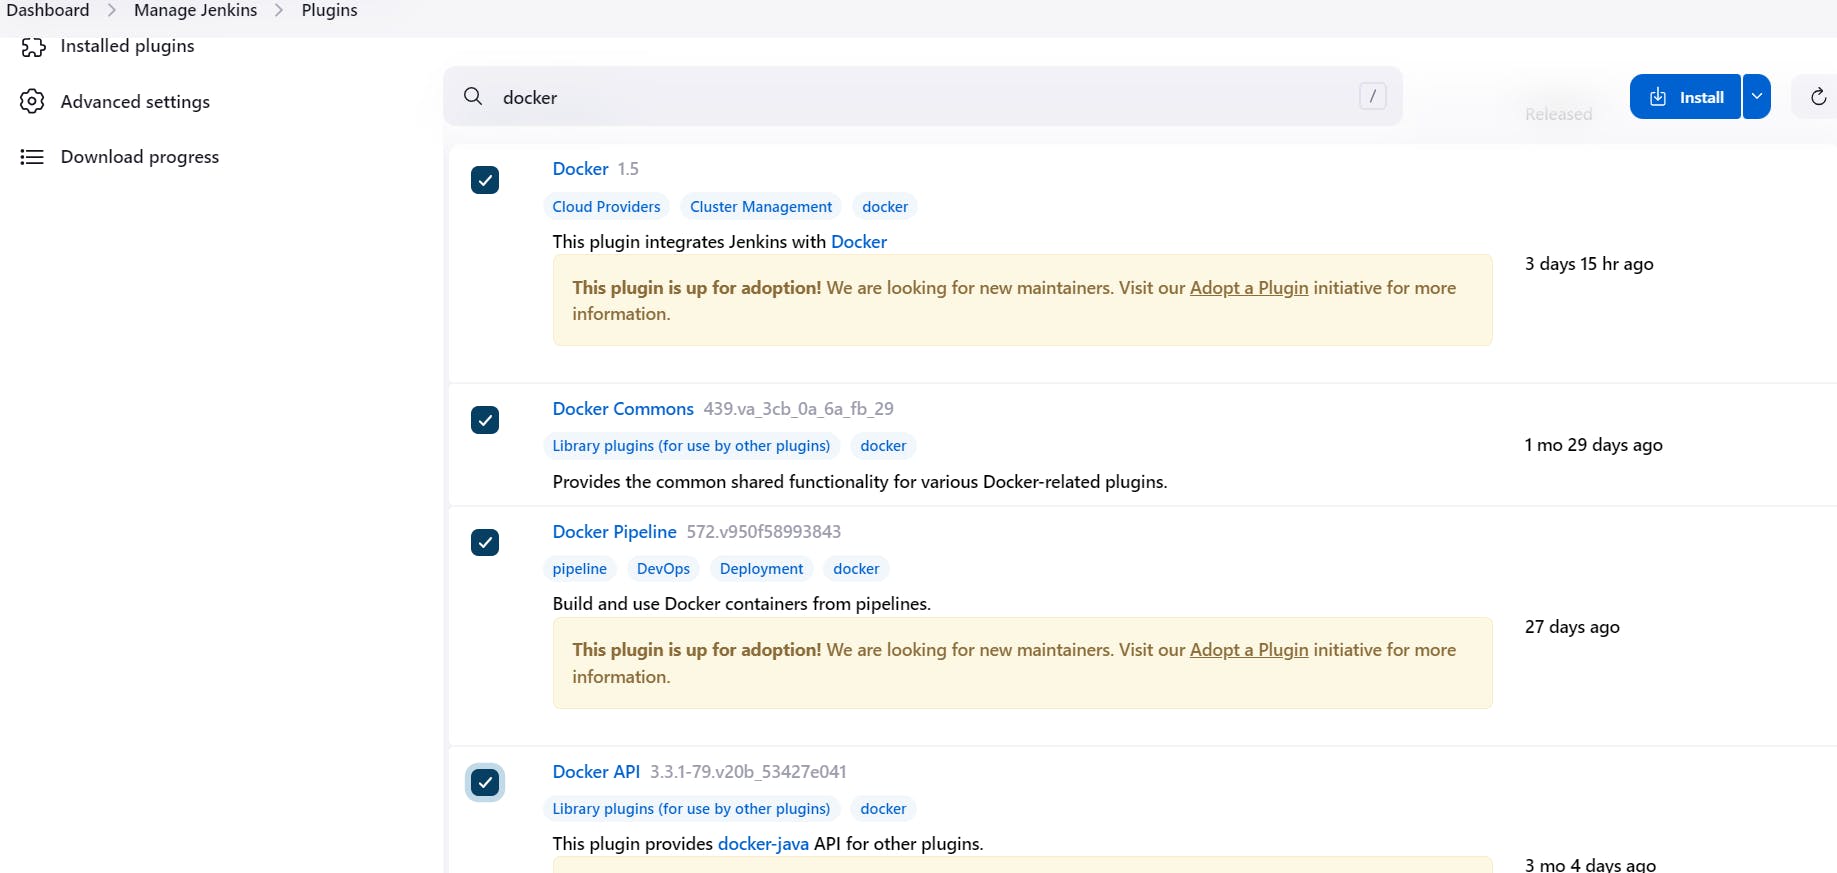
Docker Plugin setup
We need to install the Docker tool in our system, Goto Dashboard → Manage Plugins → Available plugins → Search for Docker and install these plugins
Docker
Docker Commons
Docker Pipeline
Docker API
docker-build-step
and click on install without restart
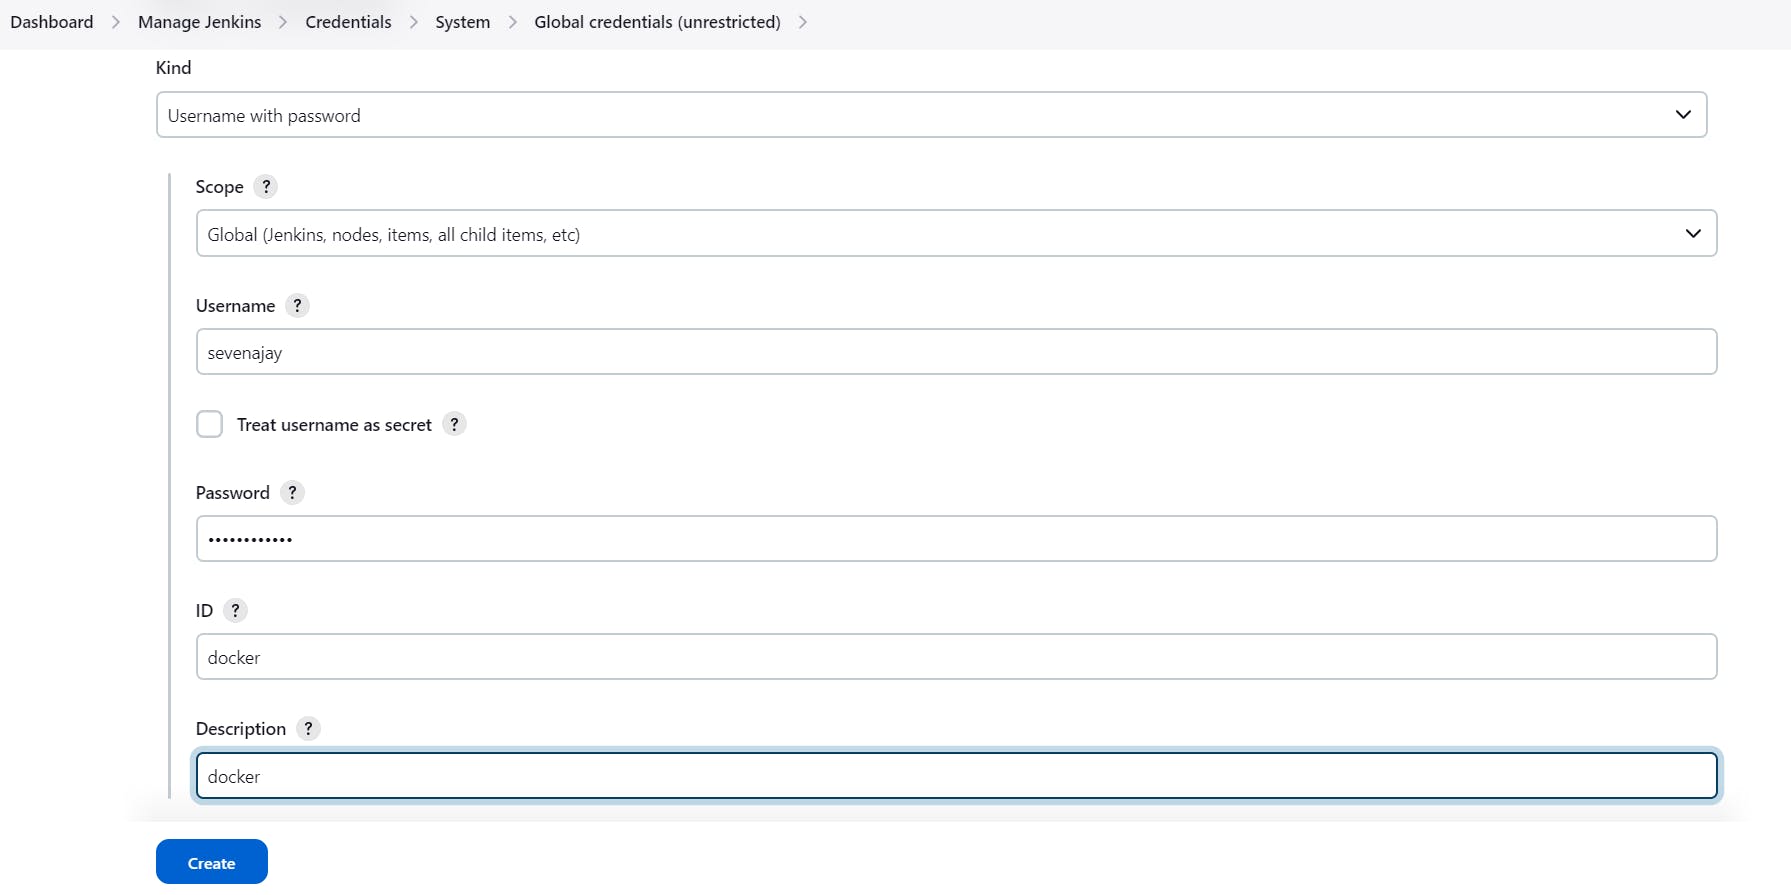
Now, goto Dashboard → Manage Jenkins → Tools →

Add DockerHub Username and Password under Global Credentials
Let’s check the Terraform code Now.
Backend.tf
terraform {
  backend "s3" {
    bucket         = "ajay-mrcloudbook777"   #change name
    key            = "my-terraform-environment/main"
    region         = "ap-south-1"
    dynamodb_table = "mrcloudbook-dynamo-db-table"
  }
}
provider.tf
terraform {
  required_providers {
    aws = {
      source  = "hashicorp/aws"
      version = "~> 4.16"
    }
  }
  required_version = ">= 1.2.0"
}
provider "aws" {
  region = var.aws_region
}
main.tf
resource "aws_instance" "Ajay" {
  ami                    = var.ami_id
  instance_type          = var.instance_type
  key_name               = var.key_name
  vpc_security_group_ids = [aws_security_group.ec2_security_group.id]
  user_data              = base64encode(file("website.sh"))
  tags = {
    Name = "Aj-EC2"
  }
}
resource "aws_security_group" "ec2_security_group" {
  name        = "ec2 security group"
  description = "allow access on ports 80 and 22 and 443"
  ingress {
    description      = "ssh access"
    from_port        = 22
    to_port          = 22
    protocol         = "tcp"
    cidr_blocks      = ["0.0.0.0/0"]
    ipv6_cidr_blocks = ["::/0"]
  }
  ingress {
    from_port   = 0
    to_port     = 0    # Allow all ports
    protocol    = "-1" # All protocols
    cidr_blocks = ["0.0.0.0/0"]
  }
  ingress {
    description      = "https"
    from_port        = 443
    to_port          = 443
    protocol         = "tcp"
    cidr_blocks      = ["0.0.0.0/0"]
    ipv6_cidr_blocks = ["::/0"]
  }
  ingress {
    description      = "http"
    from_port        = 80
    to_port          = 80
    protocol         = "tcp"
    cidr_blocks      = ["0.0.0.0/0"]
    ipv6_cidr_blocks = ["::/0"]
  }
  egress {
    from_port        = 0
    to_port          = 0
    protocol         = "-1"
    cidr_blocks      = ["0.0.0.0/0"]
    ipv6_cidr_blocks = ["::/0"]
  }
  tags = {
    Name = "Aj_sg"
  }
}
s3.tf
#create s3 bucket
resource "aws_s3_bucket" "mybucket" {
  bucket = var.bucketname
}
resource "aws_s3_bucket_ownership_controls" "example" {
  bucket = aws_s3_bucket.mybucket.id
  rule {
    object_ownership = "BucketOwnerPreferred"
  }
}
resource "aws_s3_bucket_public_access_block" "example" {
  bucket = aws_s3_bucket.mybucket.id
  block_public_acls       = false
  block_public_policy     = false
  ignore_public_acls      = false
  restrict_public_buckets = false
}
resource "aws_s3_bucket_acl" "example" {
  depends_on = [
    aws_s3_bucket_ownership_controls.example,
    aws_s3_bucket_public_access_block.example,
  ]
  bucket = aws_s3_bucket.mybucket.id
  acl    = "public-read"
}
resource "aws_s3_object" "index" {
  bucket = aws_s3_bucket.mybucket.id
  key = "index.html"
  source = "index.html"
  acl = "public-read"
  content_type = "text/html"
}
resource "aws_s3_object" "error" {
  bucket = aws_s3_bucket.mybucket.id
  key = "error.html"
  source = "error.html"
  acl = "public-read"
  content_type = "text/html"
}
resource "aws_s3_object" "style" {
  bucket = aws_s3_bucket.mybucket.id
  key = "style.css"
  source = "style.css"
  acl = "public-read"
  content_type = "text/css"
}
resource "aws_s3_object" "script" {
  bucket = aws_s3_bucket.mybucket.id
  key = "script.js"
  source = "script.js"
  acl = "public-read"
  content_type = "text/javascript"
}
resource "aws_s3_bucket_website_configuration" "website" {
  bucket = aws_s3_bucket.mybucket.id
  index_document {
    suffix = "index.html"
  }
  error_document {
    key = "error.html"
  }
  depends_on = [ aws_s3_bucket_acl.example.id ]
}
Variables.tf
variable "aws_region" {
  description = "The AWS region to create things in."
  default     = "ap-south-1"
}
variable "key_name" {
  description = " SSH keys to connect to ec2 instance"
  default     = "Mumbai"     #change key name here
}
variable "instance_type" {
  description = "instance type for ec2"
  default     = "t2.medium"
}
variable "ami_id" {
  description = "AMI for Ubuntu Ec2 instance"
  default     = "ami-0f5ee92e2d63afc18"
}
variable "bucketname" {
  description = "The name of the S3 bucket to create"
  type        = string
  default     = "ajaykumar-yegireddi-cloud"  #change Bucket name also
}
User data for Instance
website.sh
#!/bin/bash
# Update the package manager and install Docker
sudo apt-get update -y
sudo apt-get install -y docker.io
# Start the Docker service
sudo systemctl start docker
# Enable Docker to start on boot
sudo systemctl enable docker
# Pull and run a simple Nginx web server container
sudo docker run -d --name zomato -p 3000:3000 sevenajay/zomato:latest
sudo docker run -d --name netflix -p 8081:80 sevenajay/netflix:latest
index.html
HTML CSS JSResult Skip Results Iframe


   Login Page Form | Nothing4us


      Show

    Login


Mr.Cloud Book
error.html
   404 page | Nothing4us


# 404


        Look like you're lost

        the page you are looking for not avaible!

        [Go to Home]()
style.css
* {
    box-sizing: border-box;
  }
  body {
    width: 100vw;
    height: 100vh;
    background-color: rgb(41, 0, 75);
    overflow: hidden;
    font-size: 12px;
  }
  .inspiration {
    position: fixed;
    bottom: 0;
    right: 0;
    padding: 10px;
    text-align: center;
    text-decoration: none;
    font-family: 'Gill Sans', sans-serif;
    font-size: 12px;
    color: #969696;
  }
  .inspiration img {
    width: 60px;
  }
  .center {
    position: relative;
    top: 50%;
    left: 50%;
    display: inline-block;
    width: 275px;
    height: 490px;
    border-radius: 3px;
    transform: translate(-50%, -50%);
    overflow: hidden;
    background-image: linear-gradient(to top right, rgb(0 168 255), rgb(249 95 230));
  }
  @media screen and (max-height: 500px) {
    .center {
      transition: transform 0.5s;
      transform: translate(-50%, -50%) scale(0.8);
    }
  }
  .center .ear {
    position: absolute;
    top: -110px;
    width: 200px;
    height: 200px;
    border-radius: 50%;
    background-color: rgb(50 22 22);
  }
  .center .ear.ear--left {
    left: -135px;
  }
  .center .ear.ear--right {
    right: -135px;
  }
  .center .face {
    display: flex;
    flex-direction: column;
    align-items: center;
    width: 200px;
    height: 150px;
    margin: 80px auto 10px;
    --rotate-head: 0deg;
    transform: rotate(var(--rotate-head));
    transition: transform 0.2s;
    transform-origin: center 20px;
  }
  .center .eye {
    display: inline-block;
    width: 25px;
    height: 25px;
    border-radius: 50%;
    background-color: #243946;
  }
  .center .eye.eye--left {
    margin-right: 40px;
  }
  .center .eye.eye--right {
    margin-left: 40px;
  }
  .center .eye .glow {
    position: relative;
    top: 3px;
    right: -12px;
    width: 12px;
    height: 6px;
    border-radius: 50%;
    background-color: #fff;
    transform: rotate(38deg);
  }
  .center .nose {
    position: relative;
    top: 30px;
    transform: scale(1.1);
  }
  .center .nose .glow {
    position: absolute;
    top: 3px;
    left: 32%;
    width: 15px;
    height: 8px;
    border-radius: 50%;
    background-color: #476375;
  }
  .center .mouth {
    position: relative;
    margin-top: 45px;
  }
  .center svg.smile {
    position: absolute;
    left: -28px;
    top: -19px;
    transform: scaleX(1.1);
    stroke: #243946;
  }
  .center .mouth-hole {
    position: absolute;
    top: 0;
    left: -50%;
    width: 60px;
    height: 15px;
    border-radius: 50%/100% 100% 0% 0;
    transform: rotate(180deg);
    background-color: #243946;
    z-index: -1;
  }
  .center .tongue {
    position: relative;
    top: 5px;
    width: 30px;
    height: 20px;
    background-color: #ffd7dd;
    transform-origin: top;
    transform: rotateX(60deg);
  }
  .center .tongue.breath {
    -webkit-animation: breath 0.3s infinite linear;
            animation: breath 0.3s infinite linear;
  }
  .center .tongue-top {
    position: absolute;
    bottom: -15px;
    width: 30px;
    height: 30px;
    border-radius: 15px;
    background-color: #ffd7dd;
  }
  .center .line {
    position: absolute;
    top: 0;
    width: 30px;
    height: 5px;
    background-color: #fcb7bf;
  }
  .center .median {
    position: absolute;
    top: 0;
    left: 50%;
    transform: translateX(-50%);
    width: 4px;
    height: 25px;
    border-radius: 5px;
    background-color: #fcb7bf;
  }
  .center .hands {
    position: relative;
  }
  .center .hands .hand {
    position: absolute;
    top: -6px;
    display: flex;
    transition: transform 0.5s ease-in-out;
    z-index: 1;
  }
  .center .hands .hand--left {
    left: 50px;
  }
  .center .hands .hand--left.hide {
    transform: translate(2px, -155px) rotate(-160deg);
  }
  .center .hands .hand--left.peek {
    transform: translate(0px, -120px) rotate(-160deg);
  }
  .center .hands .hand--right {
    left: 170px;
  }
  .center .hands .hand--right.hide {
    transform: translate(-6px, -155px) rotate(160deg);
  }
  .center .hands .hand--right.peek {
    transform: translate(-4px, -120px) rotate(160deg);
  }
  .center .hands .finger {
    position: relative;
    z-index: 0;
  }
  .center .hands .finger .bone {
    width: 20px;
    height: 20px;
    border: 2px solid #243946;
    border-bottom: none;
    border-top: none;
    background-color: rgb(255 211 11);
  }
  .center .hands .finger .nail {
    position: absolute;
    left: 0;
    top: 10px;
    width: 20px;
    height: 18px;
    border-radius: 50%;
    border: 2px solid #243946;
    background-color: #fac555;
    z-index: -1;
  }
  .center .hands .finger:nth-child(1),
  .center .hands .finger:nth-child(3) {
    left: 4px;
    z-index: 1;
  }
  .center .hands .finger:nth-child(1) .bone,
  .center .hands .finger:nth-child(3) .bone {
    height: 10px;
  }
  .center .hands .finger:nth-child(3) {
    left: -4px;
  }
  .center .hands .finger:nth-child(2) {
    top: -5px;
    z-index: 2;
  }
  .center .hands .finger:nth-child(1) .nail,
  .center .hands .finger:nth-child(3) .nail {
    top: 0px;
  }
  .center .login {
    position: relative;
    display: flex;
    flex-direction: column;
  }
  .center .login label {
    position: relative;
    padding: 0 20px;
  }
  .center .login label .fa {
    position: absolute;
    top: 40%;
    left: 35px;
    color: #bbb;
  }
  .center .login label .fa:before {
    position: relative;
    left: 1px;
  }
  .center .login input,
  .center .login .login-button {
    width: 100%;
    height: 35px;
    border: none;
    border-radius: 30px;
  }
  .center .login input {
    padding: 0 20px 0 40px;
    margin: 5px 0;
    box-shadow: none;
    outline: none;
  }
  .center .login input::-moz-placeholder {
    color: #ccc;
  }
  .center .login input:-ms-input-placeholder {
    color: #ccc;
  }
  .center .login input::placeholder {
    color: #ccc;
  }
  .center .login input.password {
    padding: 0 90px 0 40px;
  }
  .center .login .password-button {
    position: absolute;
    top: 9px;
    right: 25px;
    display: flex;
    justify-content: center;
    align-items: center;
    width: 80px;
    height: 27px;
    border-radius: 30px;
    border: none;
    outline: none;
    background-color: #243946;
    color: #fff;
  }
  .center .login .password-button:active {
    transform: scale(0.95);
  }
  .center .login .login-button {
    width: calc(100% - 40px);
    margin: 20px 20px 0;
    outline: none;
    background-color: #243946;
    color: #fff;
    transition: transform 0.1s;
  }
  .center .login .login-button:active {
    transform: scale(0.95);
  }
  .center .social-buttons {
    display: flex;
    justify-content: center;
    margin-top: 25px;
  }
  .center .social-buttons .social {
    display: flex;
    justify-content: center;
    align-items: center;
    width: 35px;
    height: 35px;
    margin: 0 10px;
    border-radius: 50%;
    background-color: #243946;
    color: #fff;
    font-size: 18px;
  }
  .center .social-buttons .social:active {
    transform: scale(0.95);
  }
  .center .footer {
    text-align: center;
    margin-top: 15px;
  }
  @-webkit-keyframes breath {
    0%, 100% {
      transform: rotateX(0deg);
    }
    50% {
      transform: rotateX(60deg);
    }
  }
  @keyframes breath {
    0%, 100% {
      transform: rotateX(0deg);
    }
    50% {
      transform: rotateX(60deg);
    }
  }
script.js
let usernameInput = document.querySelector('.username');
let passwordInput = document.querySelector('.password');
let showPasswordButton = document.querySelector('.password-button');
let face = document.querySelector('.face');
passwordInput.addEventListener('focus', event => {
  document.querySelectorAll('.hand').forEach(hand => {
    hand.classList.add('hide');
  });
  document.querySelector('.tongue').classList.remove('breath');
});
passwordInput.addEventListener('blur', event => {
  document.querySelectorAll('.hand').forEach(hand => {
    hand.classList.remove('hide');
    hand.classList.remove('peek');
  });
  document.querySelector('.tongue').classList.add('breath');
});
usernameInput.addEventListener('focus', event => {
  let length = Math.min(usernameInput.value.length - 16, 19);
  document.querySelectorAll('.hand').forEach(hand => {
    hand.classList.remove('hide');
    hand.classList.remove('peek');
  });
  face.style.setProperty('--rotate-head', `${-length}deg`);
});
usernameInput.addEventListener('blur', event => {
  face.style.setProperty('--rotate-head', '0deg');
});
usernameInput.addEventListener('input', _.throttle(event => {
  let length = Math.min(event.target.value.length - 16, 19);
  face.style.setProperty('--rotate-head', `${-length}deg`);
}, 100));
showPasswordButton.addEventListener('click', event => {
  if (passwordInput.type === 'text') {
    passwordInput.type = 'password';
    document.querySelectorAll('.hand').forEach(hand => {
      hand.classList.remove('peek');
      hand.classList.add('hide');
    });
  } else {
    passwordInput.type = 'text';
    document.querySelectorAll('.hand').forEach(hand => {
      hand.classList.remove('hide');
      hand.classList.add('peek');
    });
  }
});
Let’s create a Job now in Jenkins
set a job name and add this pipeline
pipeline{
    agent any
    tools{
        jdk 'jdk17'
        terraform 'terraform'
    }
    environment {
        SCANNER_HOME=tool 'sonar-scanner'
    }
    stages {
        stage('clean workspace'){
            steps{
                cleanWs()
            }
        }
        stage('Checkout from Git'){
            steps{
                git branch: 'main', url: 'https://github.com/Aj7Ay/TERRAFORM-JENKINS-CICD.git'
            }
        }
        stage('Terraform version'){
             steps{
                 sh 'terraform --version'
                }
        }
        stage("Sonarqube Analysis "){
            steps{
                withSonarQubeEnv('sonar-server') {
                    sh ''' $SCANNER_HOME/bin/sonar-scanner -Dsonar.projectName=Terraform \
                    -Dsonar.projectKey=Terraform '''
                }
            }
        }
        stage("quality gate"){
           steps {
                script {
                    waitForQualityGate abortPipeline: false, credentialsId: 'Sonar-token'
                }
            }
        }
        stage('TRIVY FS SCAN') {
            steps {
                sh "trivy fs . > trivyfs.txt"
            }
        }
    }
}
stage view


we have to provide Executable permissions for our user data otherwise it won’t run.
If we run with sudo directly we will get the error
To give a user sudo permissions on an Ubuntu system, you need to add the user to the sudo group or grant them specific sudo access by editing the sudoers file. Here are two common ways to give a user sudo permissions:
Method 1: Add User to the sudo Group
- Log in to your Ubuntu system as a user with sudo privileges, or log in as the root user.
- Open a terminal.
- Run the following command to add a user (replace
<username>with the actual username) to thesudogroup - After running the command, the user will have sudo privileges. They can now execute commands with superuser privileges using
sudo.
sudo usermod -aG sudo ubuntu
sudo apt update
Method 2: Edit the sudoers File
In some cases, you may want more fine-grained control over a user’s sudo permissions. To do this, you can edit the sudoers file using the visudo command:
- Log in to your Ubuntu system as a user with sudo privileges, or log in as the root user.
- Open a terminal.
- Run the following command to edit the sudoers file:
- sudo visudo
 # User privilege specification
 ALL=(ALL:ALL) ALL
If you want to limit their sudo access to specific commands, you can specify those commands instead of ALL.
Save and exit the text editor. On most systems, you can save and exit visudo by pressing Ctrl + X, followed by Y, and then Enter.
After completing one of these methods, the user should have sudo permissions and can run commands with superuser privileges using sudo. Make sure to exercise caution when granting sudo access to users, as it can provide them with significant control over the system.
After granting sudo permissions to a user on a Ubuntu system, you do not need to restart the system for the changes to take effect. The user can immediately start using sudo to run commands with superuser privileges.
To test whether the user can use sudo, you can simply open a terminal and have the user run a command with sudo. For example:
sudo apt update
If the user is prompted for their password and the command executes without errors, it means that the sudo permissions have been successfully granted and applied.
There is no need to restart the system to apply changes to sudo permissions.
Now add the below stages to your pipeline
stage('Excutable permission to userdata'){
            steps{
                sh 'chmod 777 website.sh'
            }
        }
        stage('Terraform init'){
            steps{
                sh 'terraform init'
            }
        }
        stage('Terraform plan'){
            steps{
                sh 'terraform plan'
            }
        }
stage view

if you want to add a security check for terraform files that also works fine but if we use that now we will get so many errors. coz we just wrote simple terraform files that’s why it throws errors. we have aqua tfsec and checkov for terraform scan.
install aqua security tfsec
curl -s https://raw.githubusercontent.com/aquasecurity/tfsec/master/scripts/install_linux.sh | bash

Add this stage. For this project, our learning purpose isn’t recommended.
stage('Trivy terraform scan'){
    steps{
        sh 'tfsec . --no-color'
       }
   }

Let’s continue without that step.
Add this stage to the pipeline
stage('Terraform apply'){
            steps{
                sh 'terraform apply --auto-approve'
            }
        }
you will succeed but I want to do this with build parameters to apply and destroy while building only.
you have to add this inside job like below image

stage('Terraform apply'){
            steps{
                sh 'terraform ${action} --auto-approve'
            }
        }

While at apply stage it automatically takes apply option and creates infrastructure in AWS and runs containers

Now copy the newly created Instance Ip address
#zomato app container

#netflix container

check s3 bucket is created or not


Check your s3 bucket for the tf state file with the name main

Let’s Destroy everything

while at the apply stage, it automatically takes the destroy option and deletes everything that we created till now.


If you find this blog Helpful make sure to give a like and subscribe.
complete pipeline
pipeline{
    agent any
    tools{
        jdk 'jdk17'
        terraform 'terraform'
    }
    environment {
        SCANNER_HOME=tool 'sonar-scanner'
    }
    stages {
        stage('clean workspace'){
            steps{
                cleanWs()
            }
        }
        stage('Checkout from Git'){
            steps{
                git branch: 'main', url: 'https://github.com/Aj7Ay/TERRAFORM-JENKINS-CICD.git'
            }
        }
        stage('Terraform version'){
             steps{
                 sh 'terraform --version'
                }
        }
        stage("Sonarqube Analysis "){
            steps{
                withSonarQubeEnv('sonar-server') {
                    sh ''' $SCANNER_HOME/bin/sonar-scanner -Dsonar.projectName=Terraform \
                    -Dsonar.projectKey=Terraform '''
                }
            }
        }
        stage("quality gate"){
           steps {
                script {
                    waitForQualityGate abortPipeline: false, credentialsId: 'Sonar-token'
                }
            }
        }
        stage('TRIVY FS SCAN') {
            steps {
                sh "trivy fs . > trivyfs.txt"
            }
        }
        stage('Excutable permission to userdata'){
            steps{
                sh 'chmod 777 website.sh'
            }
        }
        stage('Terraform init'){
            steps{
                sh 'terraform init'
            }
        }
        stage('Terraform plan'){
            steps{
                sh 'terraform plan'
            }
        }
        stage('Terraform apply'){
            steps{
                sh 'terraform ${action} --auto-approve'
            }
        }
    }
}
Comments (2)
Great stuff, as a junior devopps, what tools am I required to be proficient in?
AI, Docker and Kubernetes and Security and Network
Leave a comment