Open-source collaborative
wiki and documentation software
Create, collaborate, and share knowledge seamlessly with Docmost.
Ideal for managing your wiki, knowledge-base, documentation and a lot more.
Docmost is an open-source collaborative wiki and documentation software. It is an open-source alternative to Confluence and Notion.
Features
- Real-time collaboration
- Diagrams (Draw.io, Excalidraw and Mermaid)
- Spaces
- Permissions management
- Groups
- Comments
- Page history
- Search
- File attachment
Prerequisites:
- AWS Account: To get started, you’ll need an active AWS account. Ensure that you have access and permission to create and manage AWS resources.
- DNS hostname required ( Https ) —> Traefik
- IAM User and Key Pair: Create an IAM (Identity and Access Management) user with the necessary permissions to provision resources on AWS. Additionally, generate an IAM Access Key and Secret Access Key for programmatic access. Ensure that you securely manage these credentials.
- S3 Bucket: Set up an S3 bucket to store your files. This bucket is crucial.
- SMTP credentials
Now, let’s get started and dig deeper into each of these steps:-
1. AWS Account and Login
- If you don’t have an AWS account, sign up at AWS Sign Up.
- Log in to the AWS Management Console.
2. Launch an EC2 Instance
- Go to the EC2 Dashboard.
B. Choose an Amazon Machine Image (AMI):
- Click “Launch Instance.”
- In the AMI selection screen, search for “Ubuntu 24.04”.
C. Choose an Instance Type:
- Select the
t2.largeinstance type. - Click “Next: Configure Instance Details.”
D. Configure Instance Details:
- Use the default settings.
- Ensure you have selected the correct VPC and subnet.
- Click “Next: Add Storage.”
E. Add Storage:
- Modify the root volume size to 30 GB.
- Click “Next: Add Tags.”
F. Add Tags:
- (Optional) Add tags for better management.
- Click “Next: Configure Security Group.”
G. Configure Security Group:
- Create a new security group.
- Set the security group name and description.
- Add a rule to allow all traffic (not recommended for production environments):
- Type: All Traffic
- Protocol: All
- Port Range: All
- Port Range : 22, 80, 443, 8080, 9000
- Source: 0.0.0.0/0 (for IPv4) and ::/0 (for IPv6)
- Warning: Opening all ports is insecure and should only be done for learning purposes in a controlled environment.
- Click “Review and Launch.”
H. Select/Create a Key Pair:
- Select “Create a new key pair.”
- Name the key pair.
- Download the key pair file (.pem) and store it securely.
- Click “Launch Instances.”
I. Review Instance Launch:
- Review all configurations.
- Click “Launch.”

Install Jenkins, Docker and Trivy
To Install Jenkins
Connect to your console, and enter these commands to Install Jenkins.
vi jenkins.sh#!/bin/bash
sudo apt update -y
wget -O - https://packages.adoptium.net/artifactory/api/gpg/key/public | sudo tee /etc/apt/keyrings/adoptium.asc
echo "deb [signed-by=/etc/apt/keyrings/adoptium.asc] https://packages.adoptium.net/artifactory/deb $(awk -F= '/^VERSION_CODENAME/{print$2}' /etc/os-release) main" | sudo tee /etc/apt/sources.list.d/adoptium.list
sudo apt update -y
sudo apt install temurin-17-jdk -y
/usr/bin/java --version
curl -fsSL https://pkg.jenkins.io/debian-stable/jenkins.io-2023.key | sudo tee /usr/share/keyrings/jenkins-keyring.asc > /dev/null
echo deb [signed-by=/usr/share/keyrings/jenkins-keyring.asc] https://pkg.jenkins.io/debian-stable binary/ | sudo tee /etc/apt/sources.list.d/jenkins.list > /dev/null
sudo apt-get update -y
sudo apt-get install jenkins -y
sudo systemctl start jenkins
sudo systemctl status jenkinssudo chmod 777 jenkins.sh
sudo su #move into root and run
./jenkins.sh # this will installl jenkinsOnce Jenkins is installed, you will need to go to your AWS EC2 Security Group and open Inbound Port 8080, since Jenkins works on Port 8080.
Now, grab your Public IP Address
EC2 Public IP Address:8080
# In Jenkins server
sudo cat /var/lib/jenkins/secrets/initialAdminPassword
Unlock Jenkins using an administrative password and install the suggested plugins. Jenkins will now get installed and install all the libraries.
 Create a user click on save and continue.Jenkins Getting Started Screen.
Install Docker
# Add Docker's official GPG key:
sudo apt-get update
sudo apt-get install ca-certificates curl
sudo install -m 0755 -d /etc/apt/keyrings
sudo curl -fsSL https://download.docker.com/linux/ubuntu/gpg -o /etc/apt/keyrings/docker.asc
sudo chmod a+r /etc/apt/keyrings/docker.asc

# Add the repository to Apt sources:
echo \
  "deb [arch=$(dpkg --print-architecture) signed-by=/etc/apt/keyrings/docker.asc] https://download.docker.com/linux/ubuntu \
  $(. /etc/os-release && echo "$VERSION_CODENAME") stable" | \
  sudo tee /etc/apt/sources.list.d/docker.list > /dev/null
sudo apt-get update
sudo apt-get install docker-ce docker-ce-cli containerd.io docker-buildx-plugin docker-compose-plugin
After the docker installation, we create a sonarqube container (Remember to add 9000 ports in the security group).
sudo chmod 777 /var/run/docker.sock
docker run -d --name sonar -p 9000:9000 sonarqube:lts-community
Now our Sonarqube is up and running

Enter username and password, click on login and change password
username admin
password admin
Update New password, This is Sonar Dashboard.

Install Trivy
vi script.shsudo apt-get install wget apt-transport-https gnupg lsb-release
wget -qO - https://aquasecurity.github.io/trivy-repo/deb/public.key | sudo apt-key add -
echo deb https://aquasecurity.github.io/trivy-repo/deb $(lsb_release -sc) main | sudo tee -a /etc/apt/sources.list.d/trivy.list
sudo apt-get update
sudo apt-get install trivy -yGive permissions and run script
sudo chmod 777 script.sh
./script.sh
Install Plugins like JDK, Sonarqube Scanner, NodeJs, OWASP Dependency Check
Install Plugin
Goto Manage Jenkins →Plugins → Available Plugins →
Install below plugins
1 → Eclipse Temurin Installer
2 → SonarQube Scanner
3 → NodeJs Plugin
4 → Docker
5 → Docker commons
6 → Docker pipeline
7 → Docker API
8 → Docker Build step
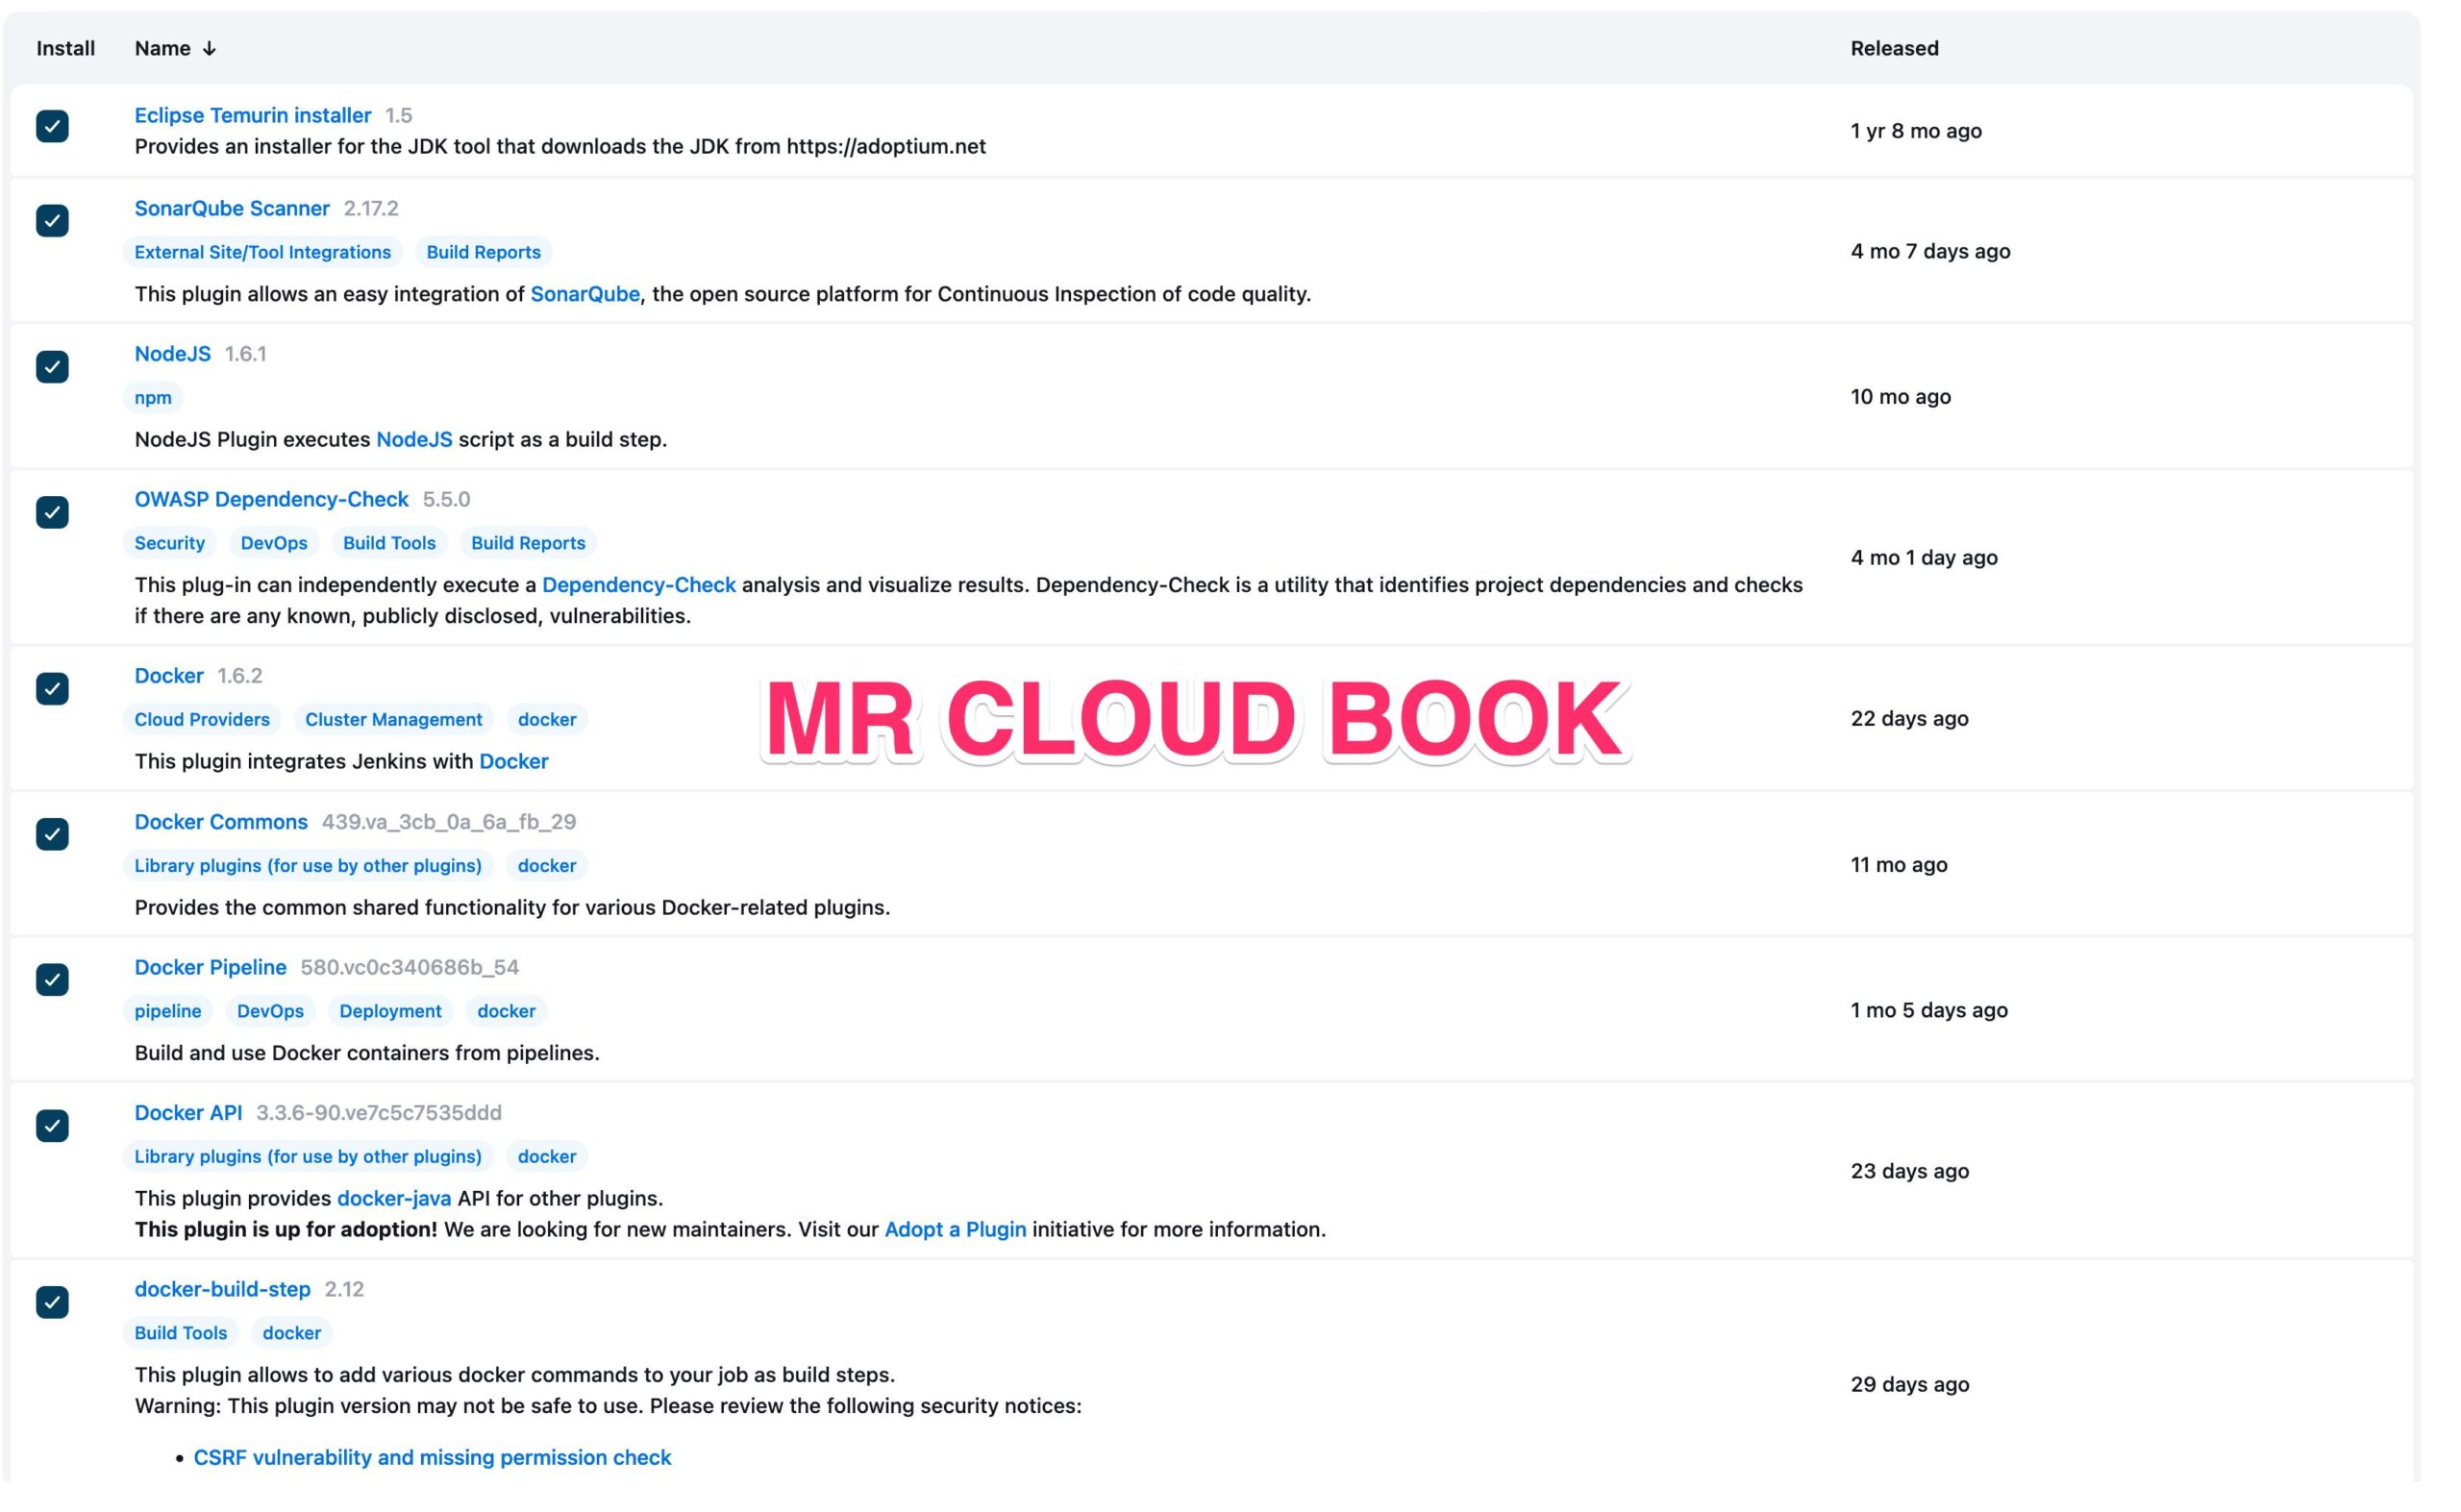
Configure Java and Nodejs in Global Tool Configuration
Goto Manage Jenkins → Tools → Install JDK(17) and NodeJs(18)→ Click on Apply and Save


Grab the Public IP Address of your EC2 Instance, Sonarqube works on Port 9000, so <Public IP>:9000. Goto your Sonarqube Server.
server-ip:9000 ( sonarqube server )Click on Administration → Security → Users → Click on Tokens and Update Token → Give it a name → and click on Generate Token

click on update Token

Create a token with a name and generate

copy Token
Go to Jenkins Dashboard → Manage Jenkins → Credentials → Add Secret Text. It should look like this

You will this page once you click on create

Now, go to Dashboard → Manage Jenkins → System and Add like the below image.
Search for SonarQube Installation

Click on Apply and Save
The Configure System option is used in Jenkins to configure different server
Global Tool Configuration is used to configure different tools that we install using Plugins
We will install a sonar scanner in the tools.
Manage Jenkins –> Tools –> SonarQube Scanner

In the Sonarqube Dashboard add a quality gate also
Administration–> Configuration–>Webhooks

Click on Create

Add details
#in url section of quality gate
http://jenkins-public-ip:8080/sonarqube-webhook/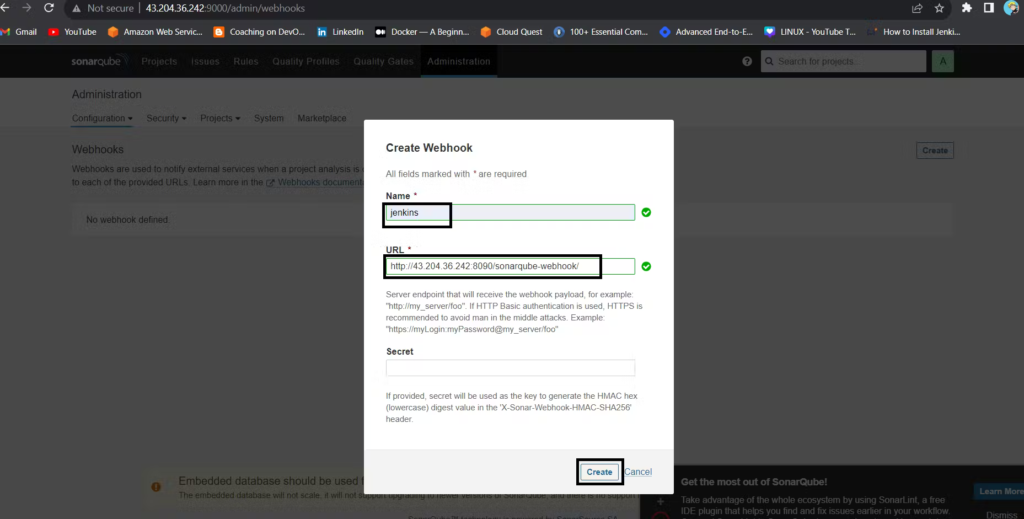
Create an IAM user
Navigate to the AWS console
Click the “Search” field.

Search for IAM

Click “Users”

Click “Add users”

Click the “User name” field.

Type “Docmost” or as you wish about the name
Click Next

Click “Attach policies directly”

Click this checkbox with Administrator access or Give only S3 access

Click “Next”

Click “Create user”

Click newly created user in my case Ajay

Click “Security credentials”

Click “Create access key”

Click this radio button with the CLI

Agree to terms

Click Next

Click “Create access key”

Download .csv file

Create an S3 bucket with simple basic settings
Search for S3 in console
Click “Create bucket”

Click the “Bucket name” field, ACL’s enabled

Nothing to change, keep the remaining default.
Click “Create bucket”, Bucket will be created.

SMTP Email Credentials
Go to your Gmail and click on your profile
Then click on Manage Your Google Account –> click on the security tab on the left side panel you will get this page(provide mail password).
2-step verification should be enabled.
Search for the app in the search bar you will get app passwords like the below image
Click on other and provide your name and click on Generate and copy the password
In the new update, you will get a password like this
Add IP to Hostinger or any DNS provider
Add Ip in A record and use @
If you have issues check video from Here (33 :15 sec ) –> https://youtu.be/ZXJu_kQKxyM
Update the Required values into a env_file.txt
Sample ENV File
Please this command for APP_SECRET in .env
openssl rand -hex 32# your domain, e.g https://example.com
APP_URL=
PORT=3000
# make sure to replace this.
APP_SECRET=
JWT_TOKEN_EXPIRES_IN=30d
DATABASE_URL="postgresql://docmost:STRONG_DB_PASSWORD@db:5432/docmost?schema=public"
REDIS_URL=redis://redis:6379
# options: local | s3
STORAGE_DRIVER=s3
# S3 driver config
AWS_S3_ACCESS_KEY_ID=
AWS_S3_SECRET_ACCESS_KEY=
AWS_S3_REGION=
AWS_S3_BUCKET=
#AWS_S3_ENDPOINT=https://ap-south-1.console.aws.amazon.com/
AWS_S3_FORCE_PATH_STYLE=false
# options: smtp | postmark
MAIL_DRIVER=smtp
MAIL_FROM_ADDRESS=
MAIL_FROM_NAME=Docmost
# SMTP driver config
SMTP_HOST=smtp.gmail.com
SMTP_PORT=465
SMTP_USERNAME=
SMTP_PASSWORD=
SMTP_SECURE=true
SMTP_IGNORETLS=falseGo to Jenkins Dashboard → Manage Jenkins → Credentials → Add Secret file.
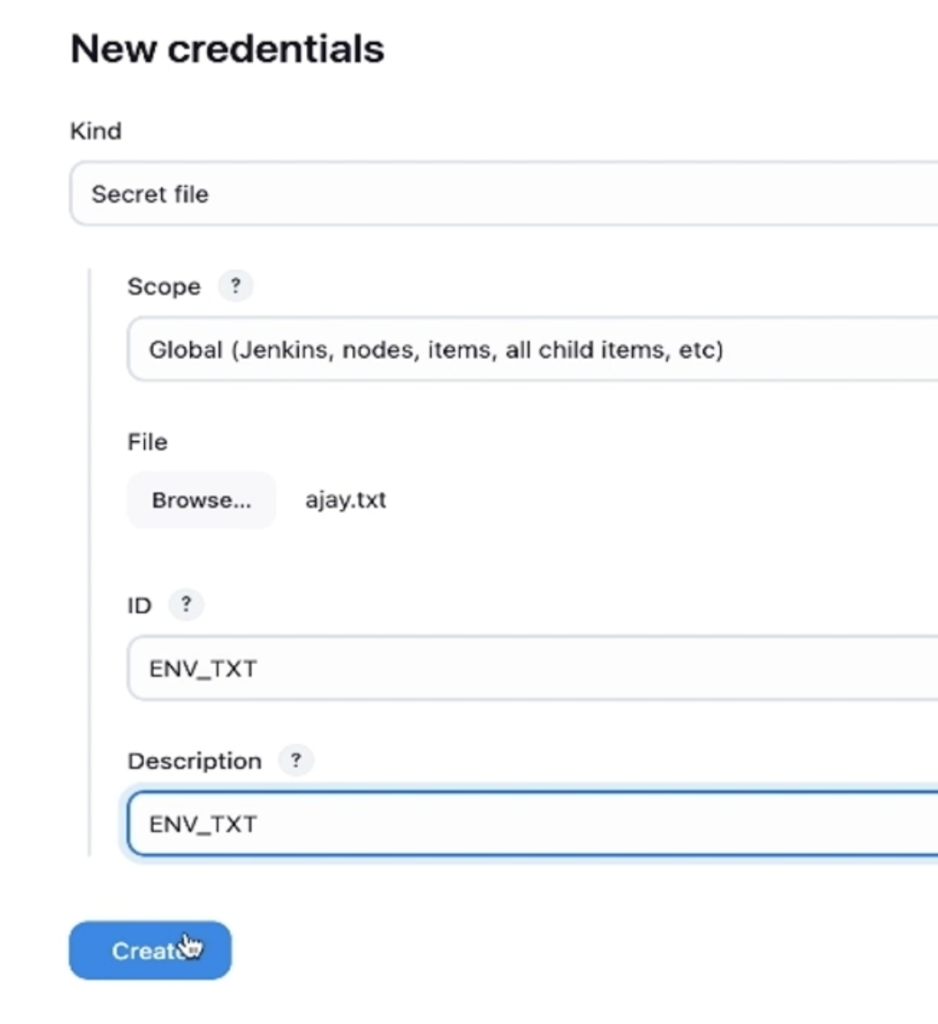
Create a new pipeline
Goto Dashboard on Jenkins and Click on + New item
Docmost –> Pipeline and Click on Ok
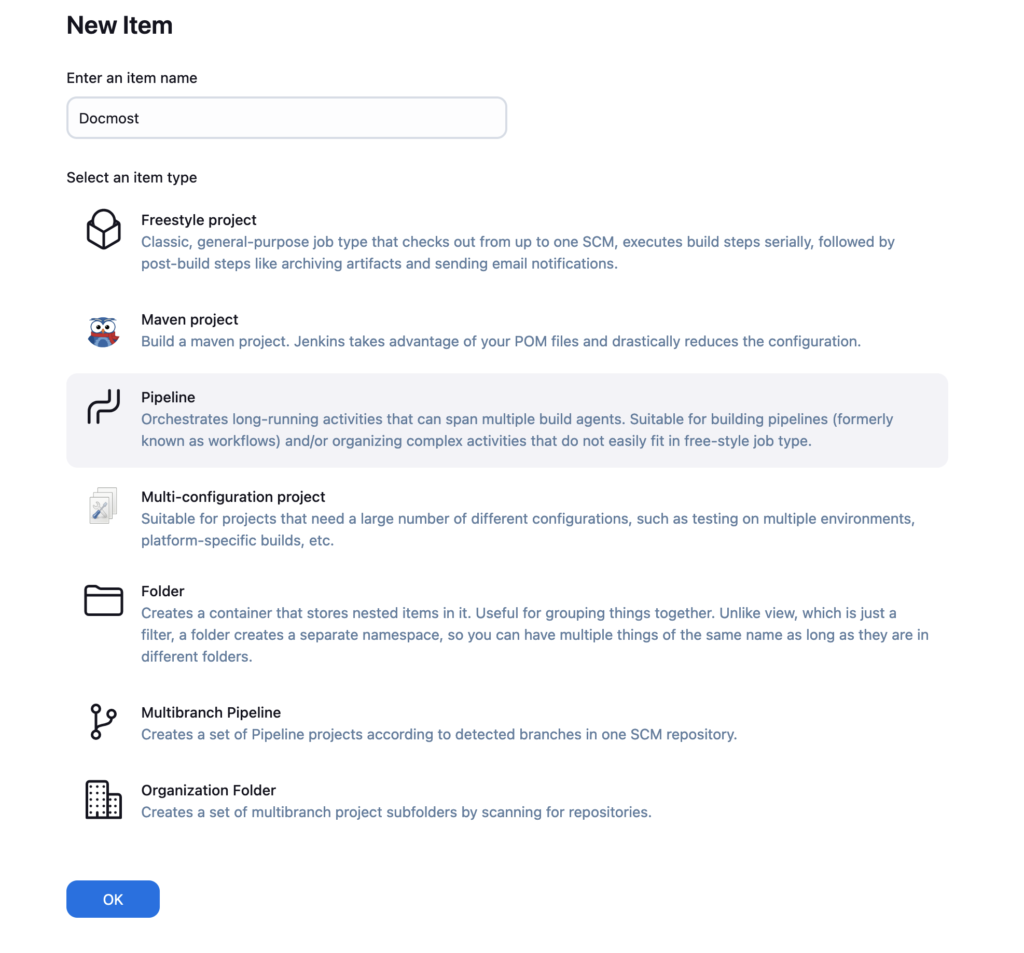
Add this Pipeline and run
pipeline{
    agent any
    tools{
        jdk 'jdk17'
        nodejs 'node18'
    }
    environment {
        SCANNER_HOME=tool 'sonar-scanner'
    }
    stages {
        stage('Checkout from Git'){
            steps{
                git branch: 'main', url: 'https://github.com/Aj7Ay/docmost-notion.git'
            }
        }
        stage('Prepare Environment') {
        	steps {
            	withCredentials([file(credentialsId: 'env-file-id', variable: 'ENV_FILE')]) {
                	script {
                    	sh "mv \$ENV_FILE .env"
                	}
            	}
        	}
    	}

        stage('Install Dependencies') {
            steps {
                sh "npm install -g pnpm"
                sh "pnpm install --frozen-lockfile"
            }
        }
        stage("Sonarqube Analysis "){
            steps{
                withSonarQubeEnv('sonar-server') {
                    sh ''' $SCANNER_HOME/bin/sonar-scanner -Dsonar.projectName=Docmost \
                    -Dsonar.projectKey=Docmost '''
                }
            }
        }
        stage("quality gate"){
           steps {
                script {
                    waitForQualityGate abortPipeline: false, credentialsId: 'Sonar-token'
                }
            }
        }
        stage('TRIVY FS SCAN') {
            steps {
                sh "trivy fs . > trivyfs.json"
            }
        }
        stage("TRIVY Image scan"){
            steps{
                sh "trivy image docmost/docmost:latest > trivy.json"
            }
        }
        stage ("Create docker Network") {
            steps{
                sh "docker network create web"
             }
        }
        stage('Deploy'){
            steps{
                sh 'docker compose -f docker-compose.yml up -d'
            }
        }
    }
}
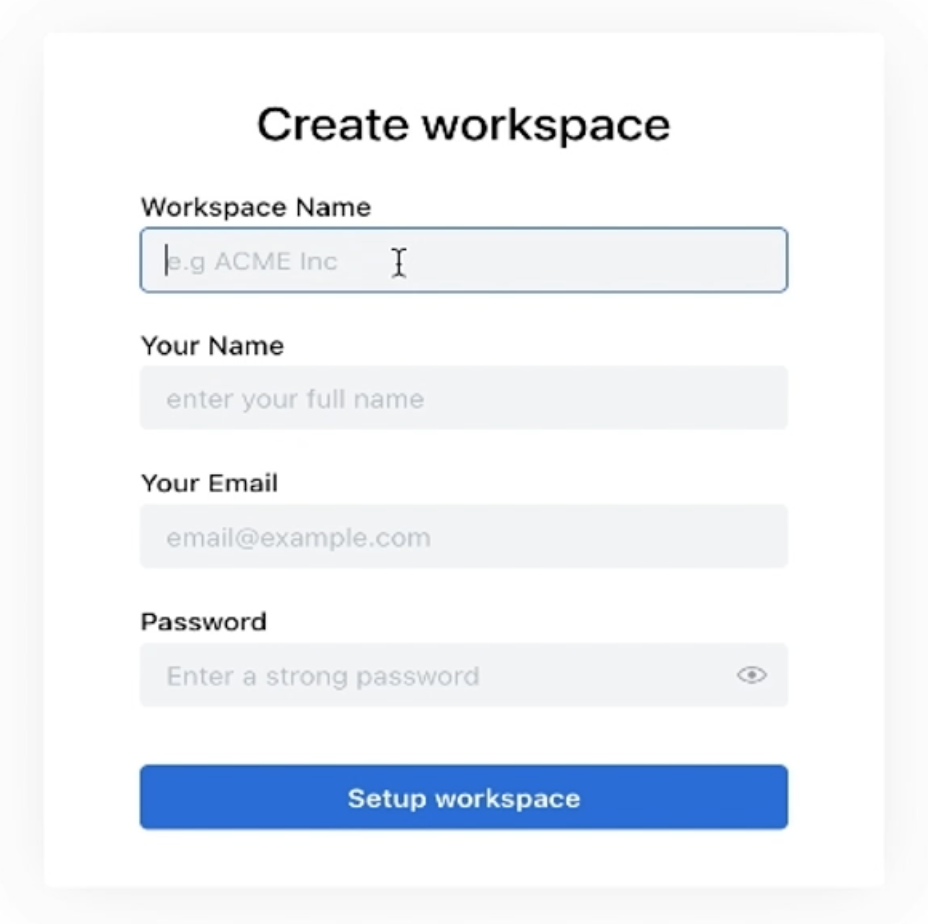
Output
Termination process
- Make compose down
- Remove IAM keys
- Remove S3 bucket
- Remove Email credentials
- Remove the Server
Leave a Reply