
I’ve been running containers in production for 4 years, and I’ll be real with you: Docker’s default configuration is terrifyingly permissive. It’s one of those tools that makes the right thing feel easy and the dangerous thing feel easy too - sometimes easier.
This isn’t a scare piece. It’s a practical breakdown of how Docker actually works, where the sharp edges are, and what you can do about them. We’ll go hands-on for every concept. By the end, you’ll understand exactly what you’re allowing when you add someone to the docker group or mount a socket into a container.
Notice: The privilege escalation and breakout techniques in this post are for educational purposes only. Run them in isolated lab environments you own. Don’t be that person.
Docker Is a Client/Server App - and That Changes Everything
Most people think of Docker as a command-line tool that runs containers. That’s only half the story. The docker command you type is just a client. All the real work happens in a background daemon - dockerd - which your client talks to over an HTTP REST API.
Why does this matter?
Because every Docker command is essentially an authenticated (or unauthenticated) HTTP request to a privileged server. And that server can run your code, mount your filesystem, and - by default - is owned by root.
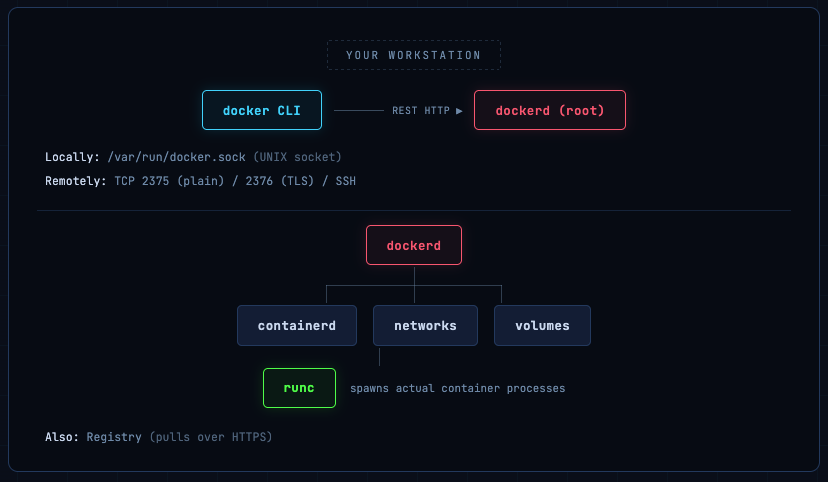
Three communication paths exist:
- UNIX socket (default):
/var/run/docker.sock - local only, permission-controlled
- TCP (network):
Plain on port 2375, TLS on 2376 - exposes Docker to the network
- SSH:
Tunnel Docker commands through SSH - often the safest remote option
Install Docker on Ubuntu
# Add Docker's official GPG key:
sudo apt update
sudo apt install ca-certificates curl
sudo install -m 0755 -d /etc/apt/keyrings
sudo curl -fsSL https://download.docker.com/linux/ubuntu/gpg -o /etc/apt/keyrings/docker.asc
sudo chmod a+r /etc/apt/keyrings/docker.asc

# Add the repository to Apt sources:
sudo tee /etc/apt/sources.list.d/docker.sources <<EOF
Types: deb
URIs: https://download.docker.com/linux/ubuntu
Suites: $(. /etc/os-release && echo "${UBUNTU_CODENAME:-$VERSION_CODENAME}")
Components: stable
Signed-By: /etc/apt/keyrings/docker.asc
EOF

sudo apt update
- Install the Docker packages.
sudo apt install docker-ce docker-ce-cli containerd.io docker-buildx-plugin docker-compose-plugin -y
Seeing the Wire: Inspecting Daemon Traffic with socat
Install socat on Ubuntu
sudo apt install socat -y
Want proof that it’s really just HTTP? Here’s a quick trick using socat to proxy the Docker socket and watch every request/response fly by. Open two terminals.
Terminal 1 - Create a proxy socket
- Connect to your server or use local machine in two different terminals
# Forward traffic from a temp socket → real docker socket, verbosely
socat -v UNIX-LISTEN:/tmp/tempdock.sock,fork UNIX-CONNECT:/var/run/docker.sock
Terminal 2 - Point Docker CLI at the proxy
docker -H unix:///tmp/tempdock.sock images
Back in Terminal 1, you’ll see the raw HTTP exchange - a HEAD /_ping health check followed by a GET /v1.51/images/json:
HEAD /_ping HTTP/1.1
Host: api.moby.localhost
User-Agent: Docker-Client/28.5.2 (linux)

HTTP/1.1 200 OK
Api-Version: 1.51
Server: Docker/28.5.2 (linux)

GET /v1.51/images/json HTTP/1.1

HTTP/1.1 200 OK
Content-Length: 3
[]
This is powerful for debugging. You can use the same technique to inspect what Compose, Kubernetes, or any tooling is actually doing to your daemon - great for auditing and troubleshooting.
Under the Hood: containerd, runc, and Their Sockets
Docker is not a monolith. There’s a layered stack under the hood, and each layer has its own attack surface:
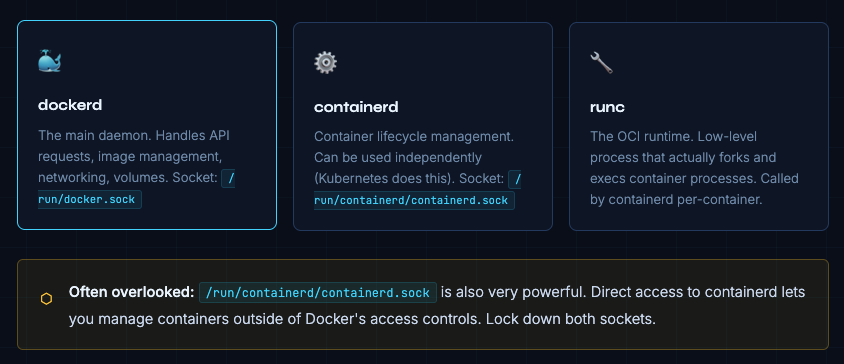
Docker’s Attack Surface: It’s Mostly the Socket
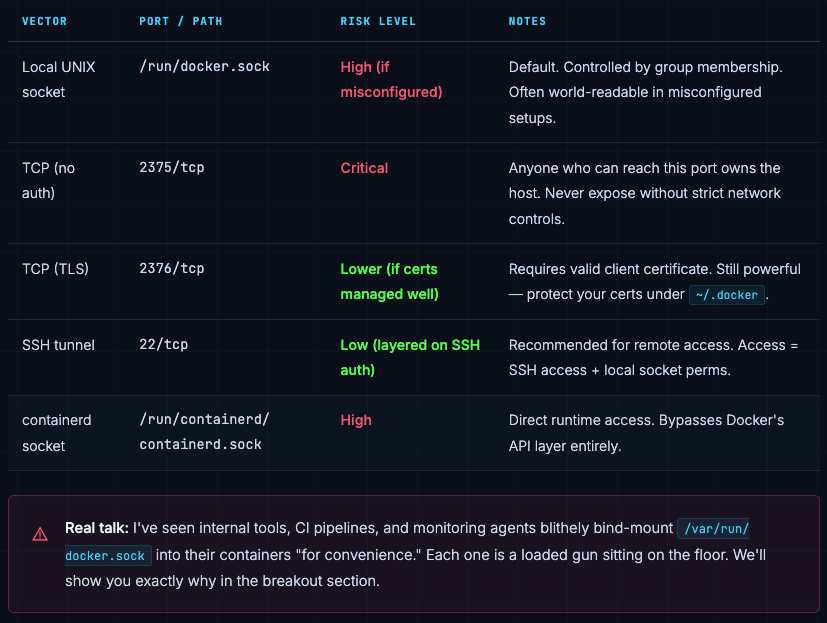
The primary attack surface is simple: whoever can talk to the Docker socket controls the host. That’s it. Everything else is downstream of that.
How Docker Controls Who Gets In
Local: It’s Just File Permissions
For local access, authentication is file-system permission on the socket. Check it:
ls -al /run/docker.sock
srw-rw---- 1 root docker 0 Mar 5 09:00 /run/docker.sock

Owner: root. Group: docker. Mode: 660. So any user in the docker group can use the socket - and as we’ll see, that means they can get root. Treat docker group membership like sudo access. Because it is.
Remote: TLS Client Certificates
When the daemon is exposed over TCP with --tlsverify, clients must present a valid certificate signed by your CA. Certificates typically live in ~/.docker. Protect that directory - anyone with those files can connect to your remote daemon.
Remote: SSH (Preferred)
Docker supports tunneling over SSH natively. Set DOCKER_HOST=ssh://user@host and Docker will connect via SSH, then talk to the local socket on the remote host. Access control is then simply “who has SSH access.” No ports to expose. No certs to manage. For most teams, this is the better answer.

Authorization: Docker’s Awkward Gap
Here’s something that surprises a lot of people: once you have access to the Docker socket, you can do everything. There’s no built-in fine-grained authorization. It’s binary: you can use Docker, or you can’t.
Authorization plugins exist (notably OPA-based ones), but they’re rarely deployed in practice. The real-world advice:
- Treat the Docker socket as a root-equivalent privilege boundary - because it is
- Audit who’s in the docker group regularly
- For multi-tenant workloads, consider Kubernetes RBAC instead, or use rootless Docker per-user
- Authorization plugins are an option if you need granularity, but add operational complexity
Container Process Security: The User Inside Matters
Containers are just processes on the host. The user identity inside the container is the user identity the process runs as on the host - at least in the default “rootful” Docker setup. This is a big deal.
Running as Root (Default)
Run a simple webserver that runs as root inside the container:
docker run -d --name=rootwebserver ctrsec/swc
On the host, the process shows as root:
ps -fC simple-webserver
Example output:
UID          PID    PPID  C STIME TTY          TIME CMD

root        1583    1556  1 14:43 ?        00:00:00 /simple-webserver
Stop the container:
docker stop rootwebserver
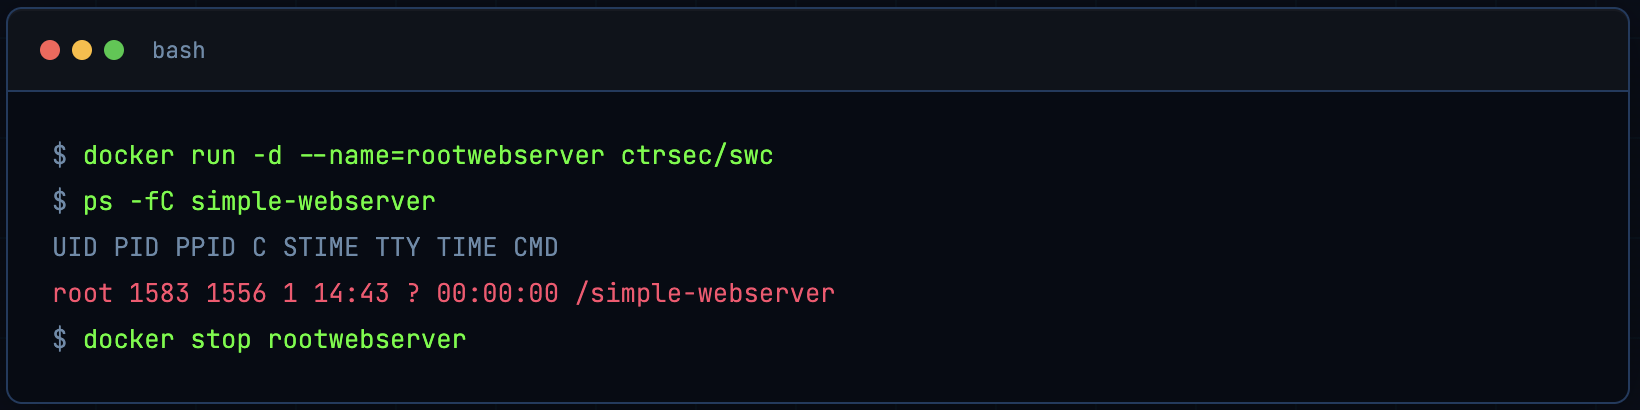
See that? root on the host. If this process has any vulnerability - a memory corruption bug, a path traversal - the attacker is operating as root on your host machine.
Running as a Non-Root User
Images can use the USER directive so the process runs as a non-root UID. Example with ctrsec/swcnr (runs as UID 3456):
docker run -d --name=nonrootwebserver ctrsec/swcnr
ps -fC simple-webserver
Example output:
UID          PID    PPID  C STIME TTY          TIME CMD

3456        1711    1684  1 14:43 ?        00:00:00 /simple-webserver
Stop it:
docker stop nonrootwebserver
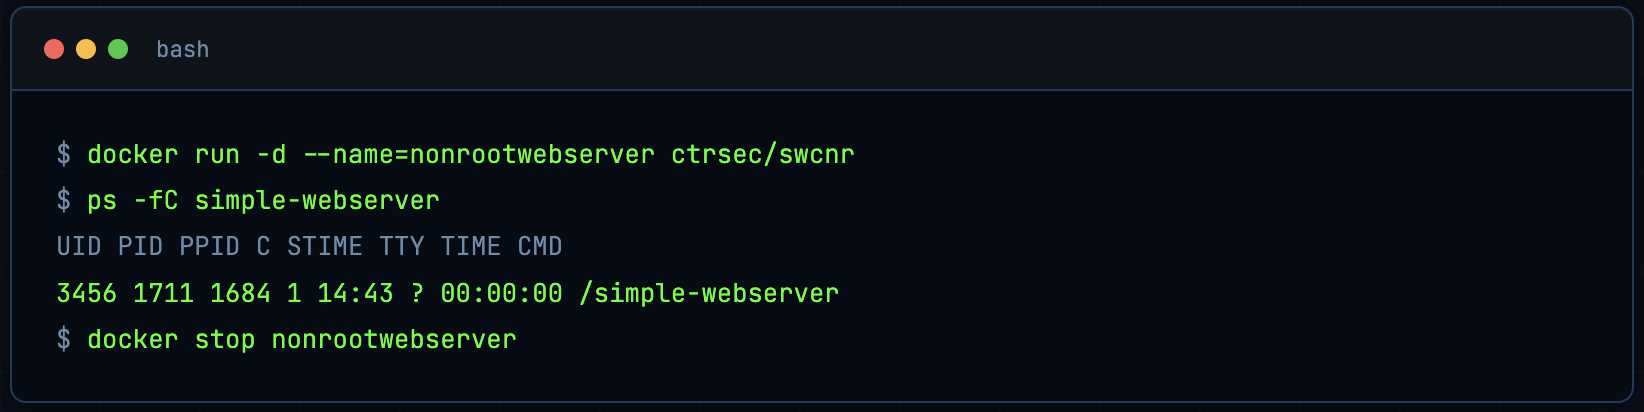
Much better. UID 3456 has no special host privileges. A compromised process here has far less blast radius.
From Docker Group to Root in One Command
Anyone who can run Docker commands (e.g. via the socket) can get root on the host. One standard way is sometimes called “the most pointless Docker command ever.”
Check current user:
whoami
Run a container that effectively gives you a root shell on the host:
docker run -ti --privileged --net=host --pid=host --ipc=host --volume /:/host busybox chroot /host
Inside the container, whoami is now root. Docker’s isolation can be removed by anyone who can run Docker.
When done, type exit to leave the container and return to your normal user.
This is sometimes called “the most pointless Docker command ever” - but it perfectly demonstrates the problem. If you have access to the Docker socket, getting root on the host is trivial:
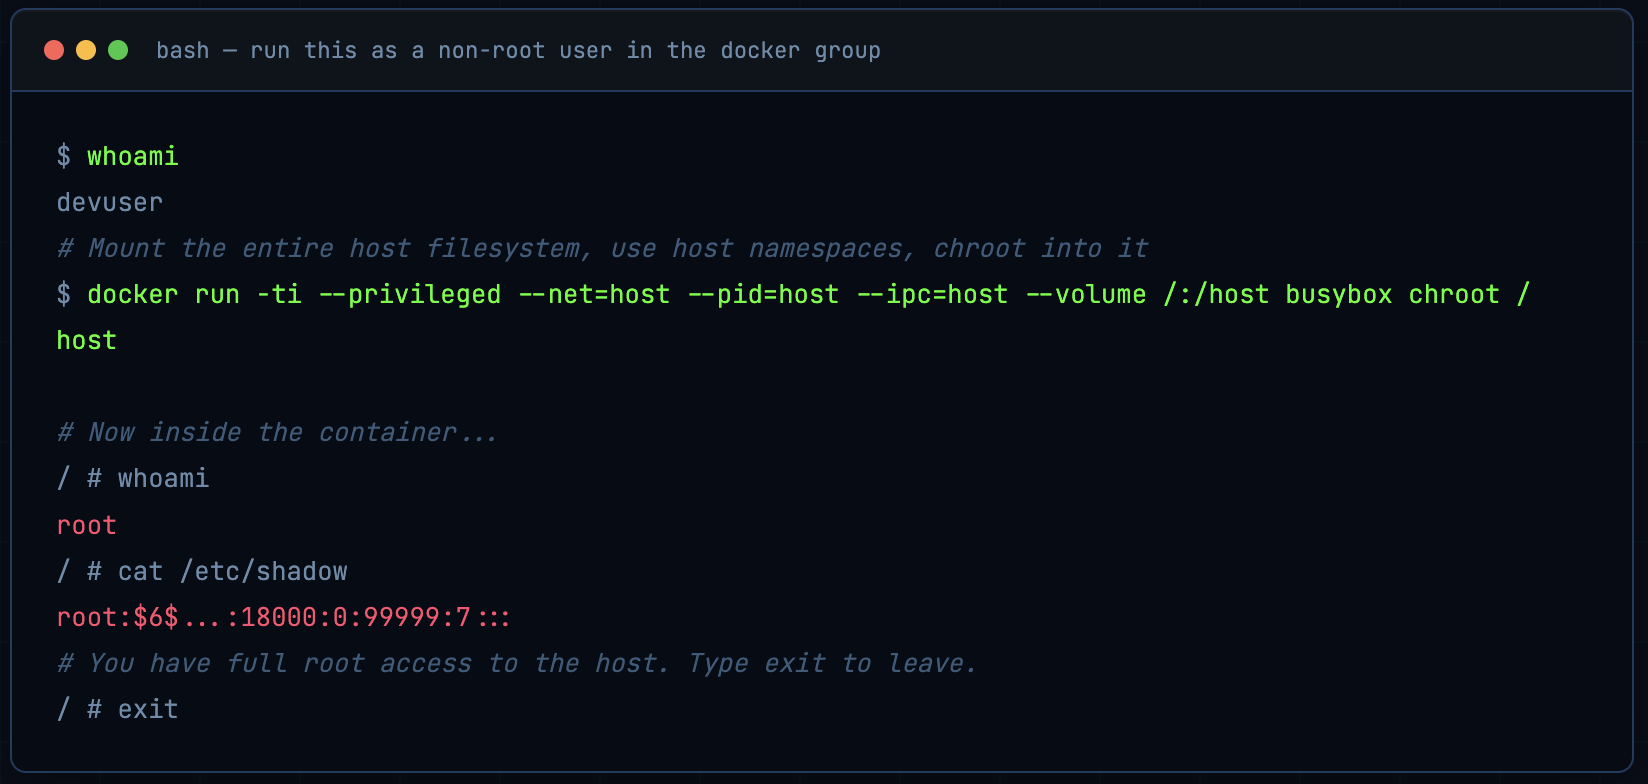
Let that sink in. A non-root user with Docker socket access can become root on the host in seconds. No exploits. No CVEs. Just Docker working exactly as designed.

The perils of --privileged
The --privileged flag in that command is critical: it drops most of Docker’s default protections (device access, capabilities, etc.). Combined with host namespaces and bind-mounting /, it gives effective host root.
The --privileged Flag: Just Don’t
Let’s unpack what --privileged actually does, because it’s disturbingly common in tutorials and CI pipelines:
- Drops all capability restrictions the container gets every Linux capability (
CAP_SYS_ADMIN,CAP_NET_ADMIN, etc.) - Disables seccomp filtering all syscalls are permitted
- Disables AppArmor/SELinux profiles LSM protections removed
- Full access to host devices including
/dev/sda,/dev/mem, etc. - Can mount filesystems including the host’s own filesystem
- Can load kernel modules allowing deep kernel modification
Combined with --net=host, --pid=host, and a bind mount of /, it’s complete, unconditional host takeover.

If a container needs specific elevated permissions, grant only what it needs:
# Instead of --privileged, grant only the capabilities you need
docker run --cap-drop=ALL --cap-add=NET_BIND_SERVICE nginx
# Or for network packet capturing:
docker run --cap-add=NET_RAW --cap-add=NET_ADMIN your-capture-tool
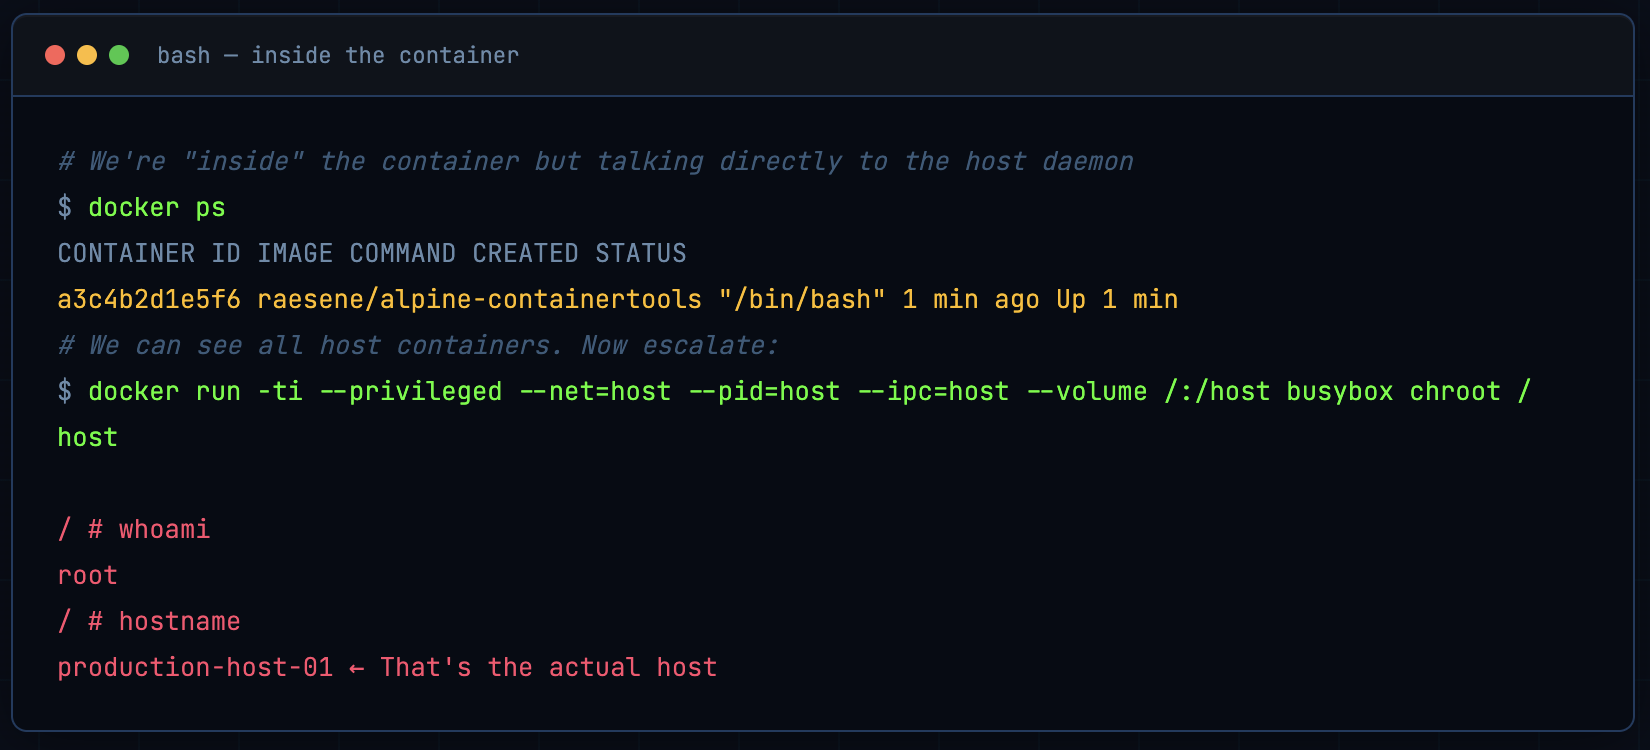
The Docker Socket in a Container: Instant Breakout
This is the one that keeps me up at night. I’ve audited real production systems where the Docker socket was mounted into containers “so the container could manage other containers.” It’s a CI/CD pattern that’s everywhere - and it’s catastrophic from a security perspective.
Mounting the Docker socket into a container gives that container root on the host. Full stop. Here’s the exact attack chain:
Step 1 - Run a container with socket access
docker run -it -v /var/run/docker.sock:/var/run/docker.sock raesene/alpine-containertools /bin/bash

Step 2 - From inside the container, list host containers
This image includes the Docker client. From inside the container you can run Docker commands on the host, e.g.:
docker ps
Escalate to host root from inside the container
From inside that container, run the same “pointless” command:
docker run -ti --privileged --net=host --pid=host --ipc=host --volume /:/host busybox chroot /host
You now have a root shell on the host (in another container). Type exit once to leave the chroot container, then exit again to leave the first container and return to the host.
Alternative
Rootless Docker: The Right Direction
Everything we’ve seen so far stems from one root cause (pun intended): the Docker daemon runs as root. Rootless Docker changes that - the daemon runs as an unprivileged user, and user namespaces map container UIDs to unprivileged host UIDs.
This doesn’t make Docker invincible, but it significantly reduces the blast radius of socket access and container breakout.
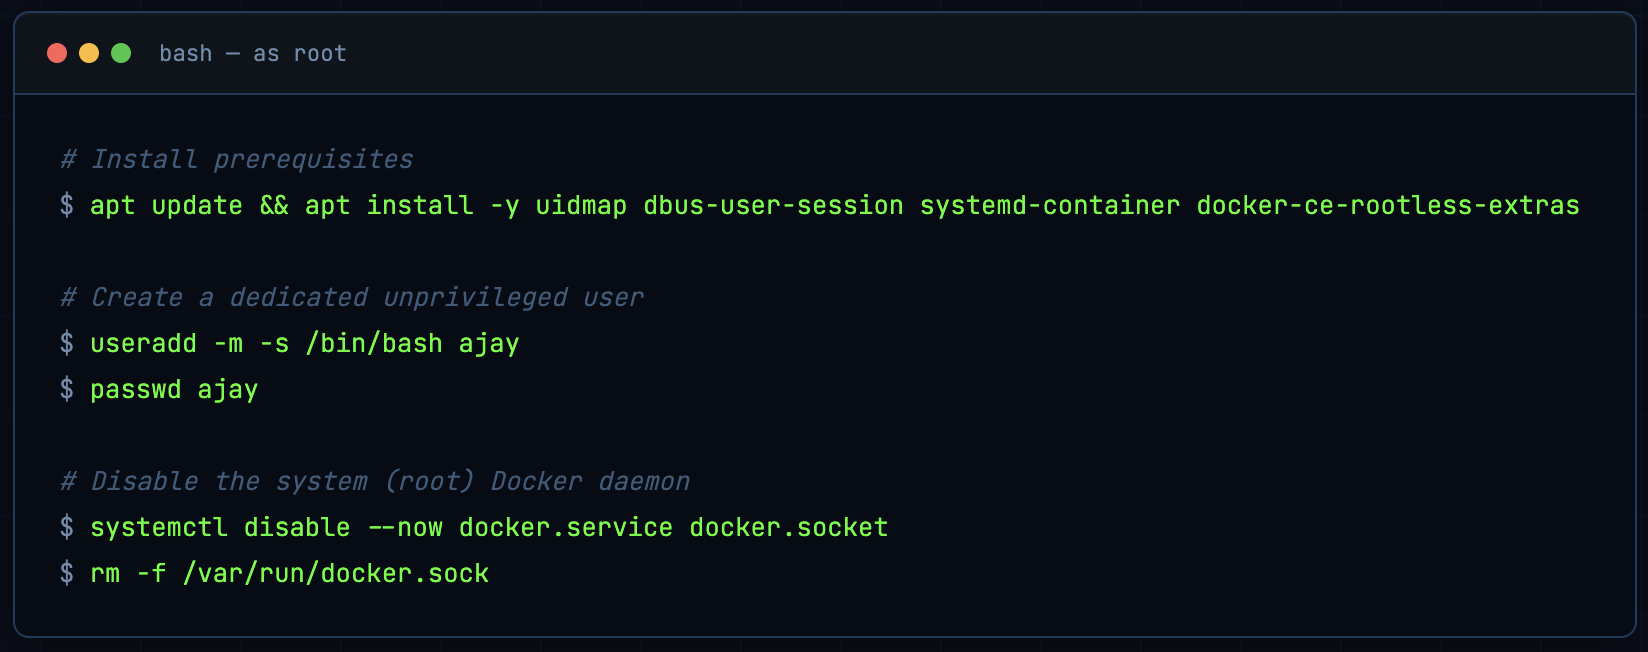
Setup (as root)
Install packages needed for rootless mode and (optionally) for switching to a non-root user with machinectl:
apt update && apt install -y uidmap

apt install -y dbus-user-session

apt install -y systemd-container

apt install -y docker-ce-rootless-extras
Create a dedicated user (e.g. ajay) and disable the system Docker daemon so only rootless will be used:
useradd -m -s /bin/bash ajay

passwd ajay

systemctl disable --now docker.service docker.socket

rm -f /var/run/docker.sock
Install rootless Docker as the non-root user
Use machinectl shell ajay@ or SSH as ajay for a proper login session. Do not use sudo su - ajay - it may block the user namespace creation that rootless Docker needs.
machinectl shell ajay@
Then as ajay:
dockerd-rootless-setuptool.sh install
Expected Output
[INFO] Creating /home/ajay/.config/systemd/user/docker.service
[INFO] starting systemd service docker.service
+ systemctl --user start docker.service
...
● docker.service - Docker Application Container Engine (Rootless)
     Loaded: loaded (/home/ajay/.config/systemd/user/docker.service; disabled; preset: enabled)
     Active: active (running) ...
[INFO] Installed docker.service successfully.
[INFO] To control docker.service, run: `systemctl --user (start|stop|restart) docker.service`
[INFO] To run docker.service on system startup, run: `sudo loginctl enable-linger ajay`

[INFO] Creating CLI context "rootless"
Successfully created context "rootless"
[INFO] Make sure the following environment variable(s) are set (or add them to ~/.bashrc):
export PATH=/usr/bin:$PATH
[INFO] Some applications may require the following environment variable too:
export DOCKER_HOST=unix:///run/user/1001/docker.sock
Set the environment so the Docker CLI uses the rootless daemon:
export DOCKER_HOST=unix:///run/user/1001/docker.sock
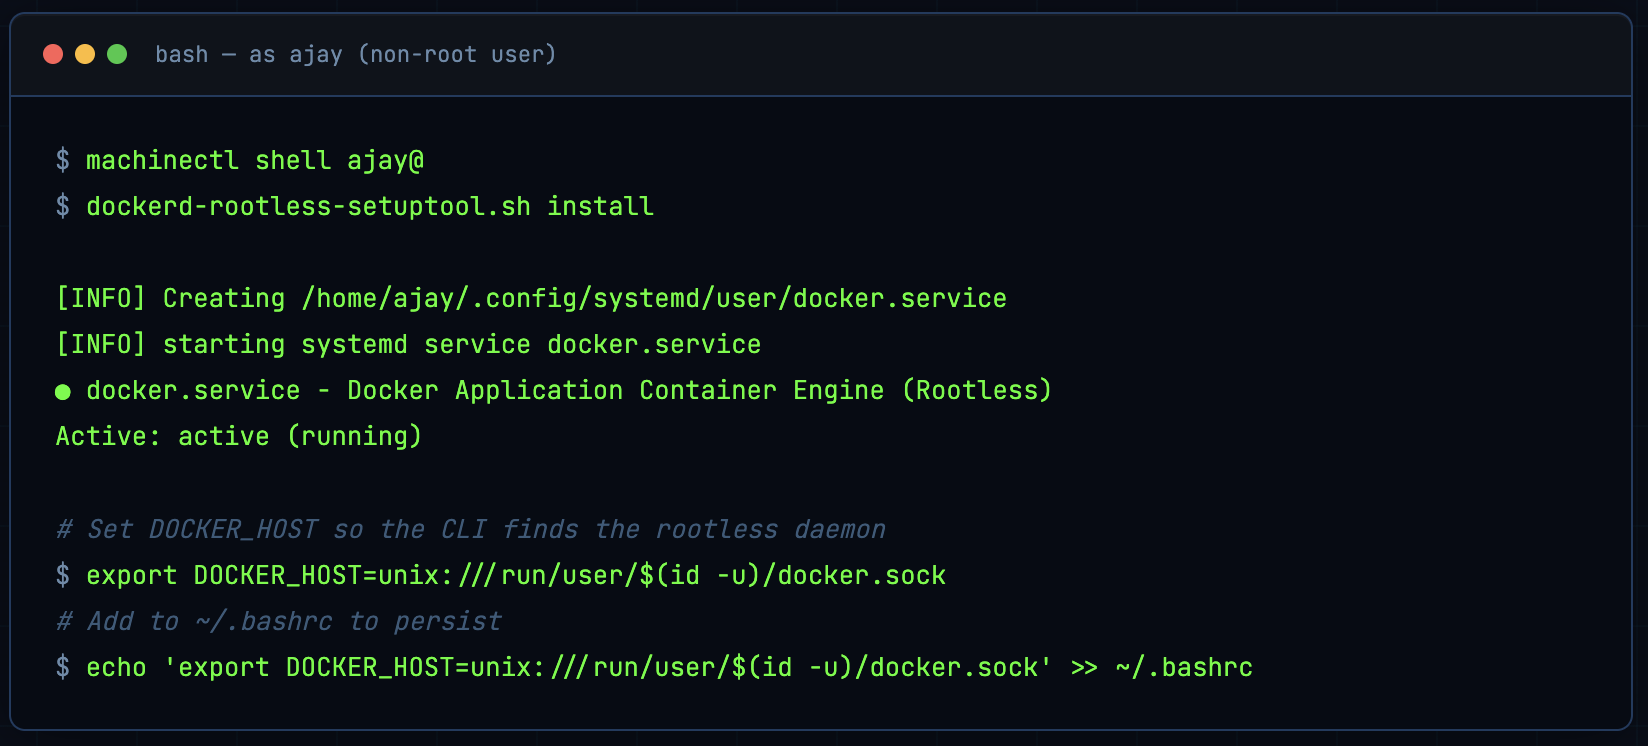
(Use the UID of your user if different; id -u shows it.)
Check that the user Docker service is running (not the system one):
systemctl status docker
# ○ docker.service - ... (system service, inactive)

systemctl --user status docker
# ● docker.service - Docker Application Container Engine (Rootless) ... active (running)
Verify: container root ≠ host root
Start the same image that runs as root inside the container:
docker run --name=rootlesswebserver -d ctrsec/swc
On the host, the process is owned by the unprivileged user (ajay), not root:
ps -fC simple-webserver
Example:
UID          PID    PPID  C STIME TTY          TIME CMD

ajay        3077    3047  2 14:50 ?        00:00:00 /simple-webserver
Inside the container the process still thinks it’s root (UID 0):
docker exec rootlesswebserver id
Example:
uid=0(root) gid=0(root) groups=0(root),10(wheel)
Rootless Docker uses user namespaces: UID 0 in the container is mapped to the unprivileged user’s UID on the host (e.g. 1001 for ajay), reducing the impact of compromise.
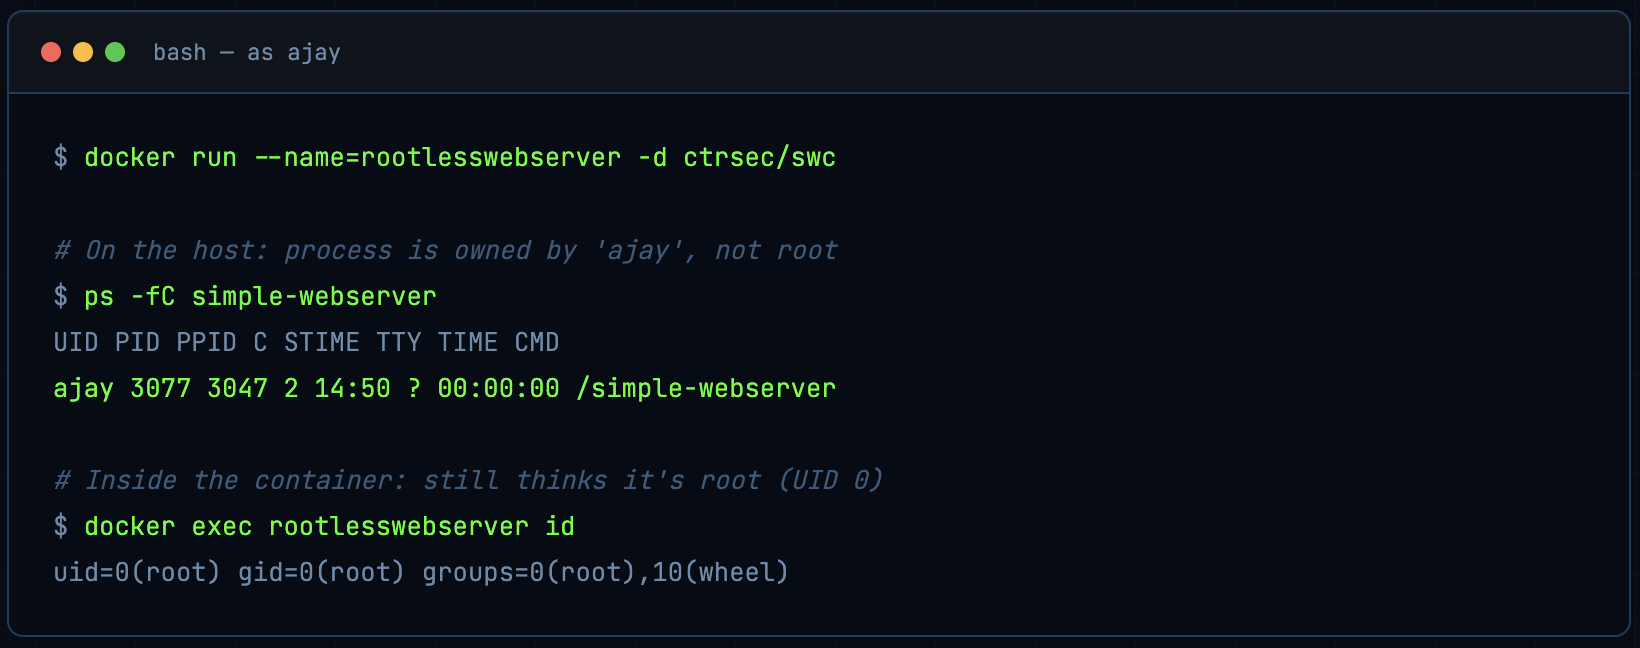
This is user namespace mapping in action. Container UID 0 is mapped to the unprivileged user’s UID on the host. If the container process escapes, it lands as ajay, not root.
The Security Checklist: What to Actually Do
Docker’s security model is simple, which is both its strength and its weakness. Here’s a distilled action list:
- Audit docker group membership run
grep docker /etc/groupright now. Every person on that list has effective root. - Never expose port 2375 unauthenticated Docker API = instant pwned. Firewall it. Always.
- Prefer SSH for remote access simpler than TLS, inherits your existing SSH auth controls.
- Use non-root USER in Dockerfiles lint it with hadolint, enforce it in CI. No exceptions.
- Avoid
--privilegeduse targeted--cap-addinstead. If someone says they need--privileged, question it hard. - Never bind-mount
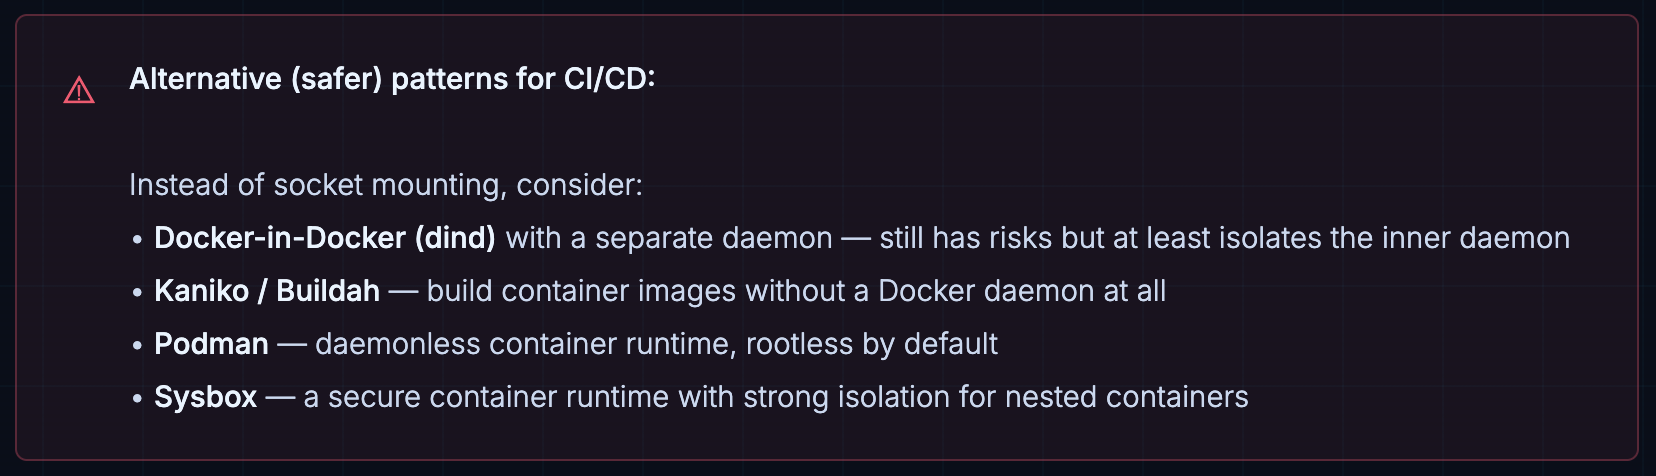
/var/run/docker.sockinto containers use alternatives like Kaniko, Buildah, or a properly isolated dind setup. - Lock down /run/containerd/containerd.sock too - it’s just as powerful and often overlooked.
- Consider rootless Docker especially for multi-user environments or workloads where the attack surface matters.
- Enable seccomp and AppArmor profiles - Docker has good defaults; make sure they haven’t been disabled (--security-opt seccomp=unconfined is a red flag).
- Scan images regularly use Trivy, Grype, or Snyk. Unpatched CVEs in base images are a real attack surface.
- Read-only root filesystem where possible
--read-onlyflag limits damage from container compromise. - Use resource limits
--memory, --cpus prevent DoS attacks from container resource exhaustion.
Further reading:
- Docker: Protect the Docker Daemon Socket
- Docker: Rootless Mode
- OWASP Docker Security Cheat Sheet
- hadolint: Dockerfile linter
Docker is a fantastic tool. I use it every day. But it was built for convenience first and security second - and in a world where supply chain attacks, misconfigured CI pipelines, and lateral movement through container environments are increasingly common, that default stance isn’t enough. The good news: fixing it isn’t hard. It mostly requires understanding what you’re allowing, and being deliberate about it.
Stay paranoid. Ship safely. 🐳
Comments (0)
No comments yet. Be the first to share your thoughts.
Leave a comment