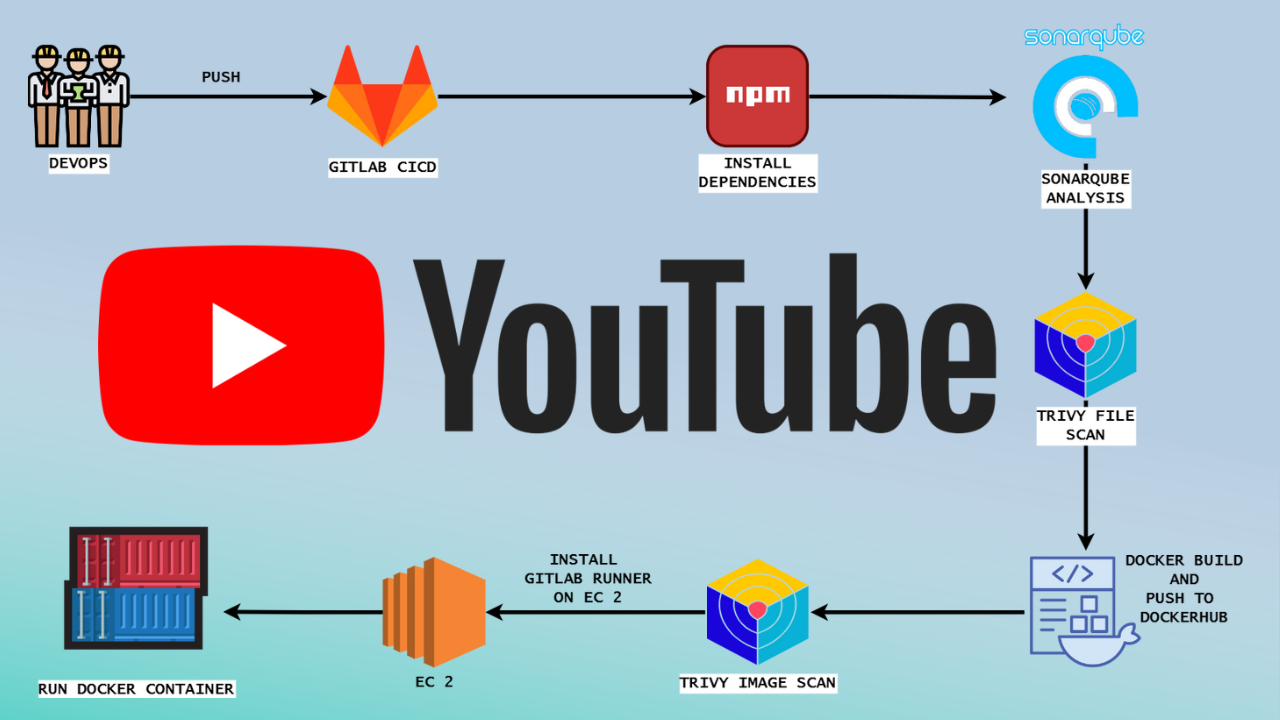
In today’s software development landscape, speed and reliability are paramount. Continuous Integration and Continuous Deployment (CI/CD) pipelines offer a way to automate and streamline your development and deployment processes. In this guide, we’ll show you how to set up a complete CI/CD pipeline for a React YouTube app clone using GitLab.

Picture this: you’re creating a YouTube-like platform where users can explore videos and channels. It’s a fantastic project, but managing the development workflow can be complex. That’s where GitLab CI/CD comes in, offering a straightforward and powerful solution to automate your work.
This step-by-step tutorial is for developers and tech enthusiasts looking to make their projects more efficient with CI/CD. By the end, you’ll know how to set up a robust CI/CD pipeline, including automated testing, code quality checks, and secure containerization. Let’s embark on this journey together and see how CI/CD can transform your development experience while building a React YouTube app clone.
Ready? Let’s simplify CI/CD and make your development life easier!
YouTube video:

Step 1: Create an API key for Youtube.
Step 2: Create a Repository and push it to GitLab.
Step 3: Launch an Ec2 instance and run Sonarqube on it.
Step 4A: Create a .gitlab-ci.yml File.
Step 4B: Add the required variables for the project.
Step 5: Install Gitlab Runner on Ec2.
Step 6: Run the Application on the Docker container.
Step 7: Access the Application on Browser.
Step 1: Create an API key from Rapid API
Open a new tab in the browser and search for rapidapi.com
It will automatically provide your mail and select a mail to create an account

Account is created

Now in the search bar search for YouTube and select YouTube v3

Copy API and save it for further use at the docker stage.
docker build --build-arg REACT_APP_RAPID_API_KEY=

Second way:
Open a new tab in the browser and search for rapidapi.com
You will see the page like this and click on signUp

Now click on Sign Up with Google

Select your mail here

It will automatically create your account now

Now in the search bar search for YouTube and select YouTube v3

Copy API and save it for further use at the docker stage.
docker build --build-arg REACT_APP_RAPID_API_KEY=

Step 2: Create a Repository and push it to GitLab
Go to GitLab.com and login to your account
Click on New Project

Click on Create Blank Project

Provide a name for the Project
Keep Visibility to the public
Uncheck the Readme and create the Project.

Use the below commands to push code to GitLab

Files pushed to GitLab

Step 3: Launch an Ec2 instance and run Sonarqube on it
Log into AWS Console: Sign in to your AWS account.
Launch an Instance:
Choose “EC2” from services. Click “Launch Instance.”
Choose an AMI: Select an Ubuntu image.
Choose an Instance Type: Pick “t2.medium.”
Key Pair: Choose an existing key pair or create a new one.
Configure Security Group:
Create a new security group. Add rules for HTTP, and HTTPS, and open all ports for learning purposes. Add Storage: Allocate at least 10 GB of storage.
Launch Instance: Review and launch the instance.
Access Your Instance: Use SSH to connect to your instance with the private key.
Keep in mind, that opening all ports is not recommended for production environments; it’s just for educational purposes.

Connect to Your EC2 Instance and install docker:
Run the below commands to install the docker
sudo apt-get update
sudo apt-get install docker.io -y
sudo usermod -aG docker $USER
newgrp docker
sudo chmod 777 /var/run/docker.sock
After the docker installation, we will create a Sonarqube container (Remember to add 9000 ports in the security group).
Run this command on your EC2 instance to create a SonarQube container:
docker run -d --name sonar -p 9000:9000 sonarqube:lts-community

Now copy the IP address of the ec2 instance
ec2-public-ip:9000

Enter username and password, click on login and change password
username admin
password admin

Update New password, This is Sonar Dashboard.

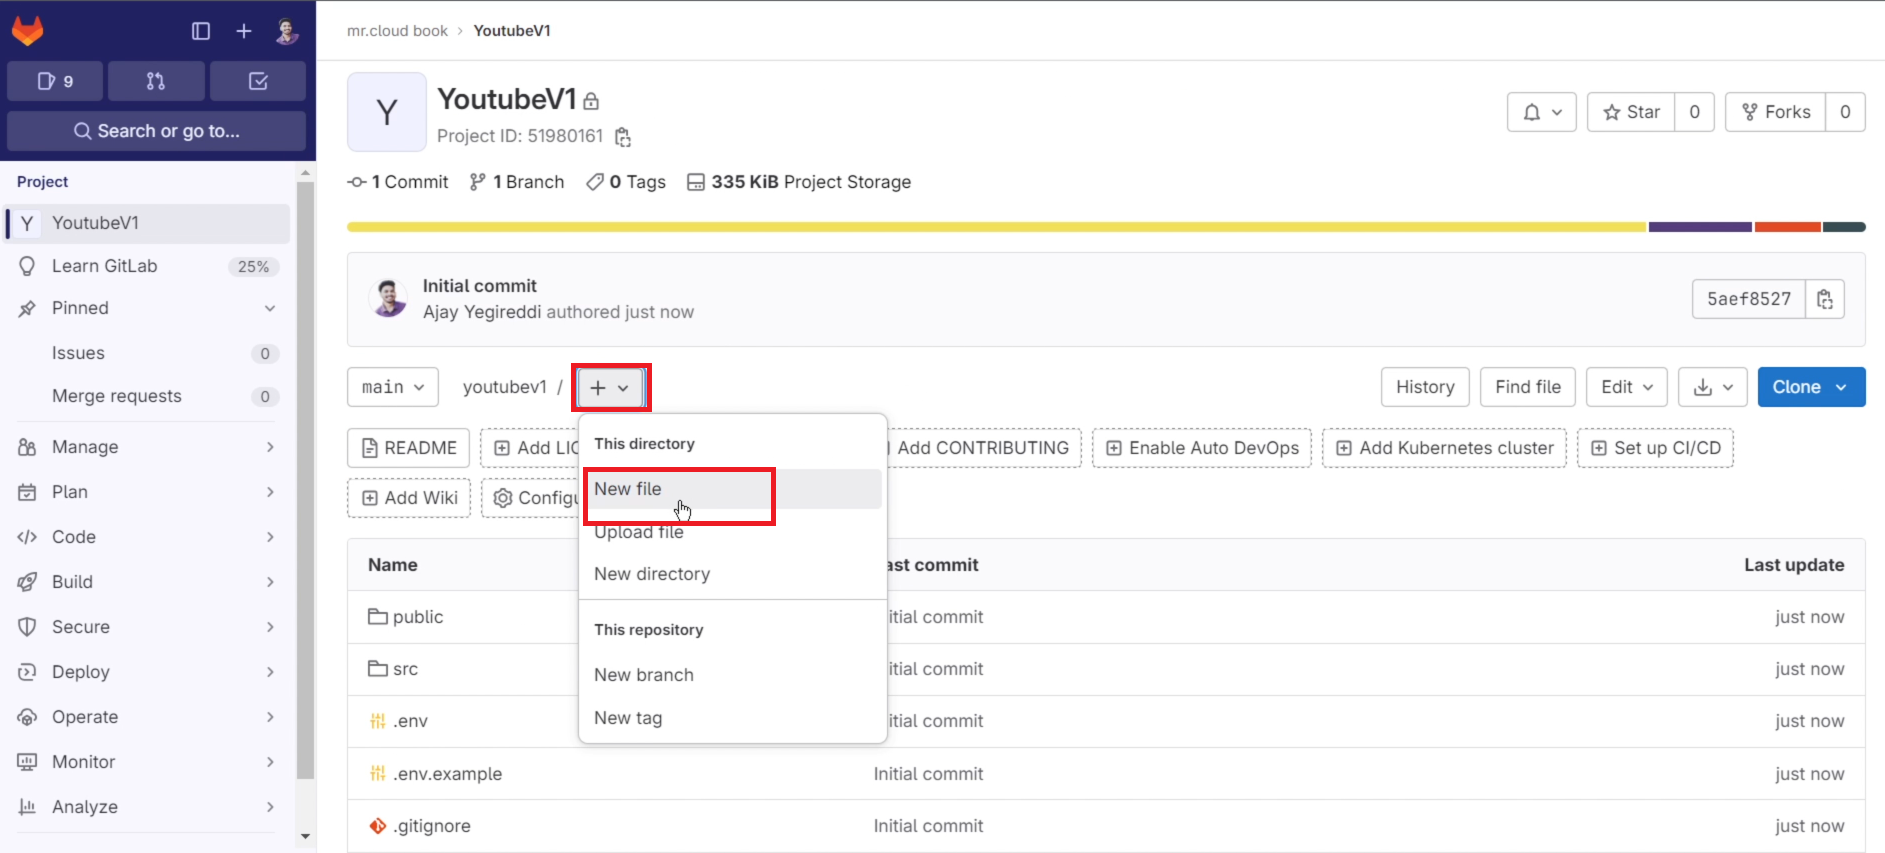
Step 4A: Create a .gitlab-ci.yml File.
Now go to GitLab click on ‘+’ and click on Newfile

File name .gitlab-ci.yml
Content
stages:
    - npm

Install dependecy:
    stage: npm
    image:
        name: node:16
    script:
        - npm install

Commit the changes and it will automatically start the build
Now click on Build and Pipelines

Now click on Running.

Click on Install dependency

You will build output

Now add the Sonarqube stage to the pipeline
Go to the Sonarqube dashboard and click on Manually.

Provide the name of the Project and click on Setup

Select the CI tool as GitLab CI

Select Other because we are using the JS App
It will provide code and we need to create a file inside our repo

Go to Gitlab and click on + and Newfile
Filename is sonar-project.properties
Paste the content that you got from Sonarqube

The file looks like this and click on commit changes

Go to Sonarqube and click on continue

Now it will provide Variables to add to our GitLab
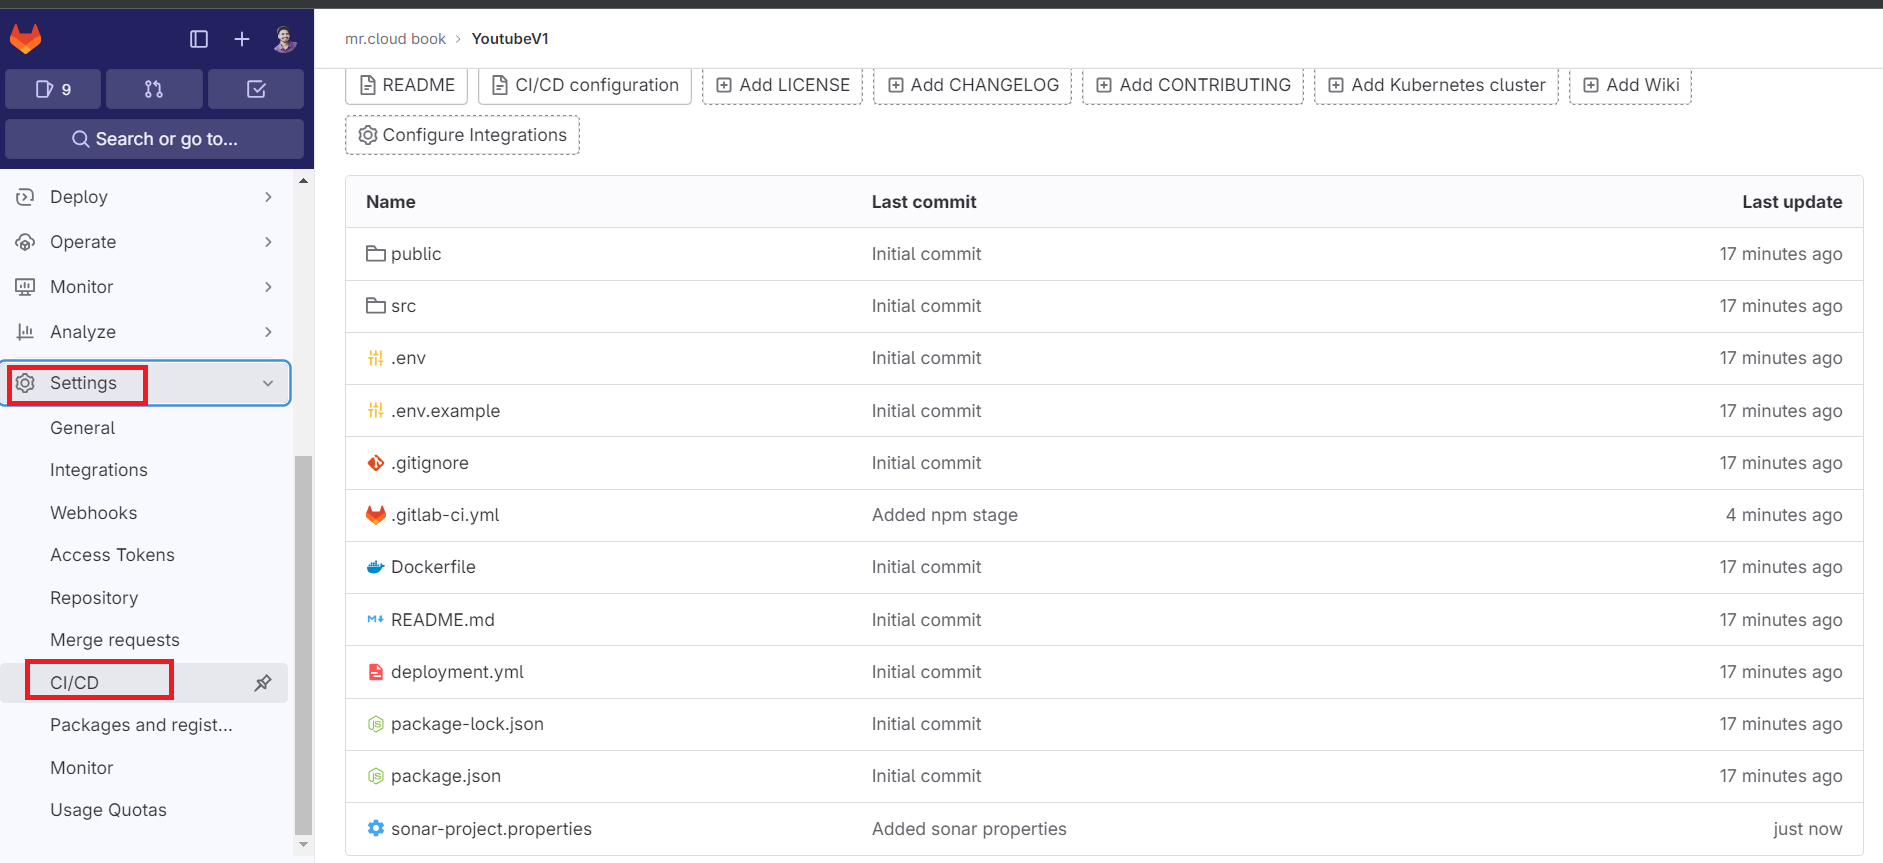
Step 4B: Add the required variables for the project.
Variables Generated

Now go to GitLab
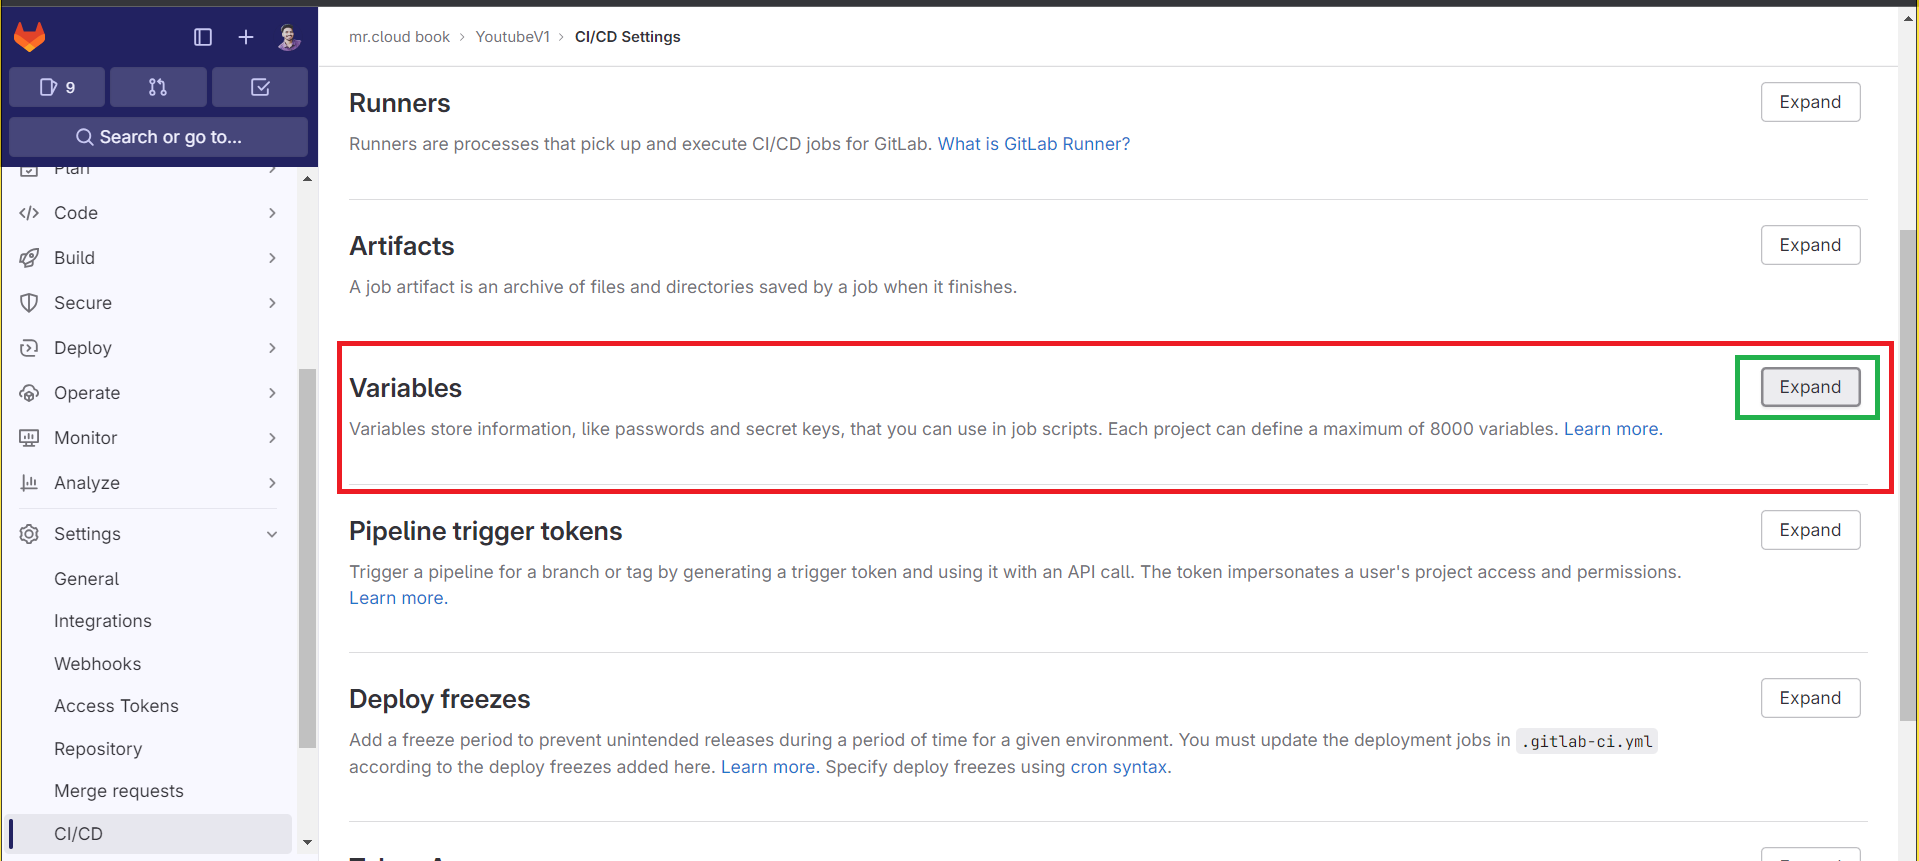
Click on settings and CI/CD

Click on Expand in variables

Click on Add variable

Now go back to Sonarqube and copy the Key
Click on Generate a token

Again Click on Generate

Copy the token

Now come back to GitLab and add them like the below image and click on add variable.

Sonar token is added

Now go to the Sonarqube Dashboard again
Let’s add another variable, copy them

Now go to GitLab and click on Add variable

Add the copied values like the below image

Two variables were added.

Now go back to the Sonarqube Dashboard
Click on continue

It will provide and CI configuration file copy it and use it inside our .gitlab-ci.yml file

Now go back to GitLab and edit the .gitlab-ci.yml file
Full file (update with your content)
stages:
    - npm
    - sonar
Install dependecy:
    stage: npm
    image:
        name: node:16
    script:
        - npm install
sonarqube-check:
  stage: sonar
  image:
    name: sonarsource/sonar-scanner-cli:latest
    entrypoint: [""]
  variables:
    SONAR_USER_HOME: "${CI_PROJECT_DIR}/.sonar"  # Defines the location of the analysis task cache
    GIT_DEPTH: "0"  # Tells git to fetch all the branches of the project, required by the analysis task
  cache:
    key: "${CI_JOB_NAME}"
    paths:
      - .sonar/cache
  script:
    - sonar-scanner
  allow_failure: true
  only:
    - main

Commit changes and it will automatically start the build.
Click on Build --> Pipelines

Click on Running

Now click on Sonarqube-check

Build output

Now add the next stage of the Trivy file scan
Update the .gitlab-ci.yml file
stages:
    - npm
    - sonar
    - trivy file scan
Install dependecy:
    stage: npm
    image:
        name: node:16
    script:
        - npm install
sonarqube-check:
  stage: sonar
  image:
    name: sonarsource/sonar-scanner-cli:latest
    entrypoint: [""]
  variables:
    SONAR_USER_HOME: "${CI_PROJECT_DIR}/.sonar"  # Defines the location of the analysis task cache
    GIT_DEPTH: "0"  # Tells git to fetch all the branches of the project, required by the analysis task
  cache:
    key: "${CI_JOB_NAME}"
    paths:
      - .sonar/cache
  script:
    - sonar-scanner
  allow_failure: true
  only:
    - main
Trivy file scan:
  stage: trivy file scan
  image:
    name: aquasec/trivy:latest
    entrypoint: [""]
  script:
    - trivy fs .

Commit changes and go to pipeline stages
Click on the Trivy file scan

Build output

Add the Docker build and push stage
Before that Add docker credentials to GitLab Variables as secrets.
Go to the docker hub and create a Personal Access token
Click on your profile name and Account Settings

Now click on Security --> New Access Token

Provide a name --> Generate

Now copy the token and keep it safe

Now go back to Gitlab
Click on settings and CI/CD
Click on Expand in variables
Click on Add variable
Use your DockerHub username in value and Add variable
Key DOCKER_USERNAME

Click on Add variable again

Key DOCKER_PASSWORD
For value use the Generated Personal Access token and add a variable.

Variables added.

Now add the below stage to the Configuration .gitlab-ci.yml file
Added Docker and Trivy image scan stages
stages:
    - npm
    - sonar
    - trivy file scan
    - docker
    - trivy image scan
Install dependecy:
    stage: npm
    image:
        name: node:16
    script:
        - npm install
sonarqube-check:
  stage: sonar
  image:
    name: sonarsource/sonar-scanner-cli:latest
    entrypoint: [""]
  variables:
    SONAR_USER_HOME: "${CI_PROJECT_DIR}/.sonar"  # Defines the location of the analysis task cache
    GIT_DEPTH: "0"  # Tells git to fetch all the branches of the project, required by the analysis task
  cache:
    key: "${CI_JOB_NAME}"
    paths:
      - .sonar/cache
  script:
    - sonar-scanner
  allow_failure: true
  only:
    - main
Trivy file scan:
  stage: trivy file scan
  image:
    name: aquasec/trivy:latest
    entrypoint: [""]
  script:
    - trivy fs .
Docker build and push:
  stage: docker
  image:
    name: docker:latest
  services:
    - docker:dind
  script:
    - docker build --build-arg REACT_APP_RAPID_API_KEY=f0ead79813mshb0aa7ddf114a7dap1adb3djsn483b017de1a9 -t youtubev1 .
    - docker tag youtubev1 sevenajay/youtubev1:latest
    - docker login -u $DOCKER_USERNAME -p $DOCKER_PASSWORD
    - docker push sevenajay/youtubev1:latest
Scan image:
  stage: trivy image scan
  image:
    name: aquasec/trivy:latest
    entrypoint: [""]
  script:
    - trivy image sevenajay/youtubev1:latest
Added stages

Commit changes and it will automatically start building.
Go to Pipelines view

Now click on Docker build and push

Build view


Go to Dockerhub and see the image

Now come back to GitLab and click on Trivy image scan

Output raw

Step 5: Install Gitlab Runner on Ec2
Go to GitLab and Click on Settings and CI/CD
Click on Expand at Runners

Click on Three dots and then click on Show Runner installation

Click on Linux and amd64 and copy the commands

Now come back to Putty or Mobaxtreme
Create a new file
sudo vi gitlab-runner-installation

Paste the below commands into it
# Download the binary for your system
sudo curl -L --output /usr/local/bin/gitlab-runner https://gitlab-runner-downloads.s3.amazonaws.com/latest/binaries/gitlab-runner-linux-amd64
# Give it permission to execute
sudo chmod +x /usr/local/bin/gitlab-runner
# Create a GitLab Runner user
sudo useradd --comment 'GitLab Runner' --create-home gitlab-runner --shell /bin/bash
# Install and run as a service
sudo gitlab-runner install --user=gitlab-runner --working-directory=/home/gitlab-runner
sudo gitlab-runner start

Provide executable permissions and run the script
sudo chmod +x
./

Installation completed

Start the GitLab runner
sudo gitlab-runner start

Now run the below command or your command to register the runner
Update the token is enough

sudo gitlab-runner register --url https://gitlab.com/ --registration-token
Provide the details for registering the runner
- Provide Enter for GitLab.com
- For token we already added with token, so click on Enter again
- Description as your wish
- Tags also and you can use multiple tags by providing a comma after each tga
- Maintenance note is just optional
- For executors use Shell

Runner added successfully.
Start the GitLab runner
sudo gitlab-runner start

Run the GitLab runner
sudo gitlab-runner run

Go to GitLab and refresh the page once or click on Enable for this project

Now the runner is active and waiting for jobs

Click on the Pencil mark to edit

Click on the Check box to indicate whether this runner can pick jobs without tags.

Click on save changes.
Step 6: Run the Application on the Docker container
Now edit the .gitlab-ci.yml file for the deploy stage
The complete file
stages:
    - npm
    - sonar
    - trivy file scan
    - docker
    - trivy image scan
    - run container
Install dependecy:
    stage: npm
    image:
        name: node:16
    script:
        - npm install
sonarqube-check:
  stage: sonar
  image:
    name: sonarsource/sonar-scanner-cli:latest
    entrypoint: [""]
  variables:
    SONAR_USER_HOME: "${CI_PROJECT_DIR}/.sonar"  # Defines the location of the analysis task cache
    GIT_DEPTH: "0"  # Tells git to fetch all the branches of the project, required by the analysis task
  cache:
    key: "${CI_JOB_NAME}"
    paths:
      - .sonar/cache
  script:
    - sonar-scanner
  allow_failure: true
  only:
    - main
Trivy file scan:
  stage: trivy file scan
  image:
    name: aquasec/trivy:latest
    entrypoint: [""]
  script:
    - trivy fs .
Docker build and push:
  stage: docker
  image:
    name: docker:latest
  services:
    - docker:dind
  script:
    - docker build --build-arg REACT_APP_RAPID_API_KEY=f0ead79813mshb0aa7ddf114a7dap1adb3djsn483b017de1a9 -t youtubev1 .
    - docker tag youtubev1 sevenajay/youtubev1:latest
    - docker login -u $DOCKER_USERNAME -p $DOCKER_PASSWORD
    - docker push sevenajay/youtubev1:latest
Scan image:
  stage: trivy image scan
  image:
    name: aquasec/trivy:latest
    entrypoint: [""]
  script:
    - trivy image sevenajay/youtubev1:latest
deploy:
  stage: run container
  tags:
    - youtube        #use your own tags
  script:
    - docker run -d --name youtube -p 3000:3000 sevenajay/youtubev1:latest

Commit changes, it will automatically start to build
Click on Build --> Pipelines

Click on Running

The last stage is added to the Pipeline

If you get an error like this

Go to GitLab and click on deploy job
Let’s see what is the error

If you get an error like this, click on that link

It will open a new tab and provide a solution for that

Now go to Mobaxtreme and stop the Runner
Go to root and use the below commands
sudo su
sudo vi /home/gitlab-runner/.bash_logout

You will see file like this

Comment them

Save and exit from that file and restart GitLab runner
sudo gitlab-runner restart
#from root

Now start and Run the GitLab runner
sudo gitlab-runner start
sudo gitlab-runner run

Now go to GitLab --> Build --> Pipelines

Click on Run Pipeline

Again Click on Run Pipeline

Build completed and click on Deploy job

See the output it ran a container on ec2

Now go to MobaXtreme or Putty and Provide the below command to see running containers.
docker ps

Container running.
Step 7: Access the Application on Browser
Copy the Public IP of the ec2 instance and paste it into the Browser.
Don’t forget to open the 3000 port in the Security Group
Public-ip:3000
Output


Step 8: Termination
- Delete the personal Access token of the docker.
- Delete the Ec2 instance.
docker stop
docker rm
And there you have it, folks! You’re now the DevOps master of your YouTube app deployment universe. We’ve journeyed through code, quality, security, containers, and automation, all with GitLab as our trusty sidekick. Now it’s your turn to unleash the power of DevOps and take your YouTube app to the next level!
So, what’s next on your development adventure? Whether it’s conquering new projects, exploring even cooler tech, or simply celebrating with a well-deserved coffee break, remember that DevOps is all about making your life easier and your code better. Embrace the joy of seamless deployments, keep learning, and never stop having fun in the ever-evolving world of software development. 🚀😎
If you enjoyed this Blog, don’t forget to hit that like button, share with your fellow tech enthusiasts, and subscribe for more exciting DevOps adventures. And as always, stay curious, stay creative, and keep coding with a smile! 😄✨
Comments (3)
Dear Ajay, I hope this message finds you well. I am writing to request the commands necessary to set up the YouTube clone project we discussed earlier. As you know, I am eager to delve into this project and learn more about web development through practical implementation. Could you please provide me with the commands required to initiate the YouTube clone project? Additionally, any guidance or instructions you can offer regarding the project setup, dependencies, and configuration would be immensely helpful. I am eager to get started and am committed to putting in the effort required to successfully complete this project. Your assistance in providing the necessary commands and guidance will greatly contribute to my learning experience. Thank you very much for your support, Ajay. I look forward to your response and getting started on this exciting project.
Hi, everything is going sound here and ofcourse every one is sharing data, that's actually good, keep up writing.
It's a shame you don't have a donate button! I'd definitely donate to this excellent blog! I suppose for now i'll settle for bookmarking and adding your RSS feed to my Google account. I look forward to brand new updates and will share this site with my Facebook group. Chat soon!
Leave a comment