What is AppArmor?
Let me be direct with you. I’ve been running containerized workloads in production for over 4 years. In that time, I’ve seen everything from misconfigured Kubernetes RBAC to full-blown container escapes. And one of the most consistently underused security controls I encounter on client engagements is AppArmor.
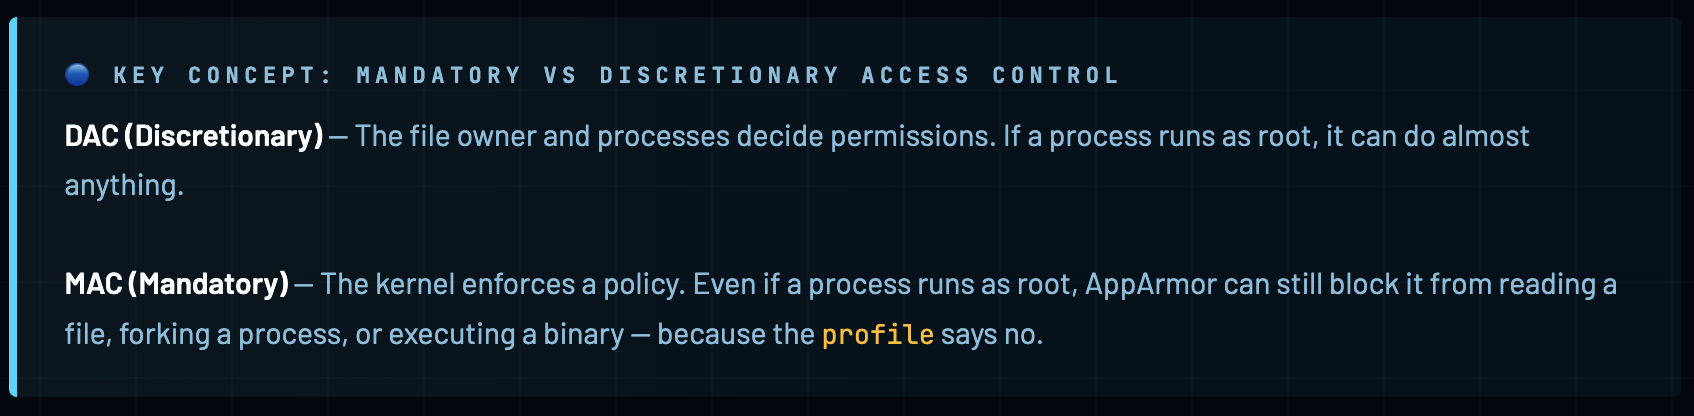
AppArmor - Application Armor - is a Linux Security Module (LSM) that enforces mandatory access control (MAC) policies on a per-program basis. It lives inside the Linux kernel and acts as a bouncer between your application and the system calls it tries to make. Unlike discretionary access control (DAC) where the app decides what it can do, with MAC the kernel decides - regardless of what the app thinks it’s allowed to do.
AppArmor was first released by Immunix in 1998, later acquired by Novell, and is now a core component of the Linux kernel. It ships by default on Ubuntu, Debian, SUSE, and other major distros. Docker has been integrating with it since the early days - Docker automatically generates and applies a default AppArmor profile to every container you run.
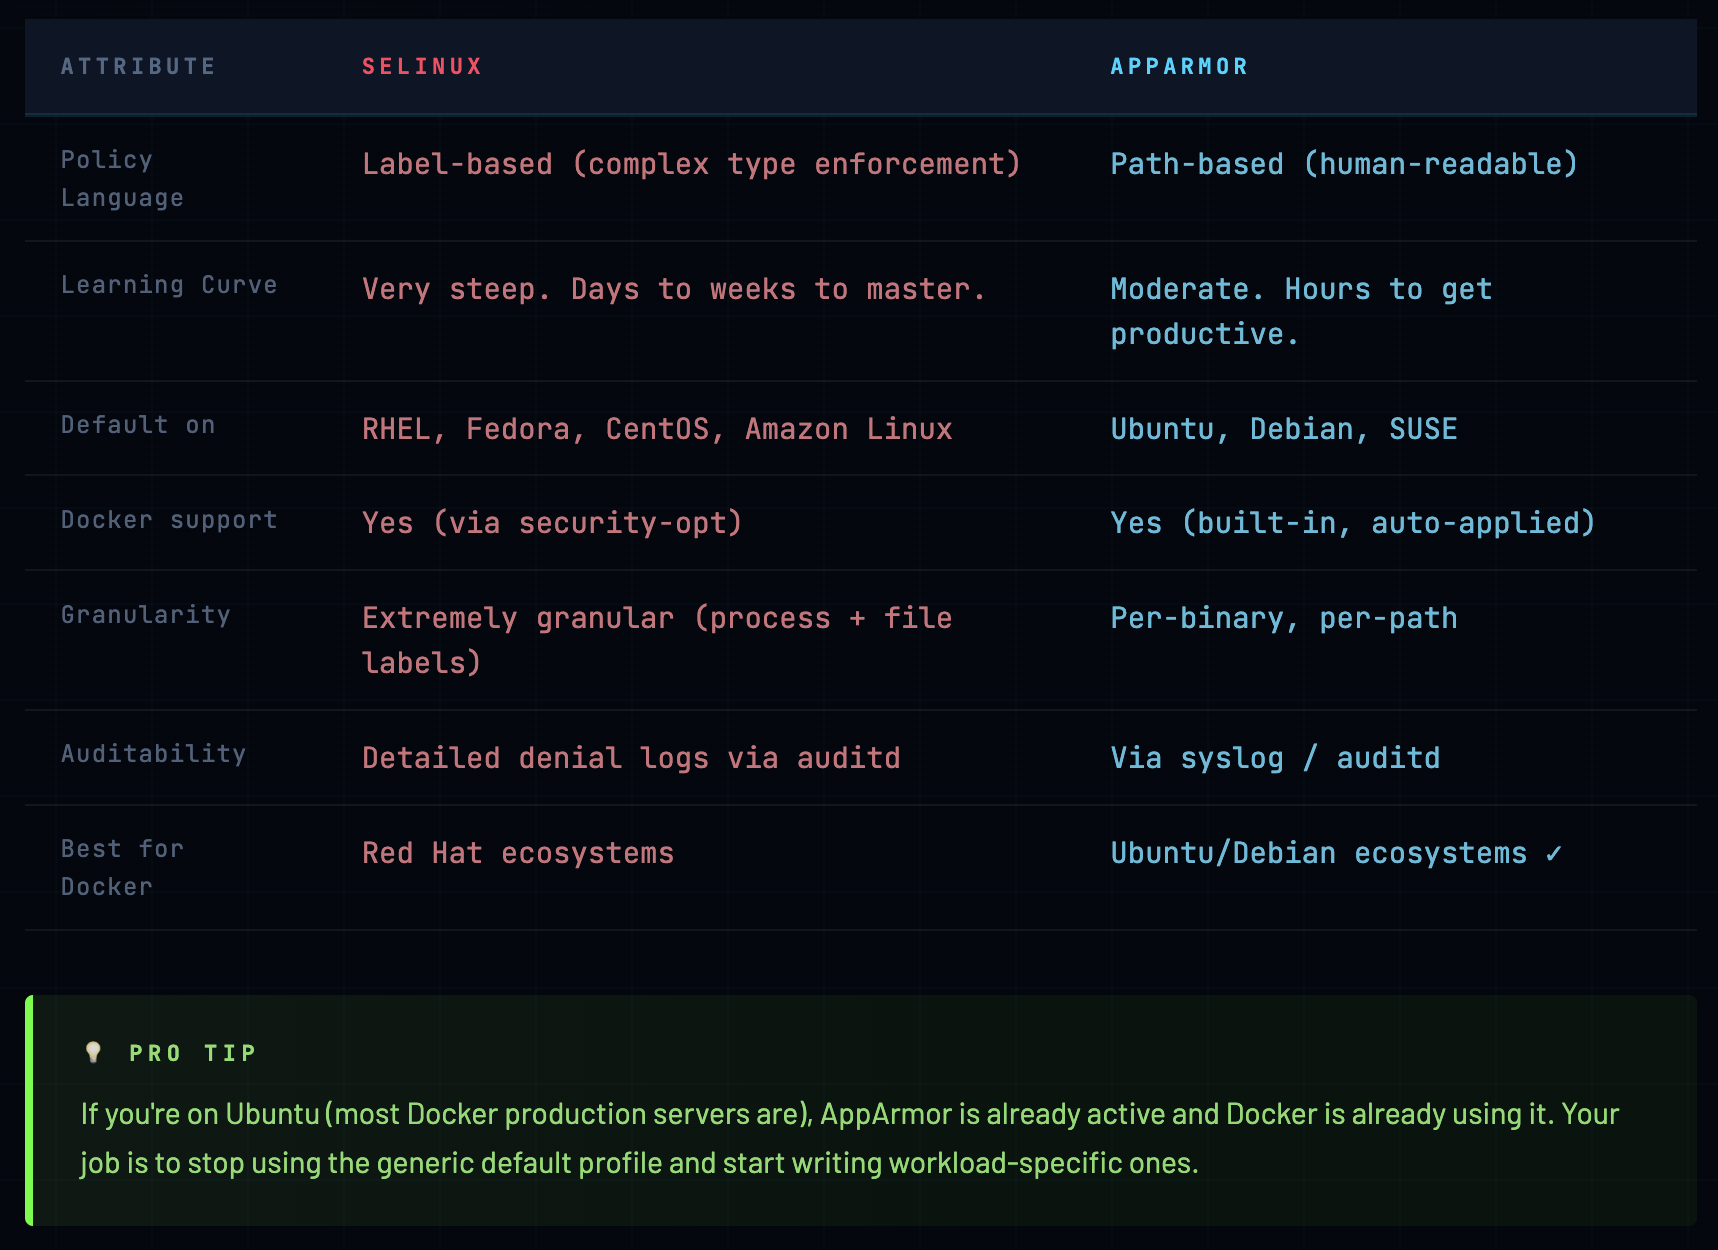
AppArmor vs SELinux - Which Should You Use?
This comes up constantly. Here’s my honest take after working with both:
How AppArmor Works at the Kernel Level
To write effective AppArmor profiles, you need to understand what actually happens under the hood. This isn’t just academic - it’s the difference between writing a profile that protects you and one that gives you false confidence.
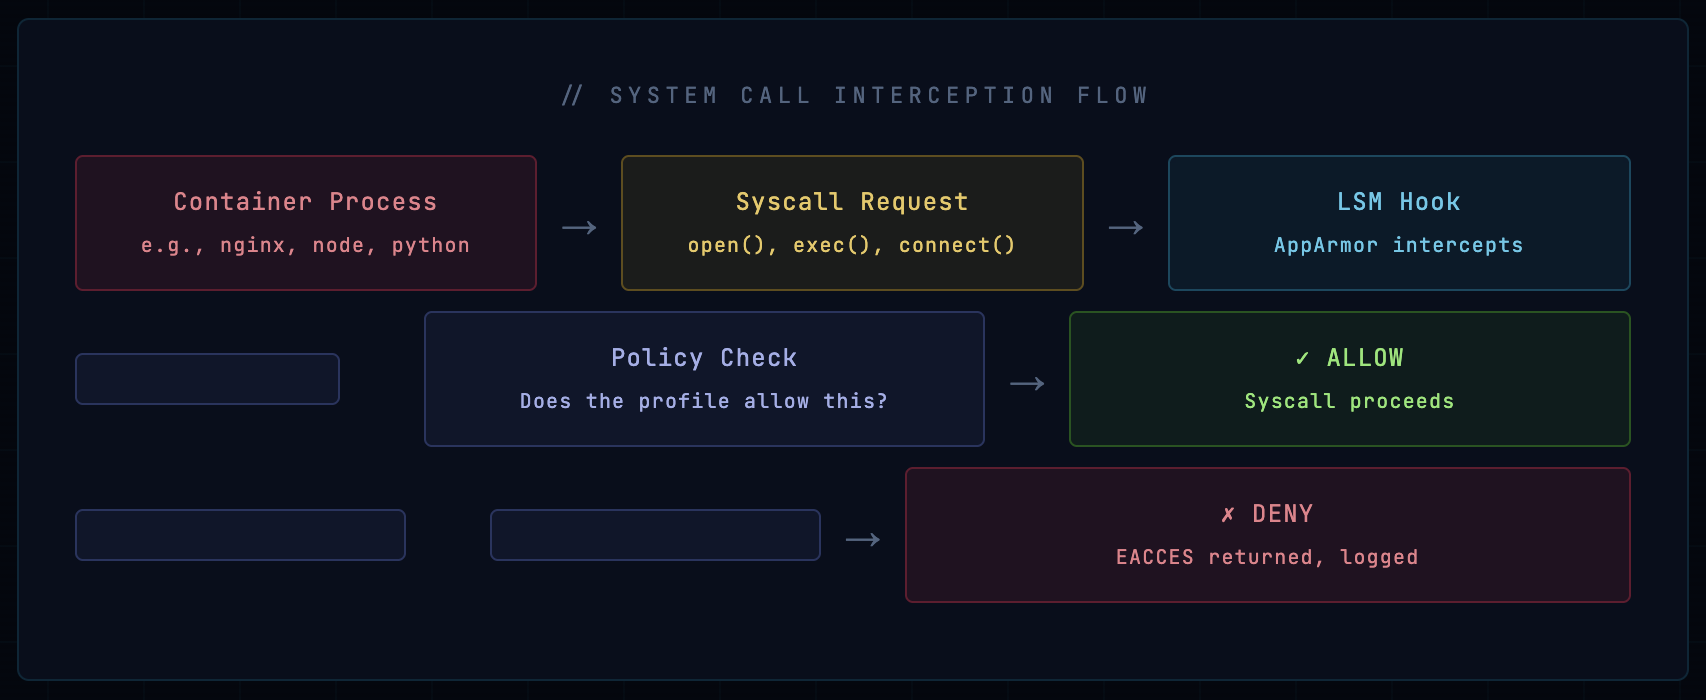
When a process makes a system call, the kernel checks the AppArmor profile associated with that process (specifically with the executable binary that spawned it). The profile defines what files, capabilities, network operations, and mounts the process is allowed to use. If the syscall doesn’t match any allow rule - it’s denied.
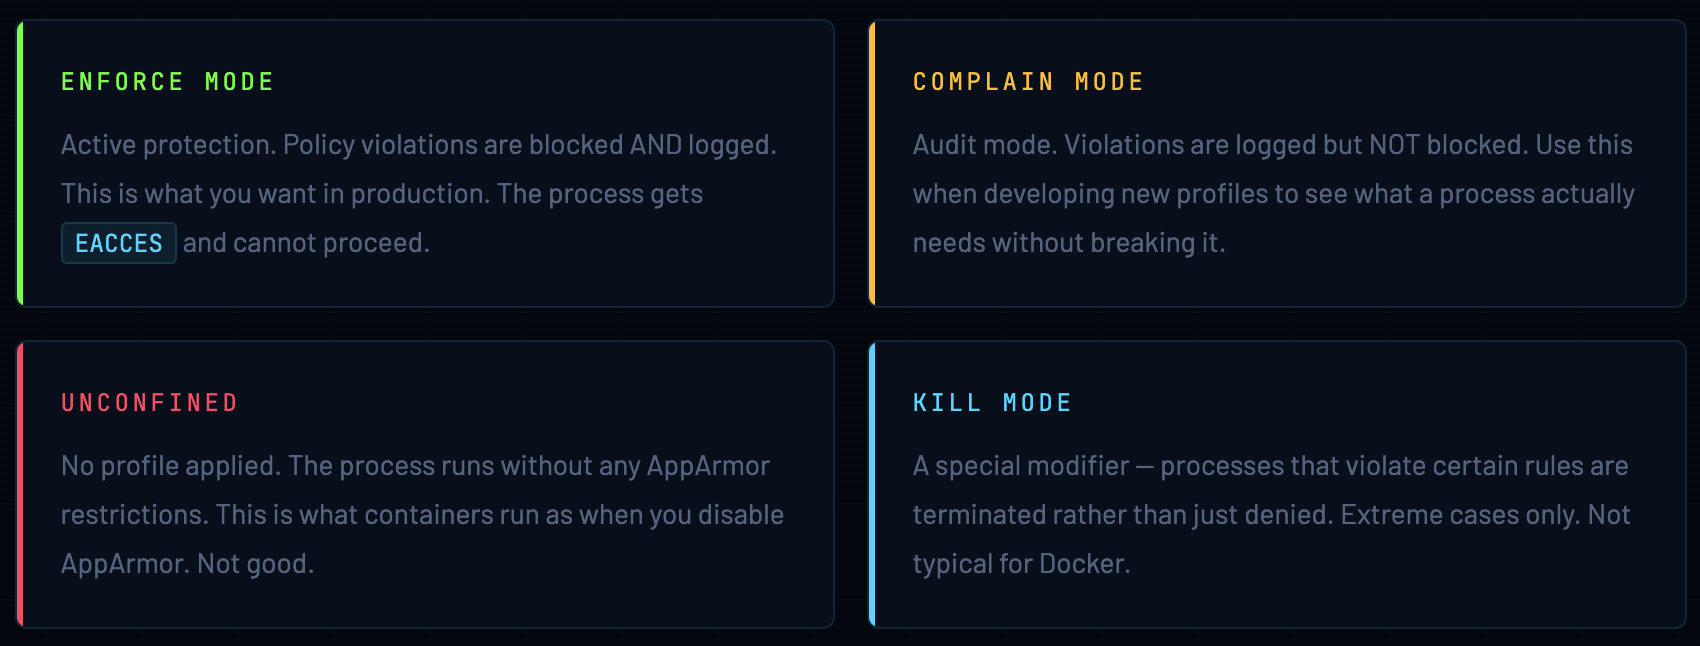
Four Operating Modes
Profile Anatomy
An AppArmor profile is a text file with a specific syntax. Here’s a minimal example to understand the structure:
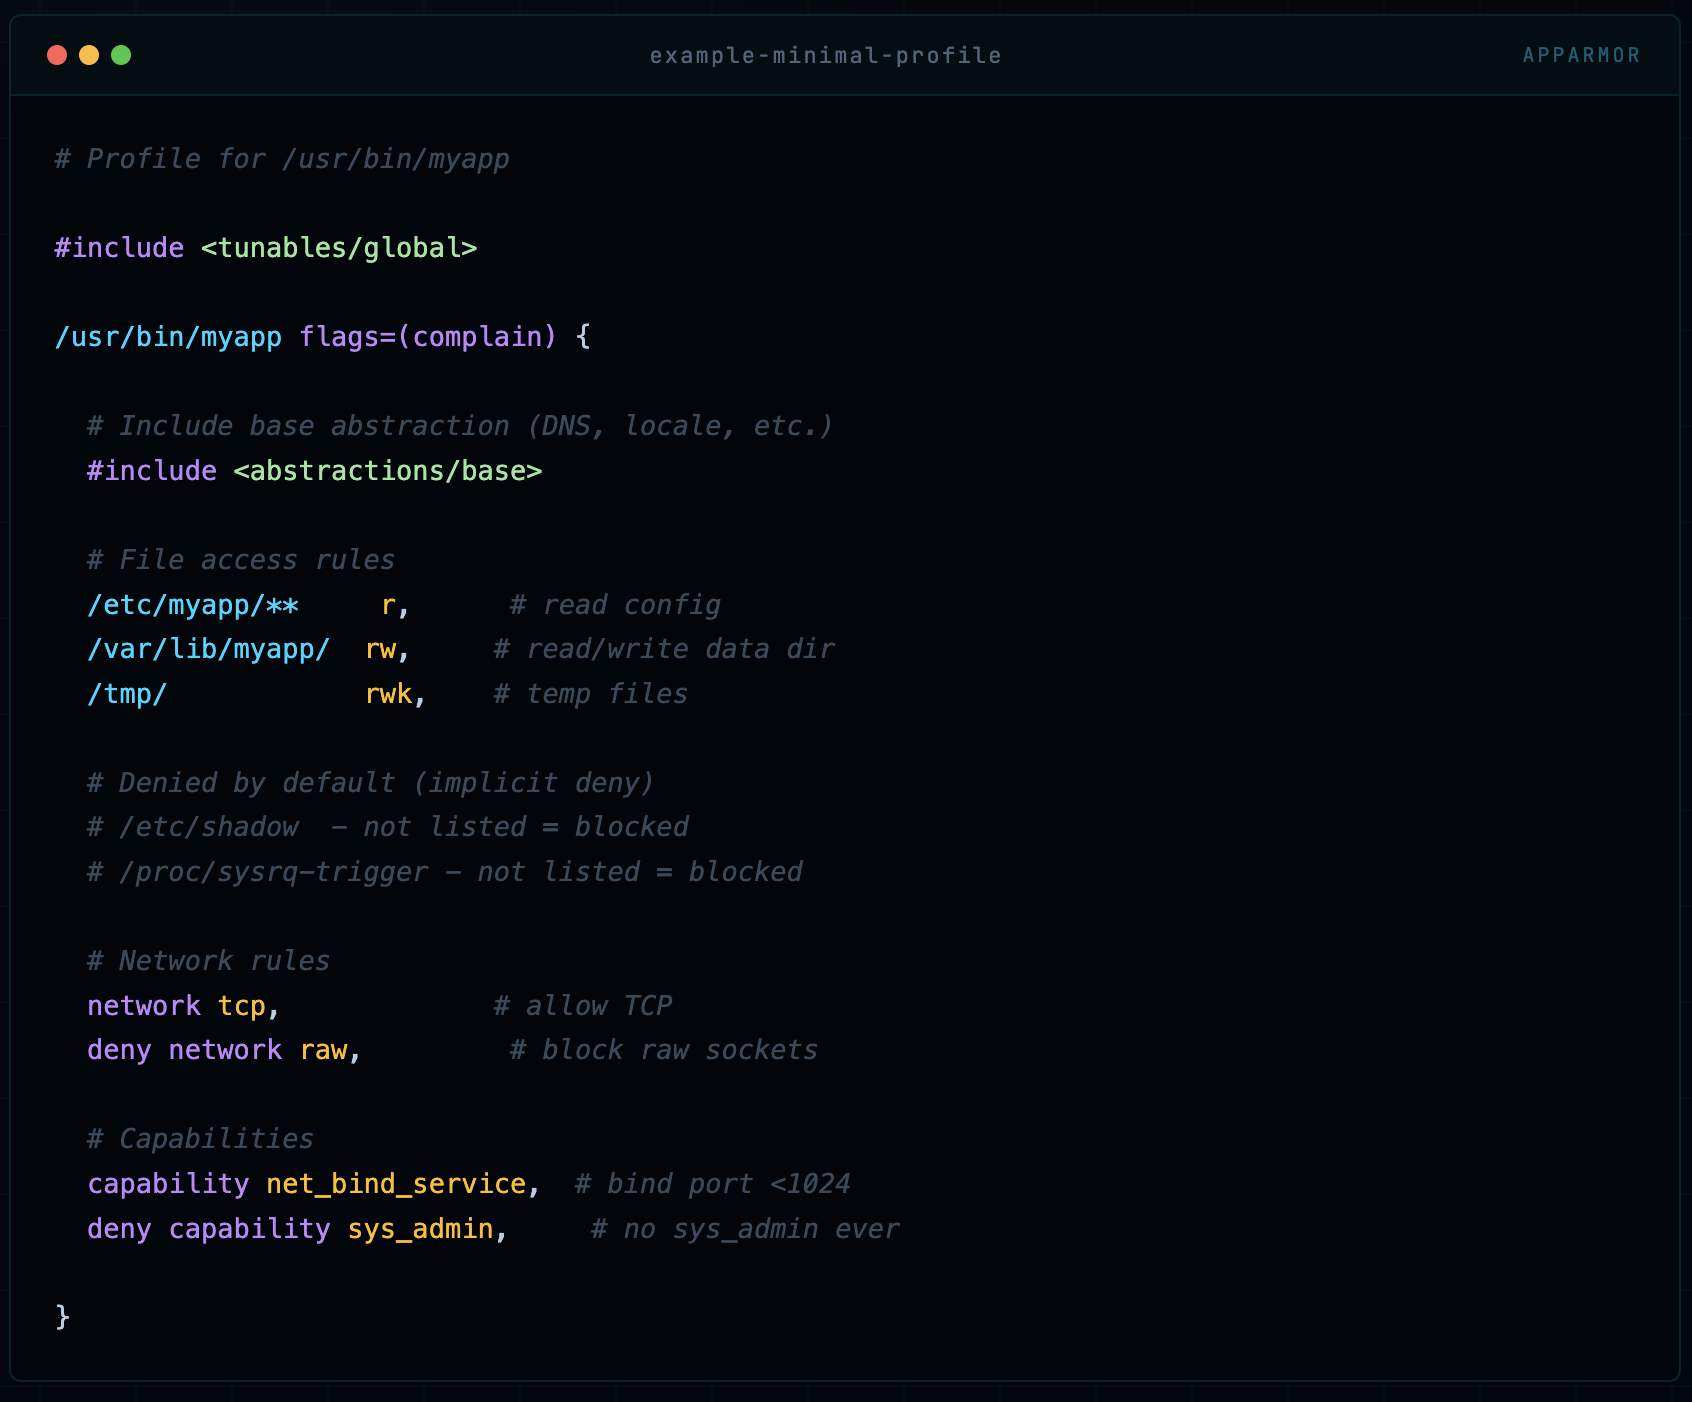
# Profile for /usr/bin/myapp

#include <tunables/global>

/usr/bin/myapp flags=(complain) {

  # Include base abstraction (DNS, locale, etc.)
  #include <abstractions/base>

  # File access rules
  /etc/myapp/**     r,      # read config
  /var/lib/myapp/  rw,     # read/write data dir
  /tmp/            rwk,    # temp files

  # Denied by default (implicit deny)
  # /etc/shadow  - not listed = blocked
  # /proc/sysrq-trigger - not listed = blocked

  # Network rules
  network tcp,             # allow TCP
  deny network raw,         # block raw sockets

  # Capabilities
  capability net_bind_service,  # bind port <1024
  deny capability sys_admin,     # no sys_admin ever

}
The fundamental rule of AppArmor profiles: everything not explicitly allowed is implicitly denied. This is the default-deny principle and it’s what makes AppArmor so powerful - you define a minimal set of permissions, and the kernel enforces that ceiling.
Docker’s Default AppArmor Profile
When you run any container on a Docker host that has AppArmor enabled, Docker automatically creates and loads a profile called docker-default. This happens transparently - you don’t have to do anything. Let’s look at exactly what this profile does.
🔵 Where to find it The docker-default profile source lives in the Docker source code at profiles/apparmor/template.go. On a running system, the loaded profile is visible at
/proc/[pid]/attr/currentfor any container process.
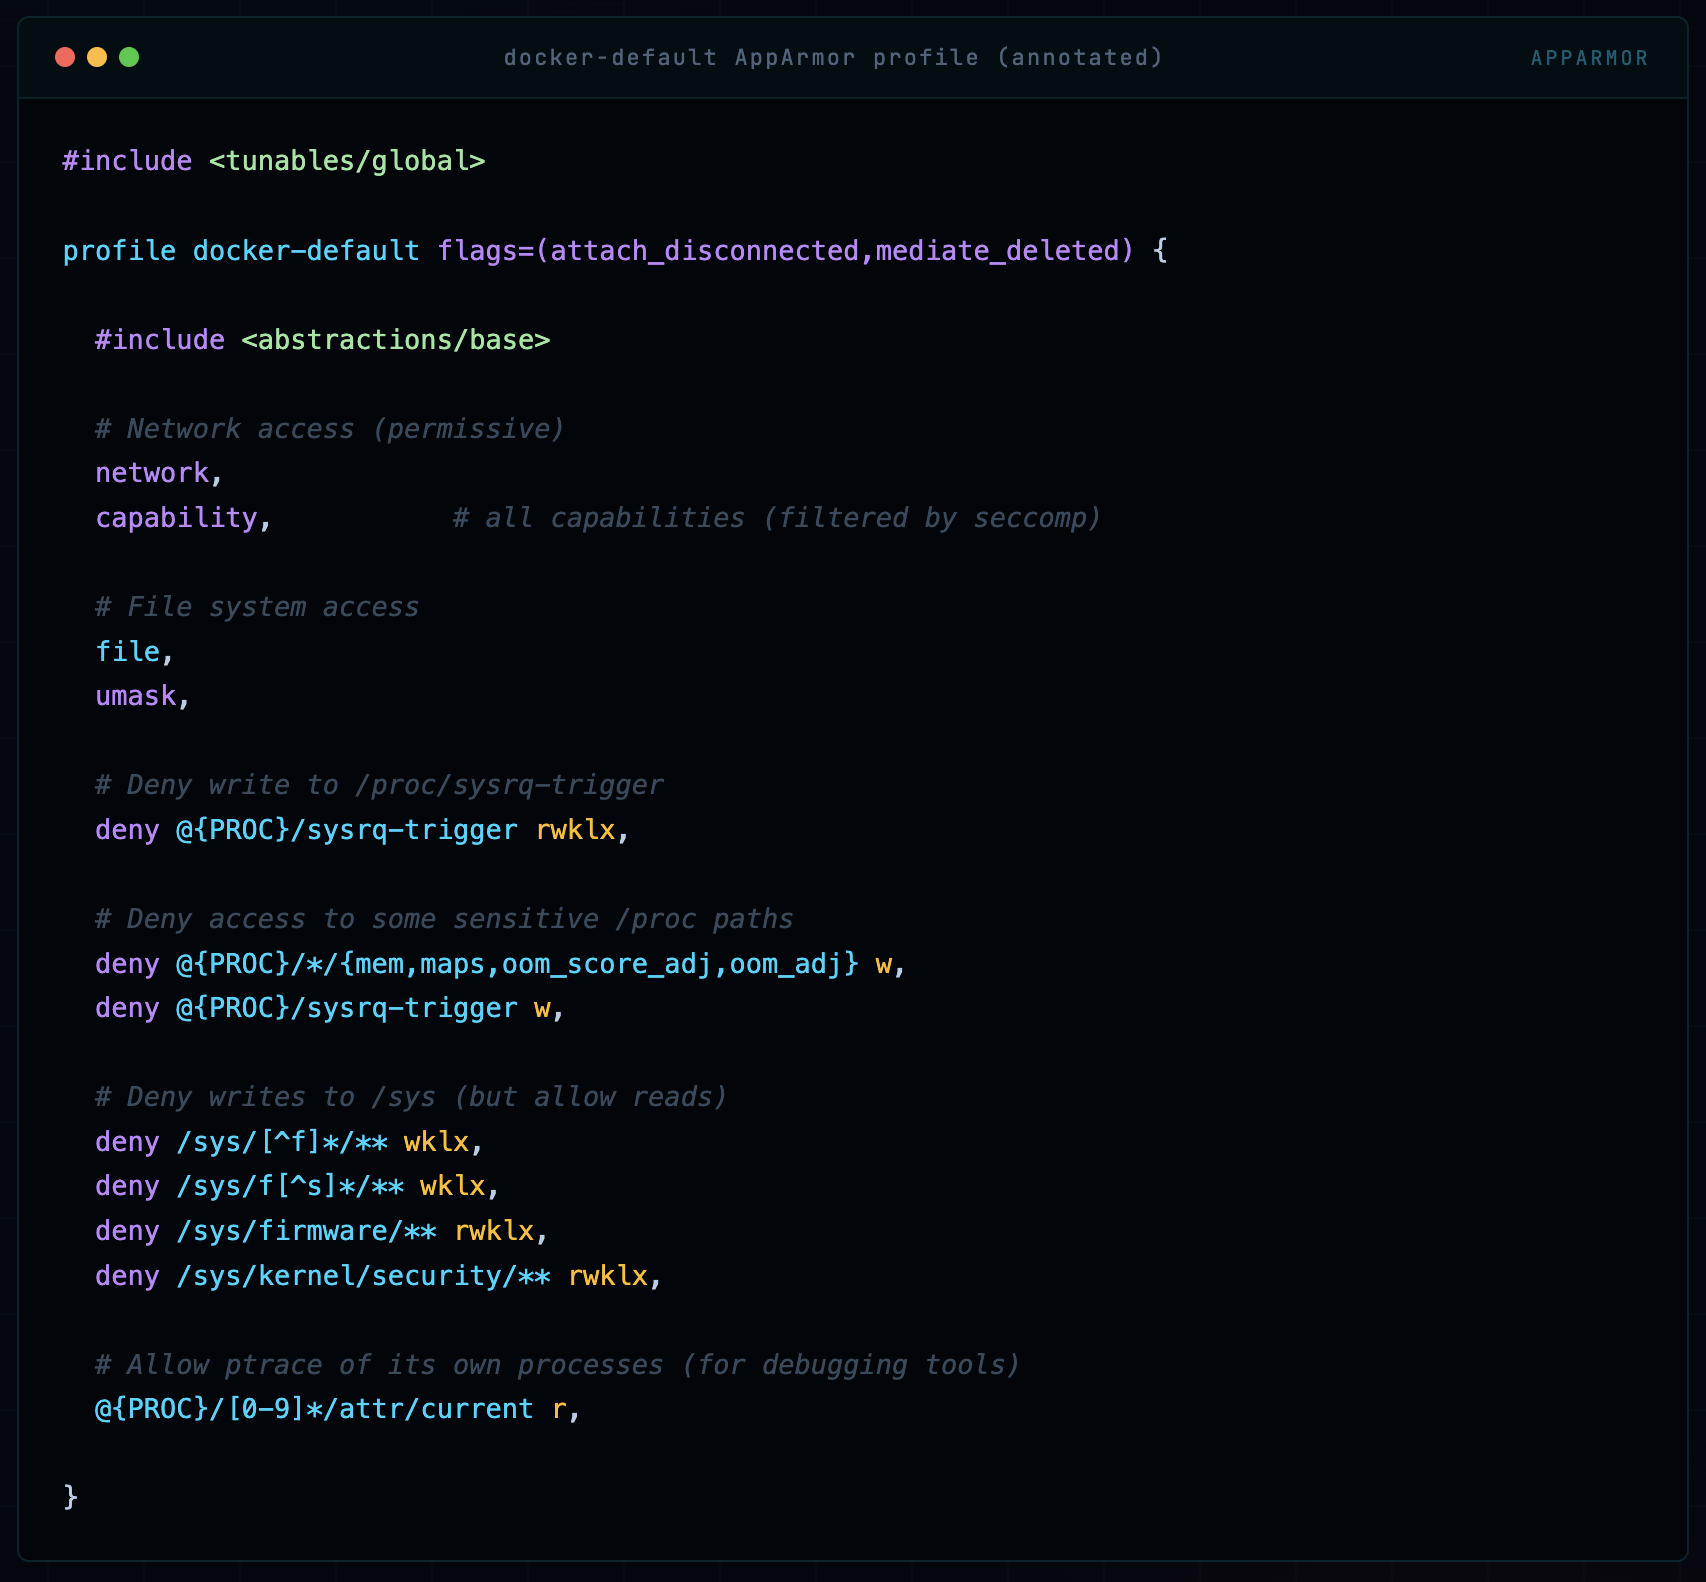
#include <tunables/global>

profile docker-default flags=(attach_disconnected,mediate_deleted) {

  #include <abstractions/base>

  # Network access (permissive)
  network,
  capability,           # all capabilities (filtered by seccomp)

  # File system access
  file,
  umask,

  # Deny write to /proc/sysrq-trigger
  deny @{PROC}/sysrq-trigger rwklx,

  # Deny access to some sensitive /proc paths
  deny @{PROC}/*/{mem,maps,oom_score_adj,oom_adj} w,
  deny @{PROC}/sysrq-trigger w,

  # Deny writes to /sys (but allow reads)
  deny /sys/[^f]*/** wklx,
  deny /sys/f[^s]*/** wklx,
  deny /sys/firmware/** rwklx,
  deny /sys/kernel/security/** rwklx,

  # Allow ptrace of its own processes (for debugging tools)
  @{PROC}/[0-9]*/attr/current r,

}
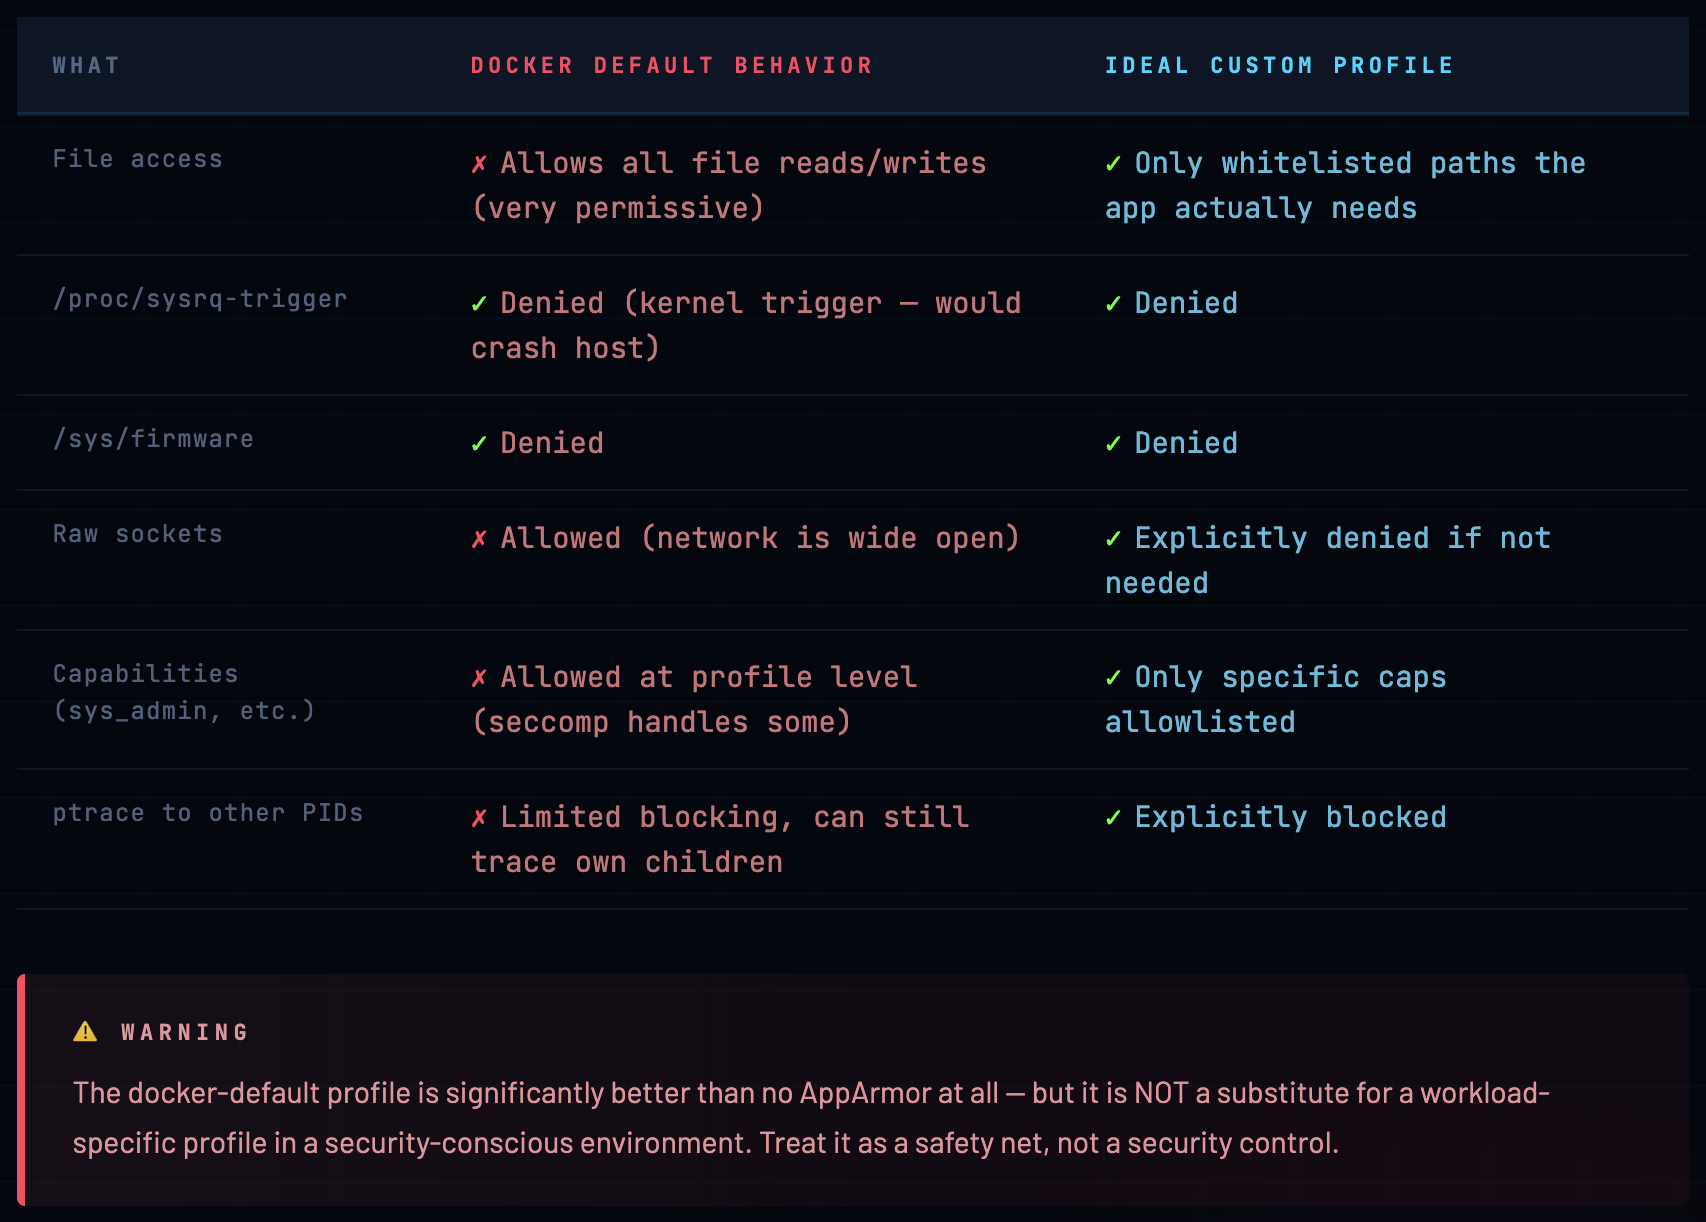
The docker-default profile is deliberately broad. Docker chose this intentionally - it needs to work with thousands of different containerized applications. But “broad enough for everything” means “specific enough for nothing.”
Here’s what it actually protects and what it doesn’t:
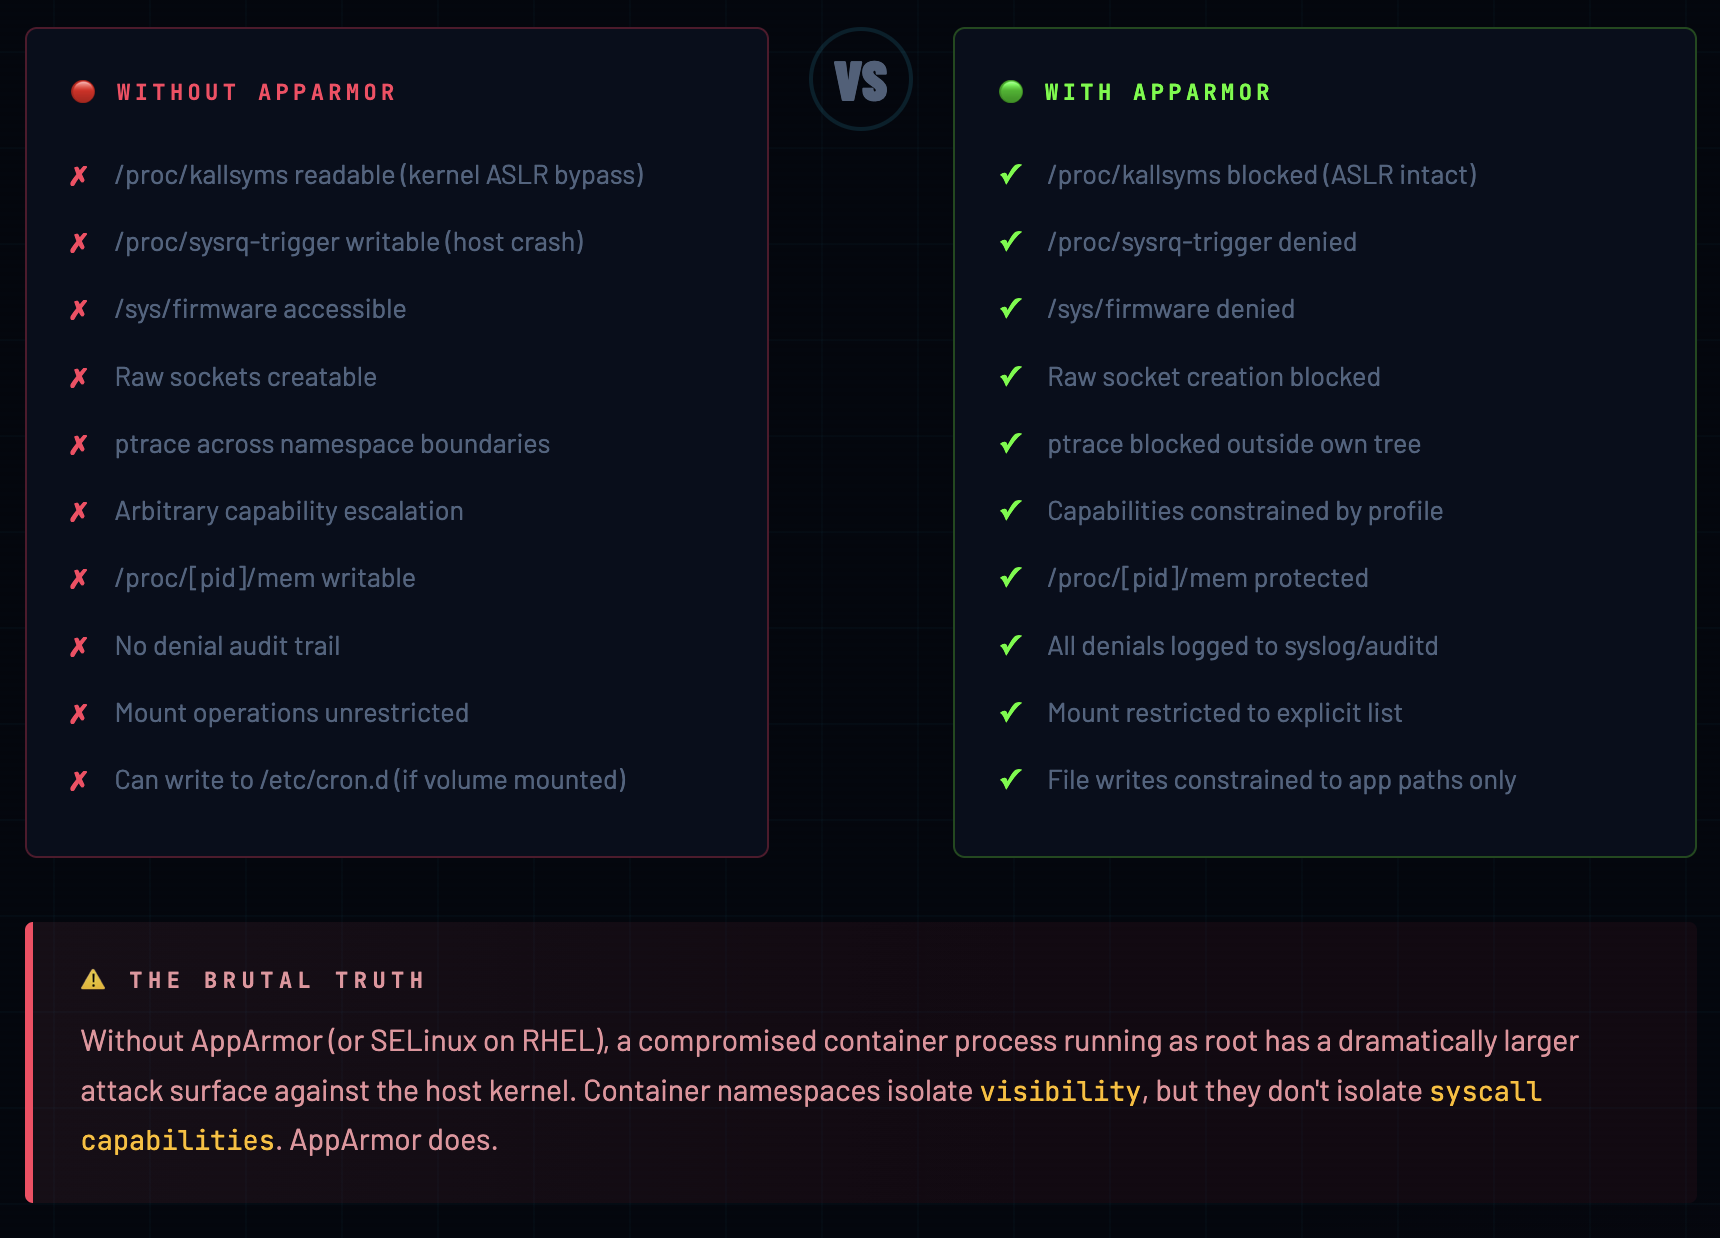
Without AppArmor vs With AppArmor
This is the section I tell every developer who asks “do we really need this?” Let me show you the difference concretely, not abstractly.
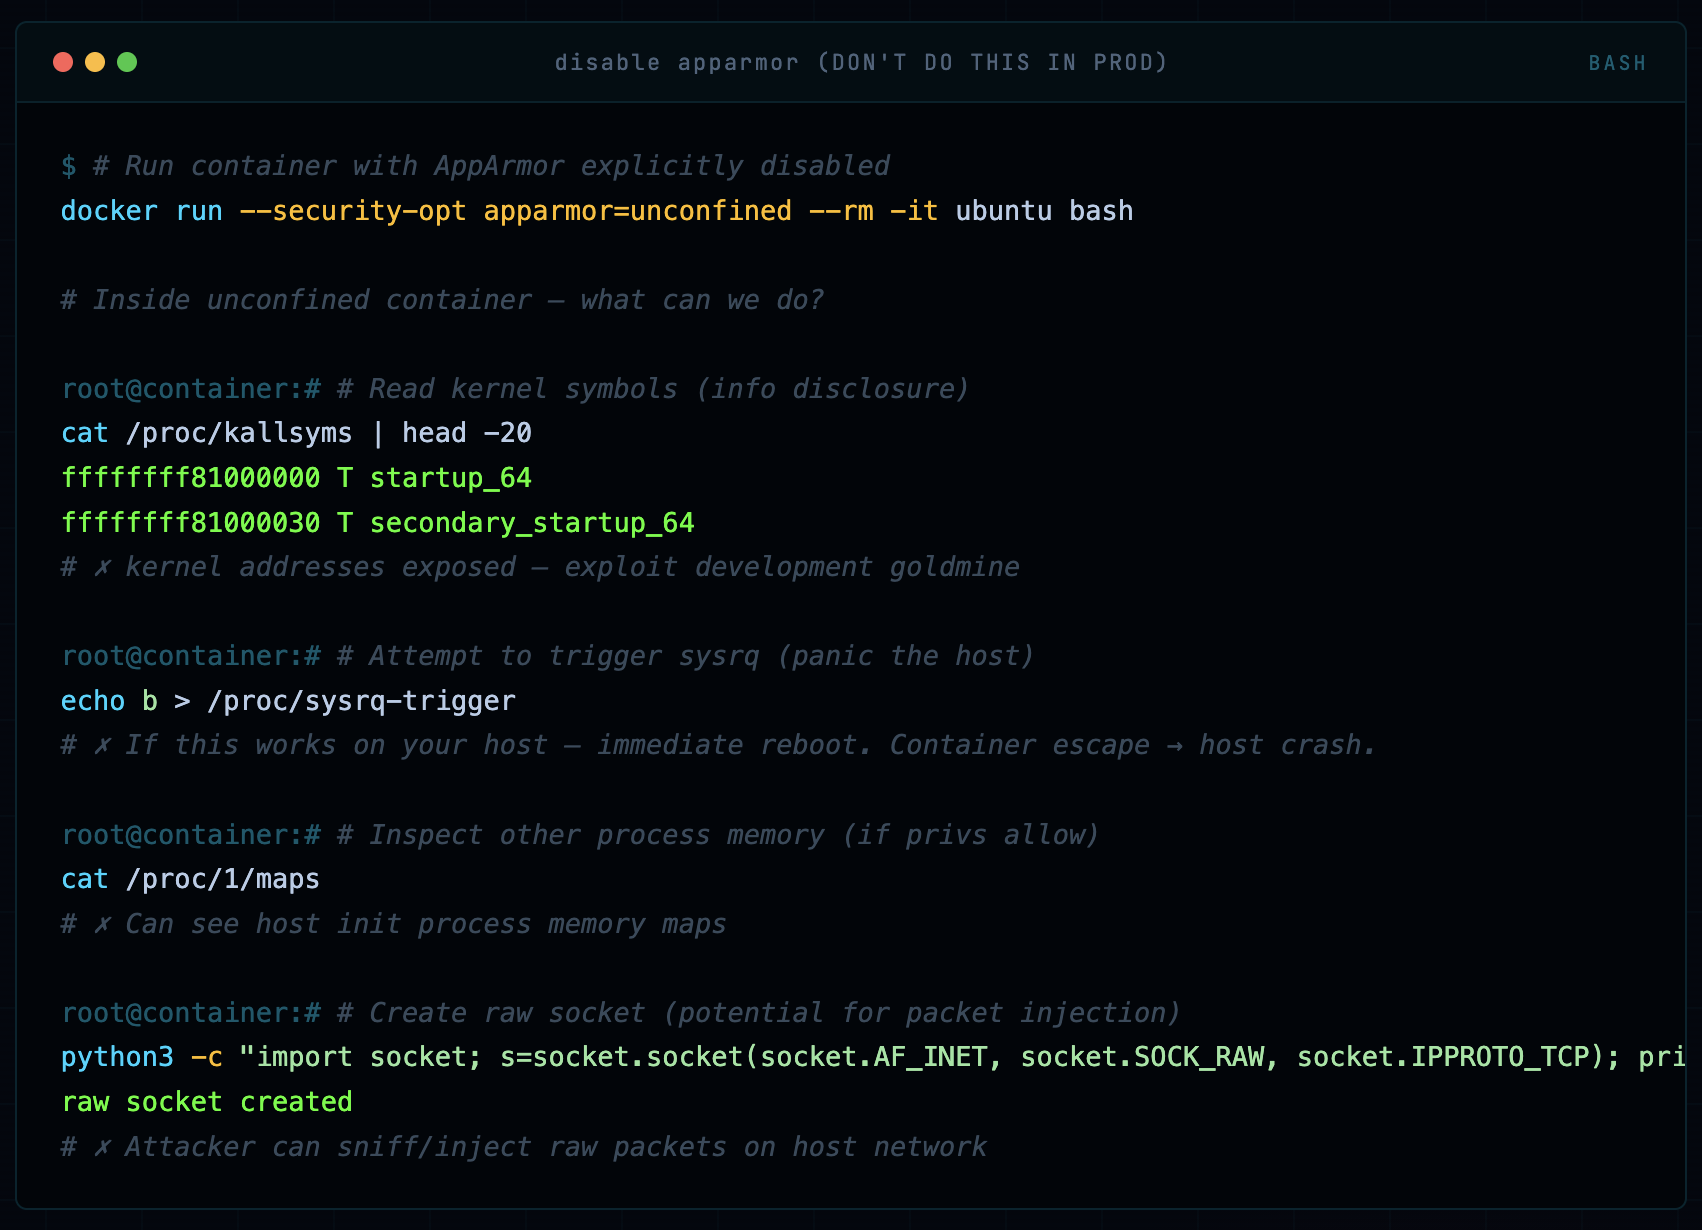
Scenario: No AppArmor - Container Running Unconfined
# Run container with AppArmor explicitly disabled
docker run --security-opt apparmor=unconfined --rm -it ubuntu bash

# Inside unconfined container - what can we do?

# Read kernel symbols (info disclosure)
cat /proc/kallsyms | head -20
ffffffff81000000 T startup_64
ffffffff81000030 T secondary_startup_64
# ✗ kernel addresses exposed - exploit development goldmine

# Attempt to trigger sysrq (panic the host)
echo b > /proc/sysrq-trigger
# ✗ If this works on your host - immediate reboot. Container escape → host crash.

# Inspect other process memory (if privs allow)
cat /proc/1/maps
# ✗ Can see host init process memory maps

# Create raw socket (potential for packet injection)
python3 -c "import socket; s=socket.socket(socket.AF_INET, socket.SOCK_RAW, socket.IPPROTO_TCP); print('raw socket created')"
raw socket created
# ✗ Attacker can sniff/inject raw packets on host network
Writing a Custom AppArmor Profile
This is where most guides stop at theory and you’re left to figure it out yourself. Not here. Let’s write a real, production-grade AppArmor profile for an nginx web server container - step by step, with explanations of every decision.
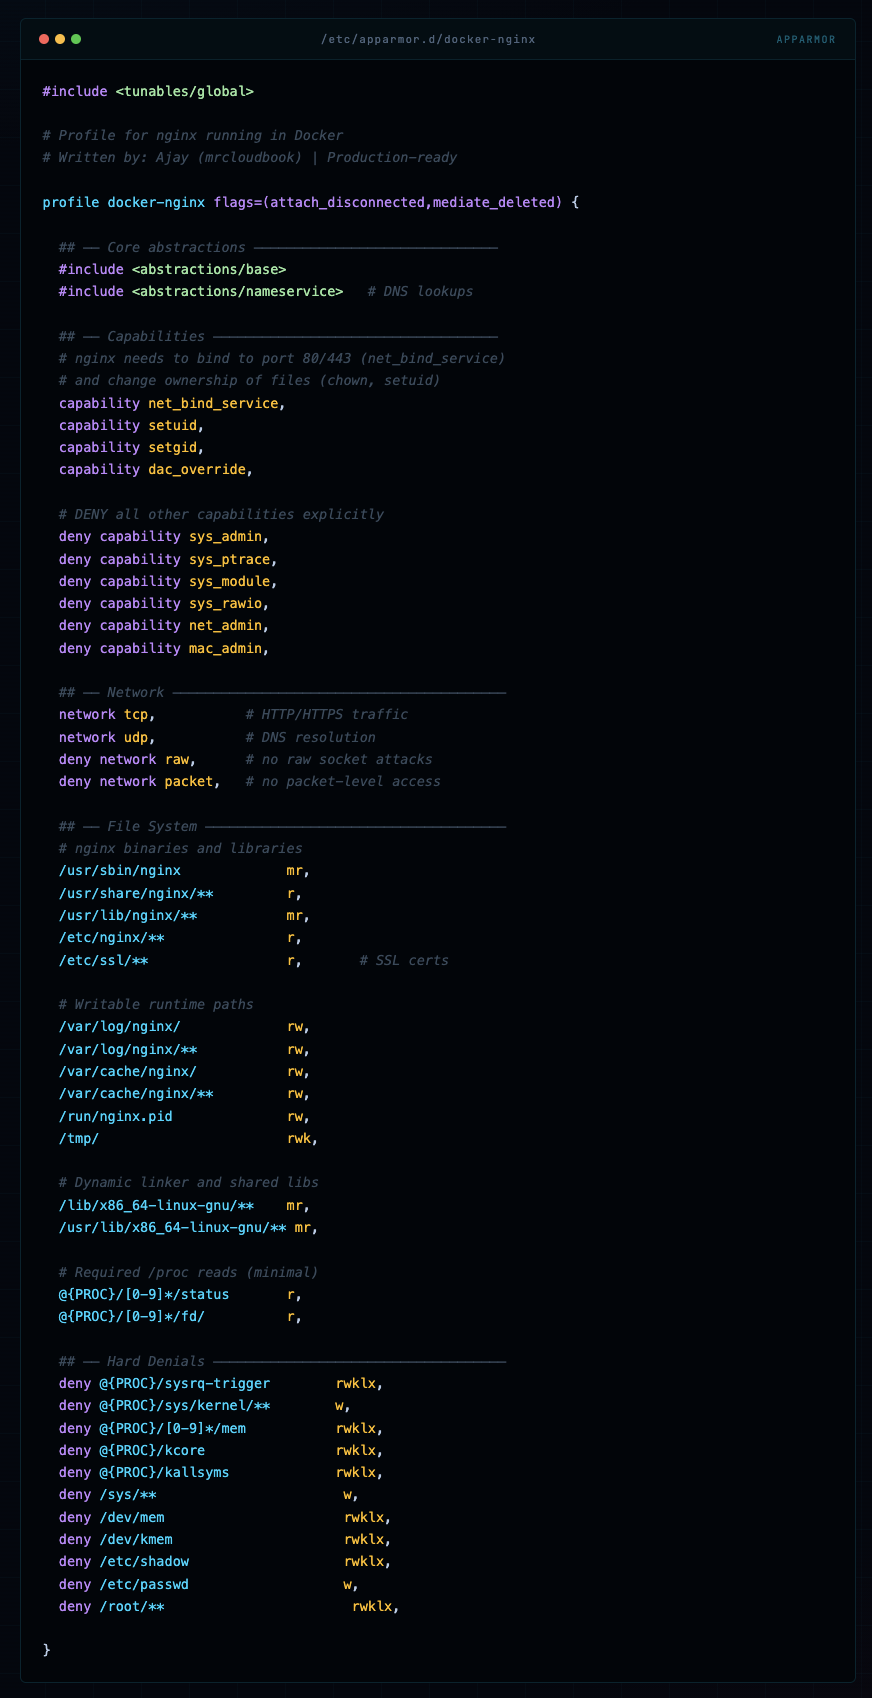
The Full nginx Profile
#include <tunables/global>

# Profile for nginx running in Docker
# Written by: Ajay (mrcloudbook) | Production-ready

profile docker-nginx flags=(attach_disconnected,mediate_deleted) {

  ## ── Core abstractions ──────────────────────────────
  #include <abstractions/base>
  #include <abstractions/nameservice>   # DNS lookups

  ## ── Capabilities ───────────────────────────────────
  # nginx needs to bind to port 80/443 (net_bind_service)
  # and change ownership of files (chown, setuid)
  capability net_bind_service,
  capability setuid,
  capability setgid,
  capability dac_override,

  # DENY all other capabilities explicitly
  deny capability sys_admin,
  deny capability sys_ptrace,
  deny capability sys_module,
  deny capability sys_rawio,
  deny capability net_admin,
  deny capability mac_admin,

  ## ── Network ─────────────────────────────────────────
  network tcp,           # HTTP/HTTPS traffic
  network udp,           # DNS resolution
  deny network raw,      # no raw socket attacks
  deny network packet,   # no packet-level access

  ## ── File System ─────────────────────────────────────
  # nginx binaries and libraries
  /usr/sbin/nginx             mr,
  /usr/share/nginx/**         r,
  /usr/lib/nginx/**           mr,
  /etc/nginx/**               r,
  /etc/ssl/**                 r,       # SSL certs

  # Writable runtime paths
  /var/log/nginx/             rw,
  /var/log/nginx/**           rw,
  /var/cache/nginx/           rw,
  /var/cache/nginx/**         rw,
  /run/nginx.pid              rw,
  /tmp/                       rwk,

  # Dynamic linker and shared libs
  /lib/x86_64-linux-gnu/**    mr,
  /usr/lib/x86_64-linux-gnu/** mr,

  # Required /proc reads (minimal)
  @{PROC}/[0-9]*/status       r,
  @{PROC}/[0-9]*/fd/          r,

  ## ── Hard Denials ────────────────────────────────────
  deny @{PROC}/sysrq-trigger        rwklx,
  deny @{PROC}/sys/kernel/**        w,
  deny @{PROC}/[0-9]*/mem           rwklx,
  deny @{PROC}/kcore                rwklx,
  deny @{PROC}/kallsyms             rwklx,
  deny /sys/**                       w,
  deny /dev/mem                      rwklx,
  deny /dev/kmem                     rwklx,
  deny /etc/shadow                   rwklx,
  deny /etc/passwd                   w,
  deny /root/**                       rwklx,

}
💡 Profile Writing Philosophy Write what you need, deny what’s dangerous, and let AppArmor’s default-deny handle everything else. Start with complain mode, run your app, collect denials, then build your allowlist. Never start with “allow all” and try to add denies - that’s how you miss things.
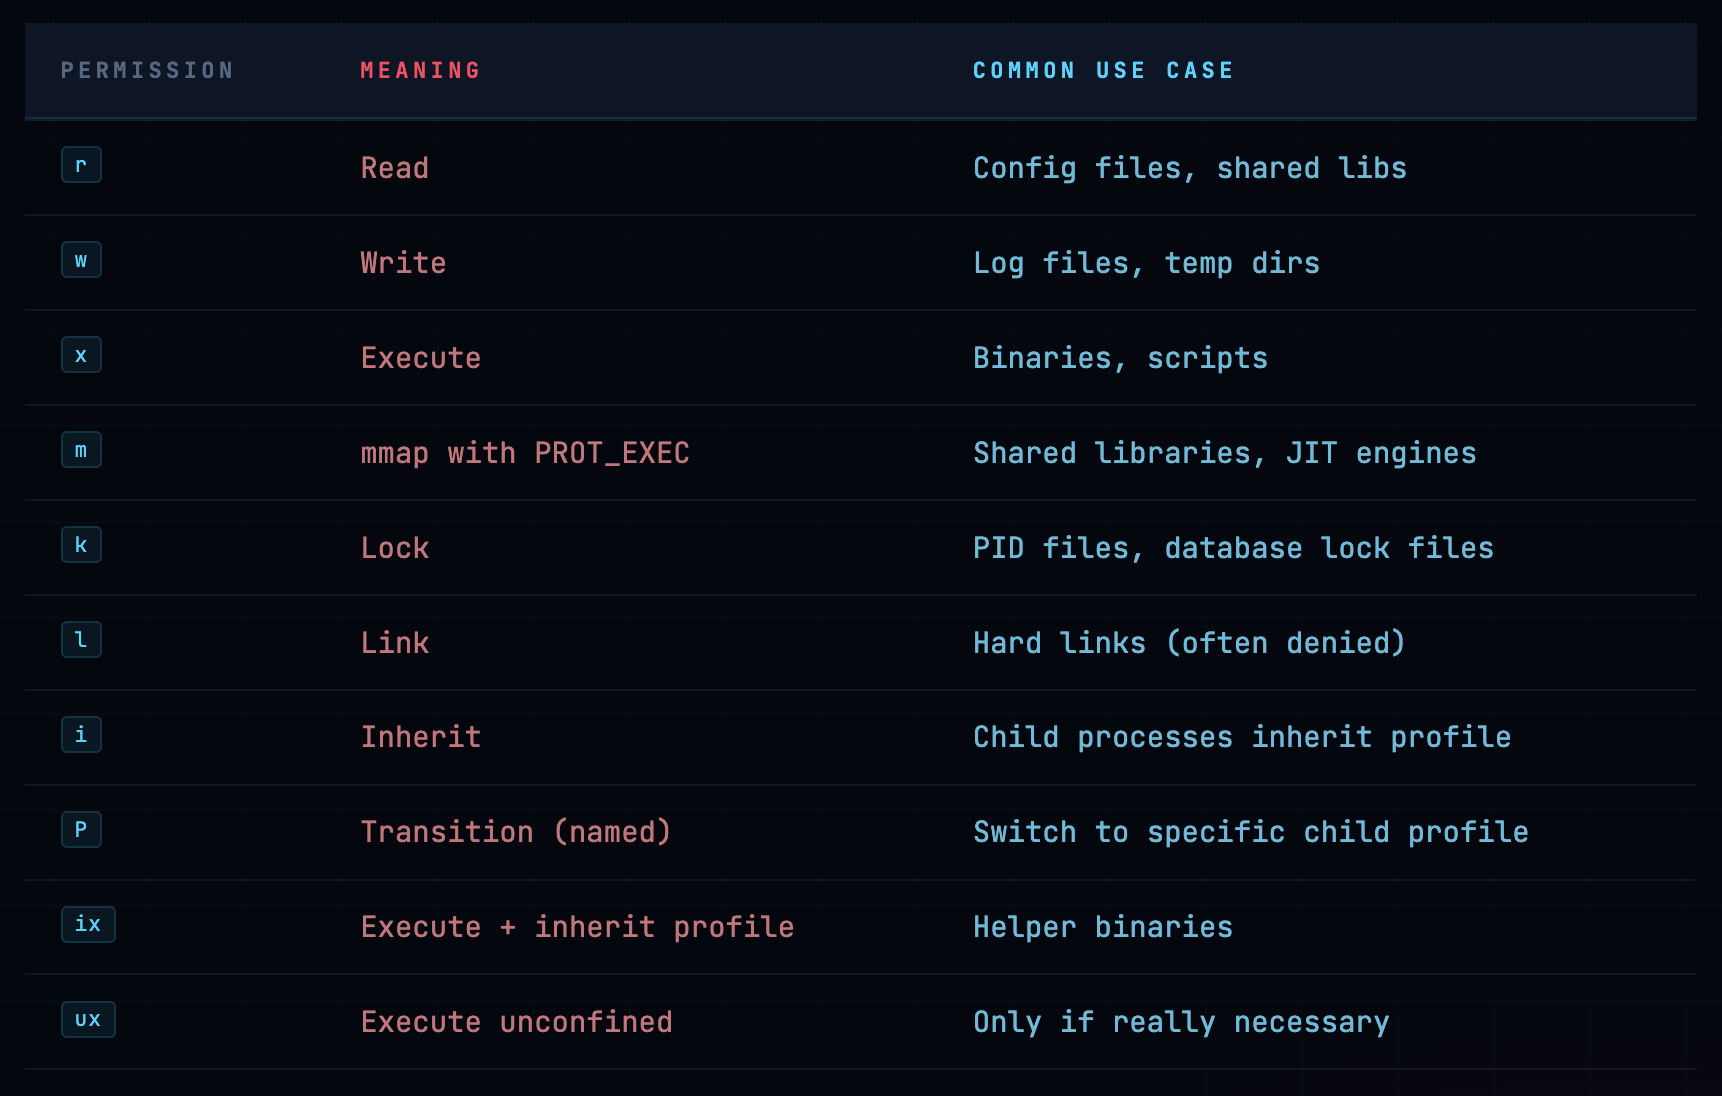
File Permission Reference
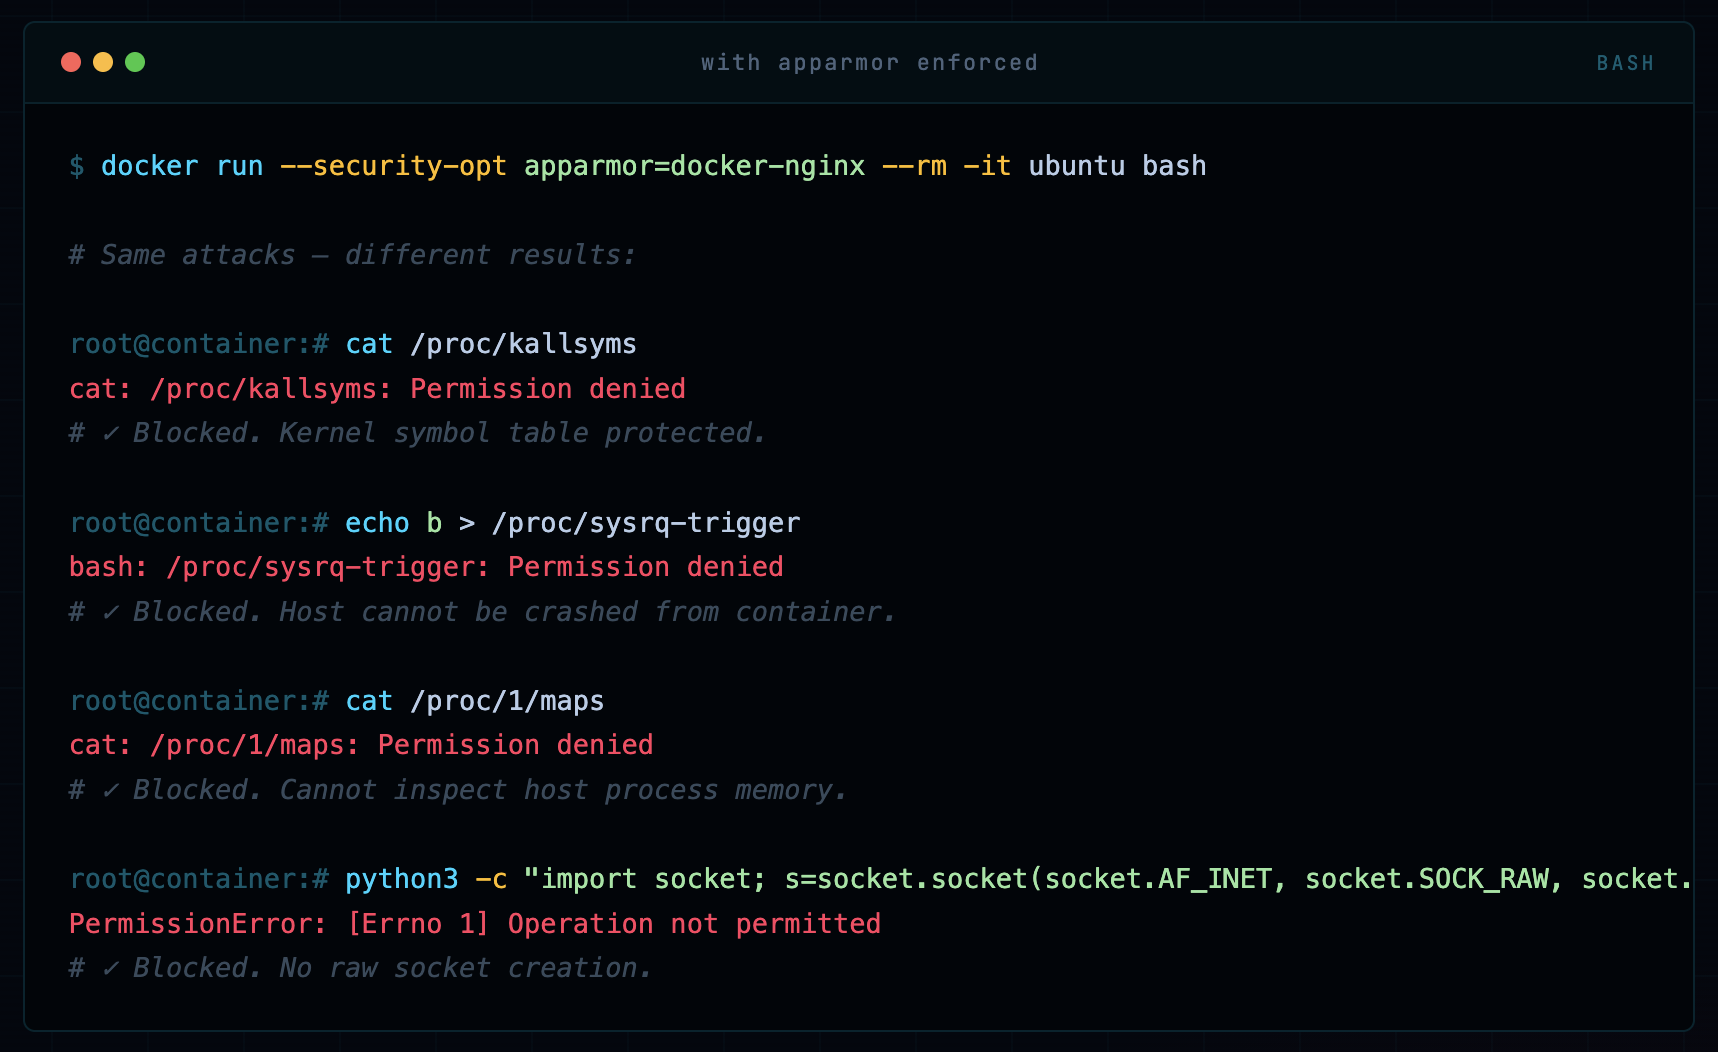
Same Scenario: With AppArmor Custom Profile
docker run --security-opt apparmor=docker-nginx --rm -it ubuntu bash

# Same attacks - different results:

cat /proc/kallsyms
cat: /proc/kallsyms: Permission denied
# ✓ Blocked. Kernel symbol table protected.

echo b > /proc/sysrq-trigger
bash: /proc/sysrq-trigger: Permission denied
# ✓ Blocked. Host cannot be crashed from container.

cat /proc/1/maps
cat: /proc/1/maps: Permission denied
# ✓ Blocked. Cannot inspect host process memory.

python3 -c "import socket; s=socket.socket(socket.AF_INET, socket.SOCK_RAW, socket.IPPROTO_TCP)"
PermissionError: [Errno 1] Operation not permitted
# ✓ Blocked. No raw socket creation.
Side-by-Side Comparison
Real Attack Scenarios: Blocked vs Not Blocked
Let me walk you through three attack scenarios I’ve actually seen (or simulated in red team engagements) and how AppArmor handles them.
Attack 1: Kernel Exploit via /proc Write
Many kernel privilege escalation exploits work by writing to specific /proc entries. For example, /proc/[pid]/mem can be written to by privileged processes to overwrite memory of another process. An attacker who gets code execution inside a container will immediately probe for these vectors.
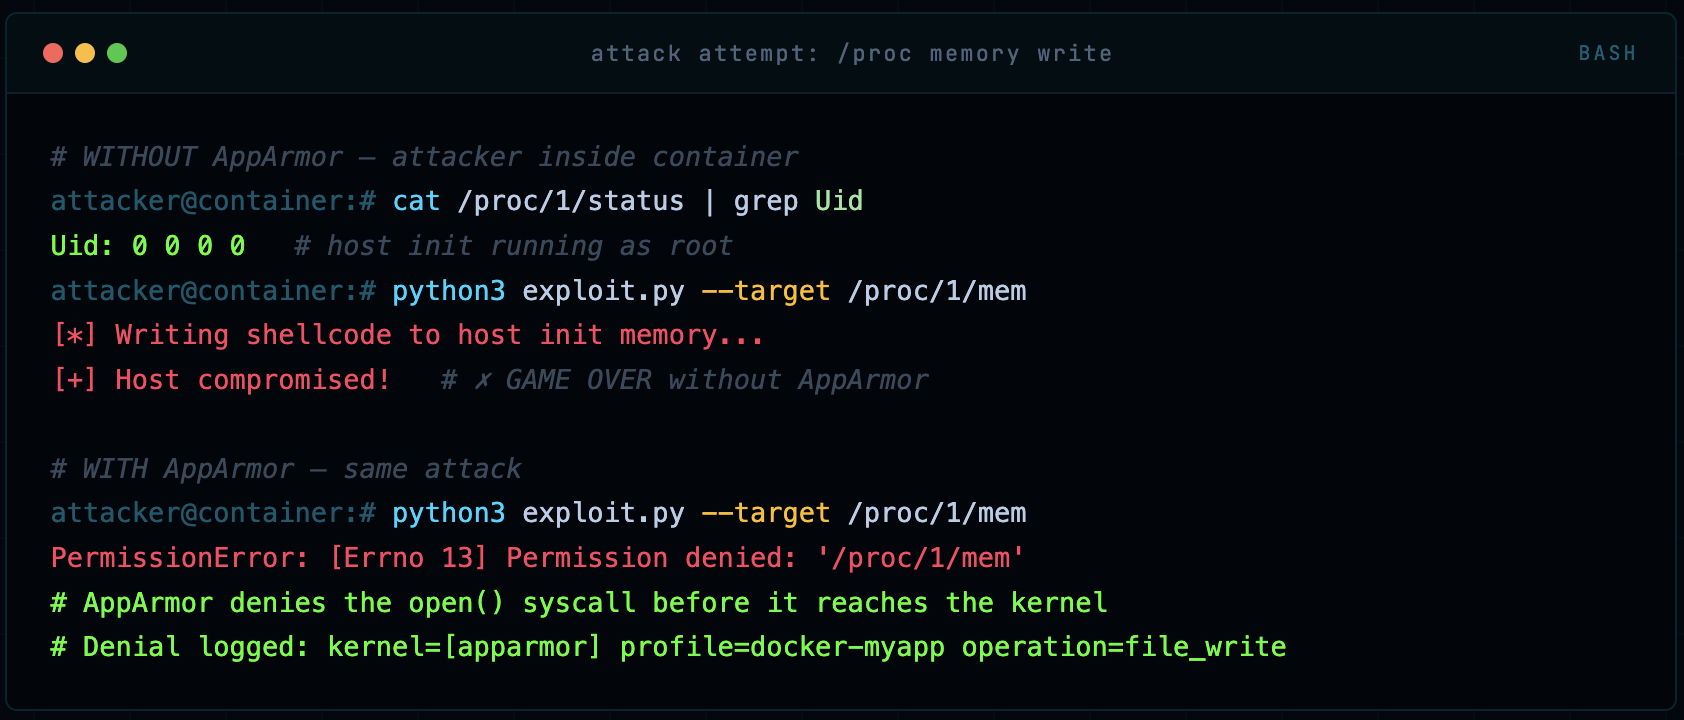
# WITHOUT AppArmor - attacker inside container
cat /proc/1/status | grep Uid
Uid: 0 0 0 0   # host init running as root
python3 exploit.py --target /proc/1/mem
[*] Writing shellcode to host init memory...
[+] Host compromised!   # ✗ GAME OVER without AppArmor

# WITH AppArmor - same attack
python3 exploit.py --target /proc/1/mem
PermissionError: [Errno 13] Permission denied: '/proc/1/mem'
# AppArmor denies the open() syscall before it reaches the kernel
# Denial logged: kernel=[apparmor] profile=docker-myapp operation=file_write
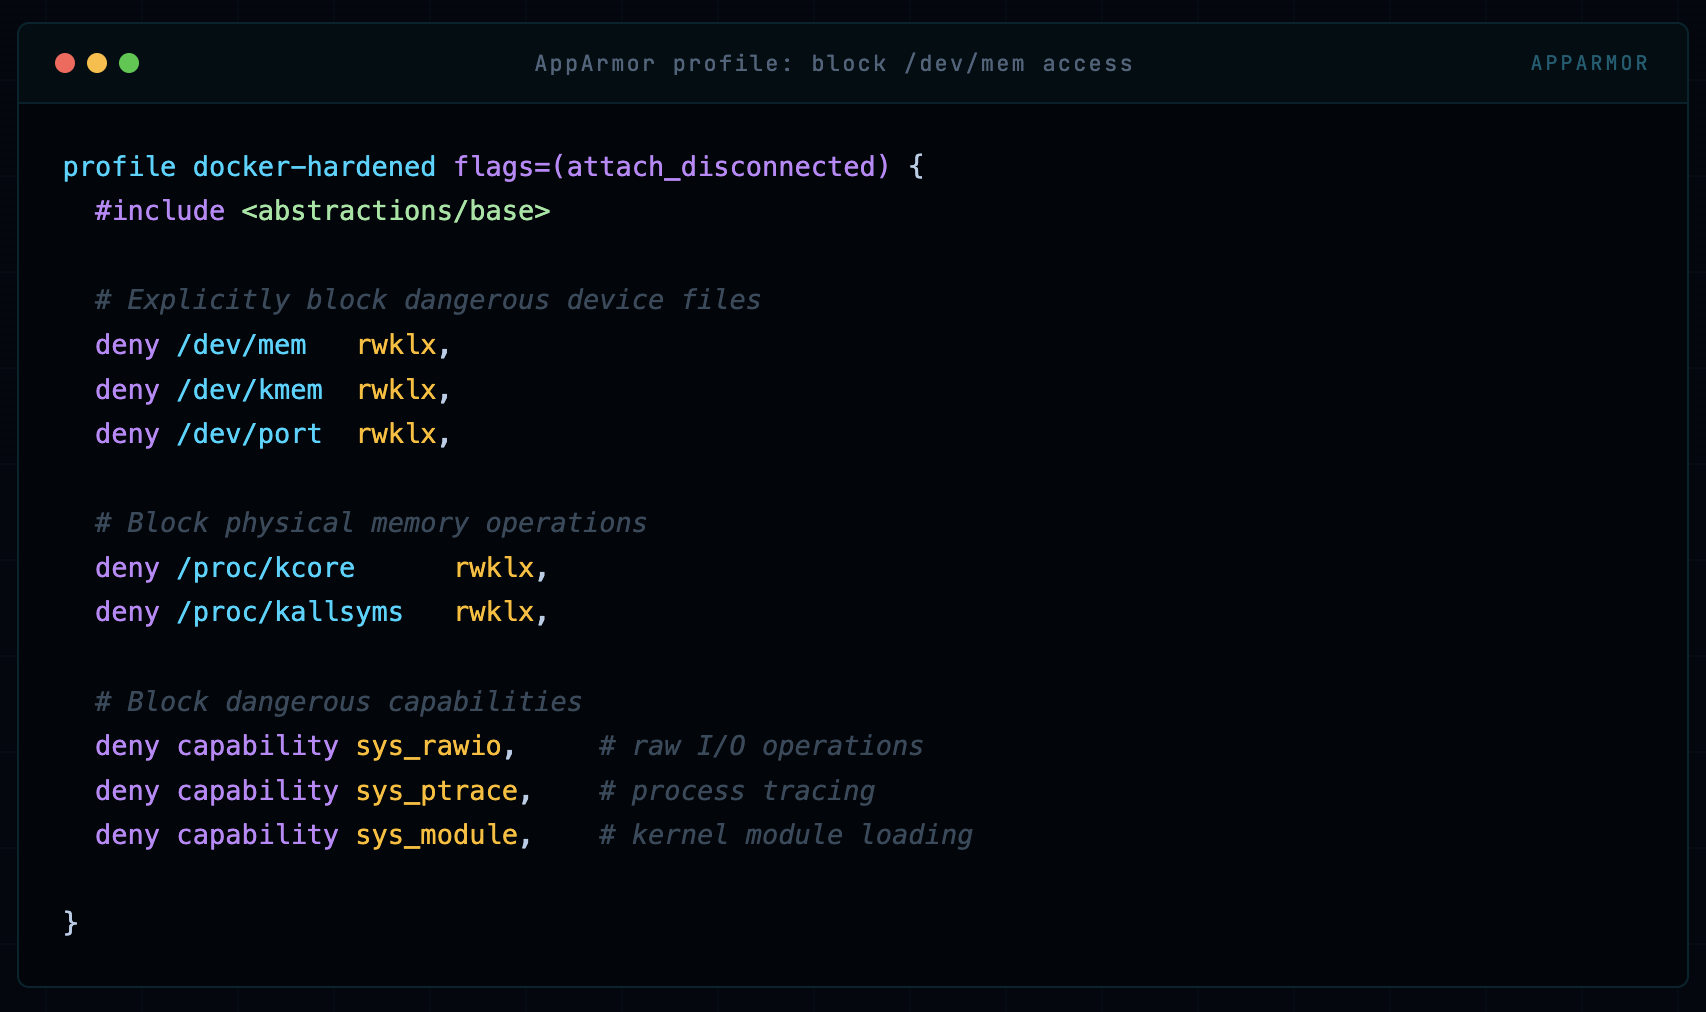
Attack 2: Container Breakout via /dev/mem
If a container has access to /dev/mem or /dev/kmem, an attacker with sufficient privileges can read and write physical memory - this is a full host takeover vector. Docker’s default profile doesn’t prevent this in all configurations.
profile docker-hardened flags=(attach_disconnected) {
  #include <abstractions/base>

  # Explicitly block dangerous device files
  deny /dev/mem   rwklx,
  deny /dev/kmem  rwklx,
  deny /dev/port  rwklx,

  # Block physical memory operations
  deny /proc/kcore      rwklx,
  deny /proc/kallsyms   rwklx,

  # Block dangerous capabilities
  deny capability sys_rawio,     # raw I/O operations
  deny capability sys_ptrace,    # process tracing
  deny capability sys_module,    # kernel module loading

}
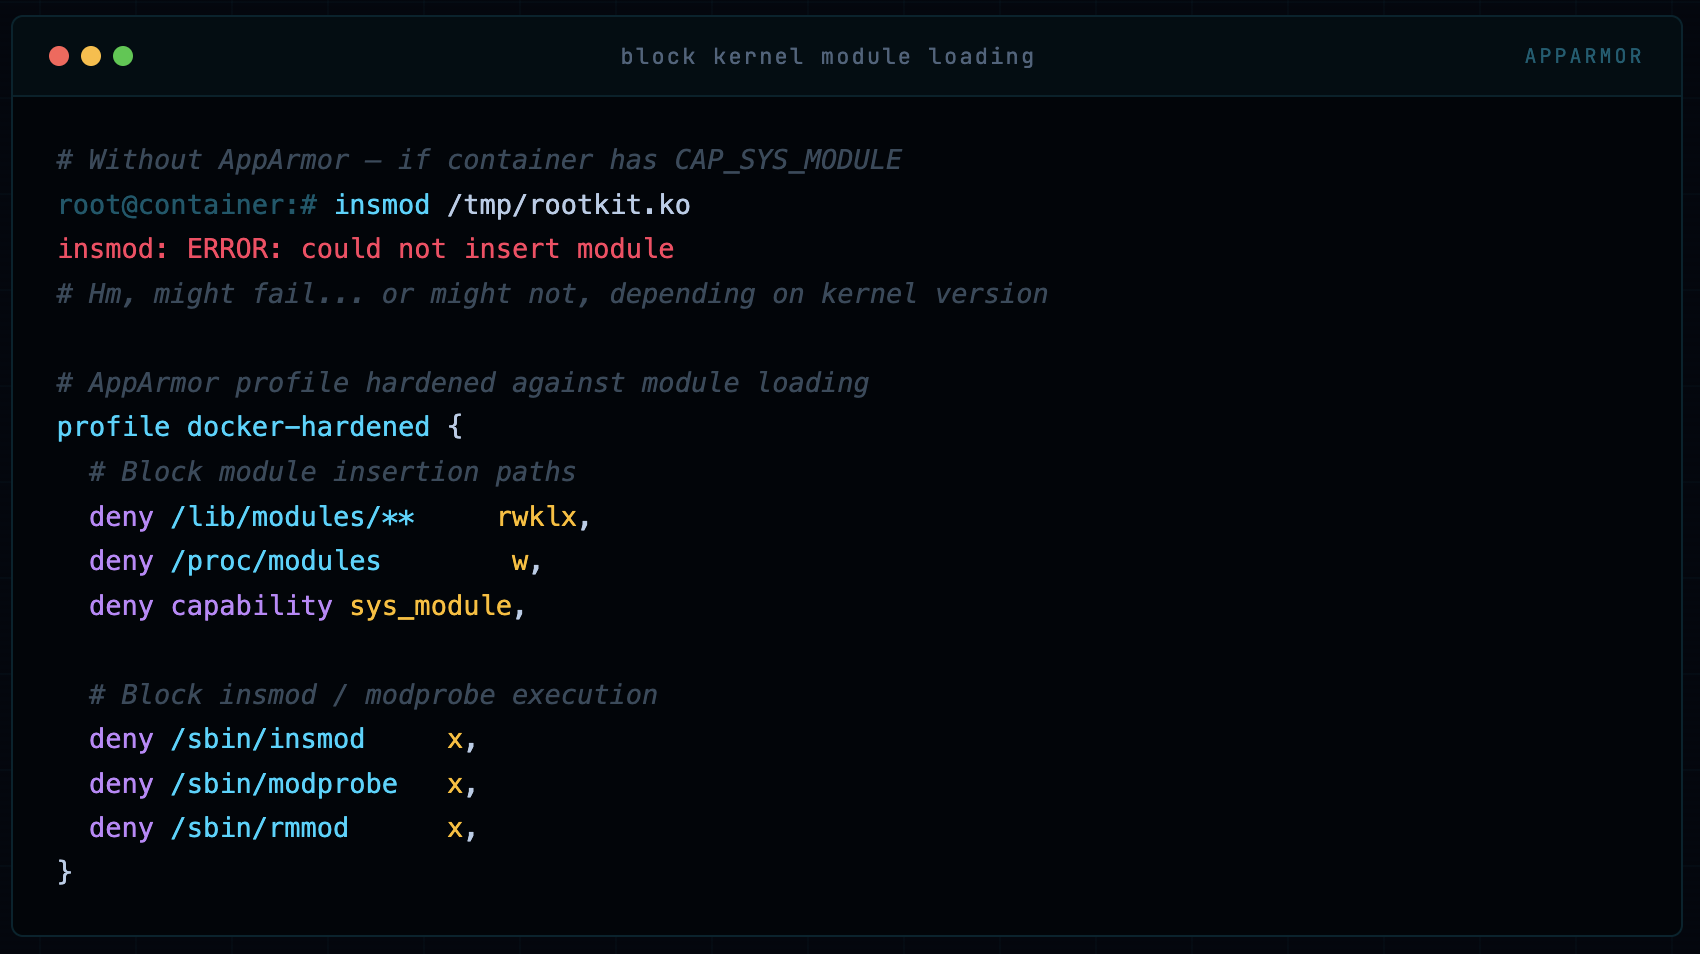
Attack 3: Malicious Kernel Module Loading
If an attacker can load a kernel module from inside a container, they own the host. This requires CAP_SYS_MODULE and access to certain /proc and /lib/modules paths. AppArmor can lock this down completely.
# Without AppArmor - if container has CAP_SYS_MODULE
insmod /tmp/rootkit.ko
insmod: ERROR: could not insert module
# Hm, might fail... or might not, depending on kernel version

# AppArmor profile hardened against module loading
profile docker-hardened {
  # Block module insertion paths
  deny /lib/modules/**     rwklx,
  deny /proc/modules        w,
  deny capability sys_module,

  # Block insmod / modprobe execution
  deny /sbin/insmod     x,
  deny /sbin/modprobe   x,
  deny /sbin/rmmod      x,
}
Step-by-Step: Full Lab Setup
Enough theory. Let’s build this from scratch on a fresh Ubuntu 22.04 system. Every command, every output, every decision explained.
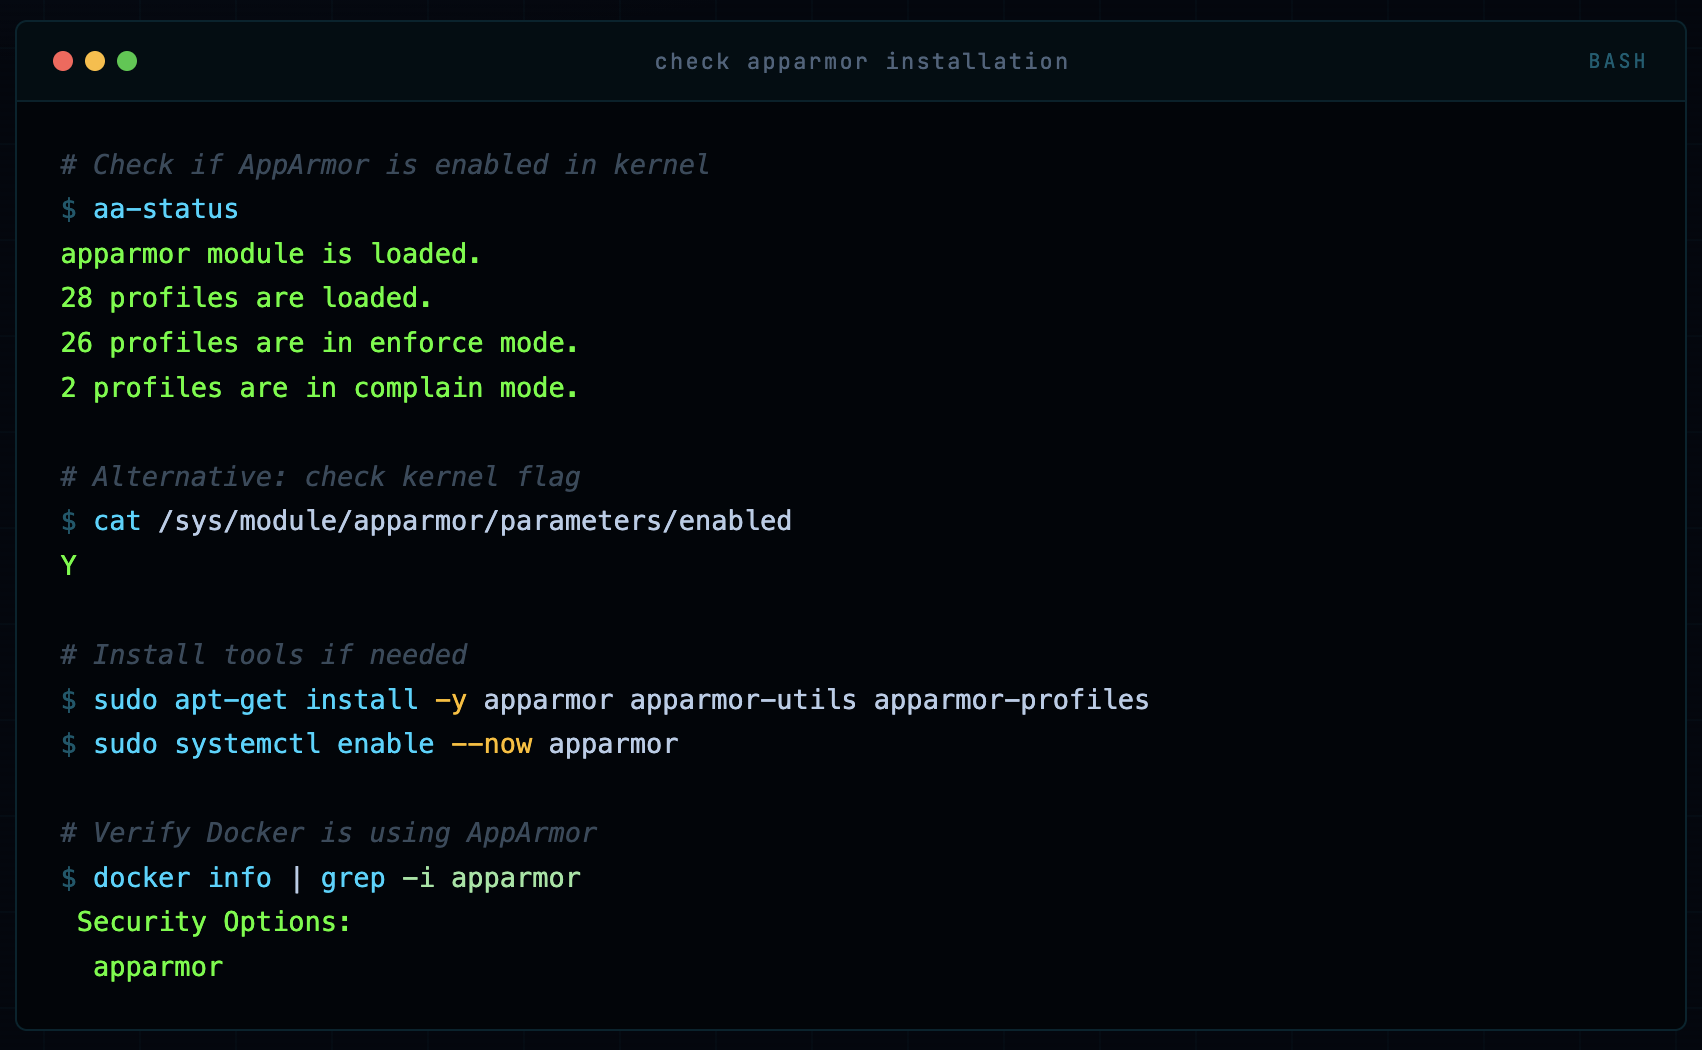
Step 1: Verify AppArmor Status
# Check if AppArmor is enabled in kernel
aa-status
apparmor module is loaded.
28 profiles are loaded.
26 profiles are in enforce mode.
2 profiles are in complain mode.

# Alternative: check kernel flag
cat /sys/module/apparmor/parameters/enabled
Y

# Install tools if needed
sudo apt-get install -y apparmor apparmor-utils apparmor-profiles
sudo systemctl enable --now apparmor

# Verify Docker is using AppArmor
docker info | grep -i apparmor
 Security Options:
  apparmor
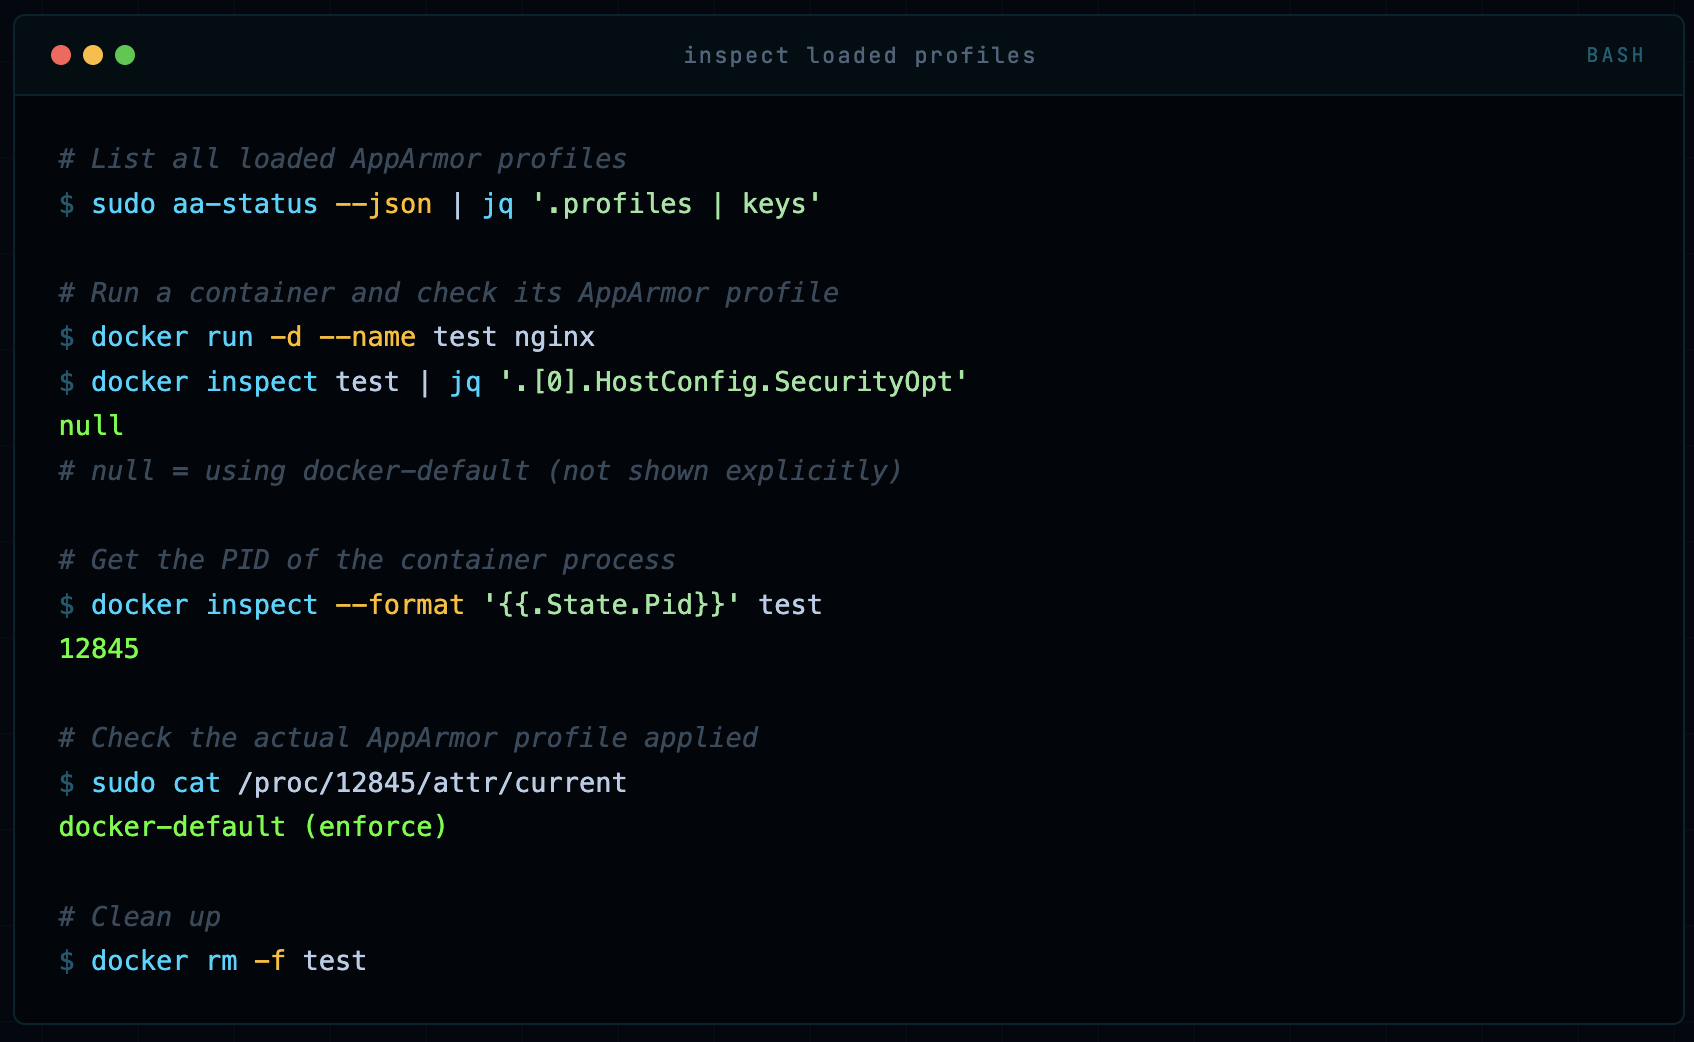
Step 2: Inspect the Default Profile
# List all loaded AppArmor profiles
sudo aa-status --json | jq '.profiles | keys'

# Run a container and check its AppArmor profile
docker run -d --name test nginx
docker inspect test | jq '.[0].HostConfig.SecurityOpt'
null
# null = using docker-default (not shown explicitly)

# Get the PID of the container process
docker inspect --format '{{.State.Pid}}' test
12845

# Check the actual AppArmor profile applied
sudo cat /proc/12845/attr/current
docker-default (enforce)

# Clean up
docker rm -f test
Step 3: Create and Load a Custom Profile
# Create the profile file
sudo nano /etc/apparmor.d/docker-nginx
# (paste the profile from Section 6)

# Validate syntax before loading
sudo apparmor_parser -p /etc/apparmor.d/docker-nginx
# No output = syntax OK. Any errors will be printed.

# Load the profile into the kernel (enforce mode)
sudo apparmor_parser -r -W /etc/apparmor.d/docker-nginx
Profile docker-nginx loaded

# Verify it's loaded
sudo aa-status | grep docker-nginx
   docker-nginx

# Run container with this profile
docker run -d --name nginx-secure \
    --security-opt "apparmor=docker-nginx" \
    -p 80:80 \
    nginx

# Confirm the profile is applied
docker inspect nginx-secure | jq '.[0].HostConfig.SecurityOpt'
["apparmor=docker-nginx"]

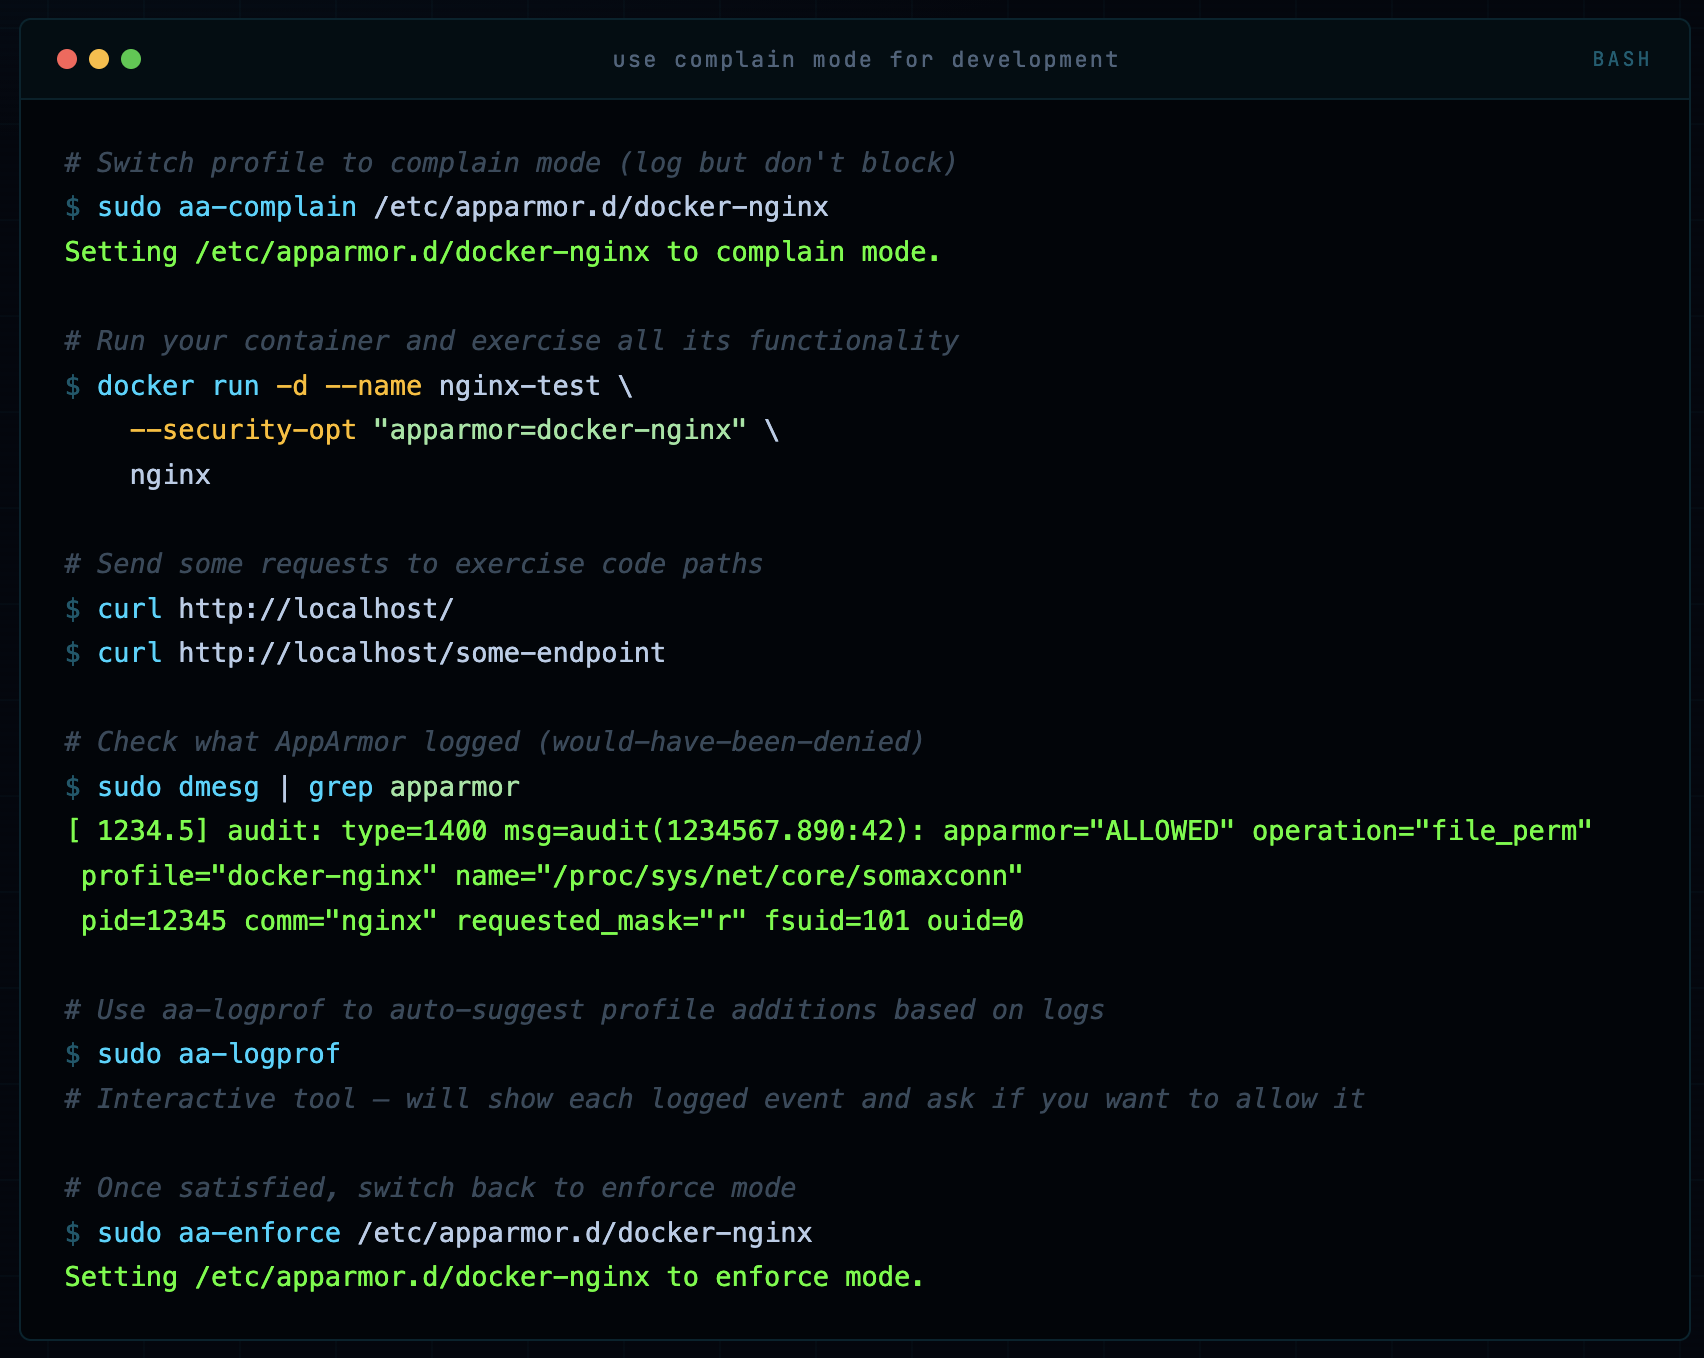
Step 4: Test the Profile in Complain Mode (Development)
# Switch profile to complain mode (log but don't block)
sudo aa-complain /etc/apparmor.d/docker-nginx
Setting /etc/apparmor.d/docker-nginx to complain mode.

# Run your container and exercise all its functionality
docker run -d --name nginx-test \
    --security-opt "apparmor=docker-nginx" \
    nginx

# Send some requests to exercise code paths
curl http://localhost/
curl http://localhost/some-endpoint

# Check what AppArmor logged (would-have-been-denied)
sudo dmesg | grep apparmor
[ 1234.5] audit: type=1400 msg=audit(1234567.890:42): apparmor="ALLOWED" operation="file_perm"
 profile="docker-nginx" name="/proc/sys/net/core/somaxconn"
 pid=12345 comm="nginx" requested_mask="r" fsuid=101 ouid=0

# Use aa-logprof to auto-suggest profile additions based on logs
sudo aa-logprof
# Interactive tool - will show each logged event and ask if you want to allow it

# Once satisfied, switch back to enforce mode
sudo aa-enforce /etc/apparmor.d/docker-nginx
Setting /etc/apparmor.d/docker-nginx to enforce mode.
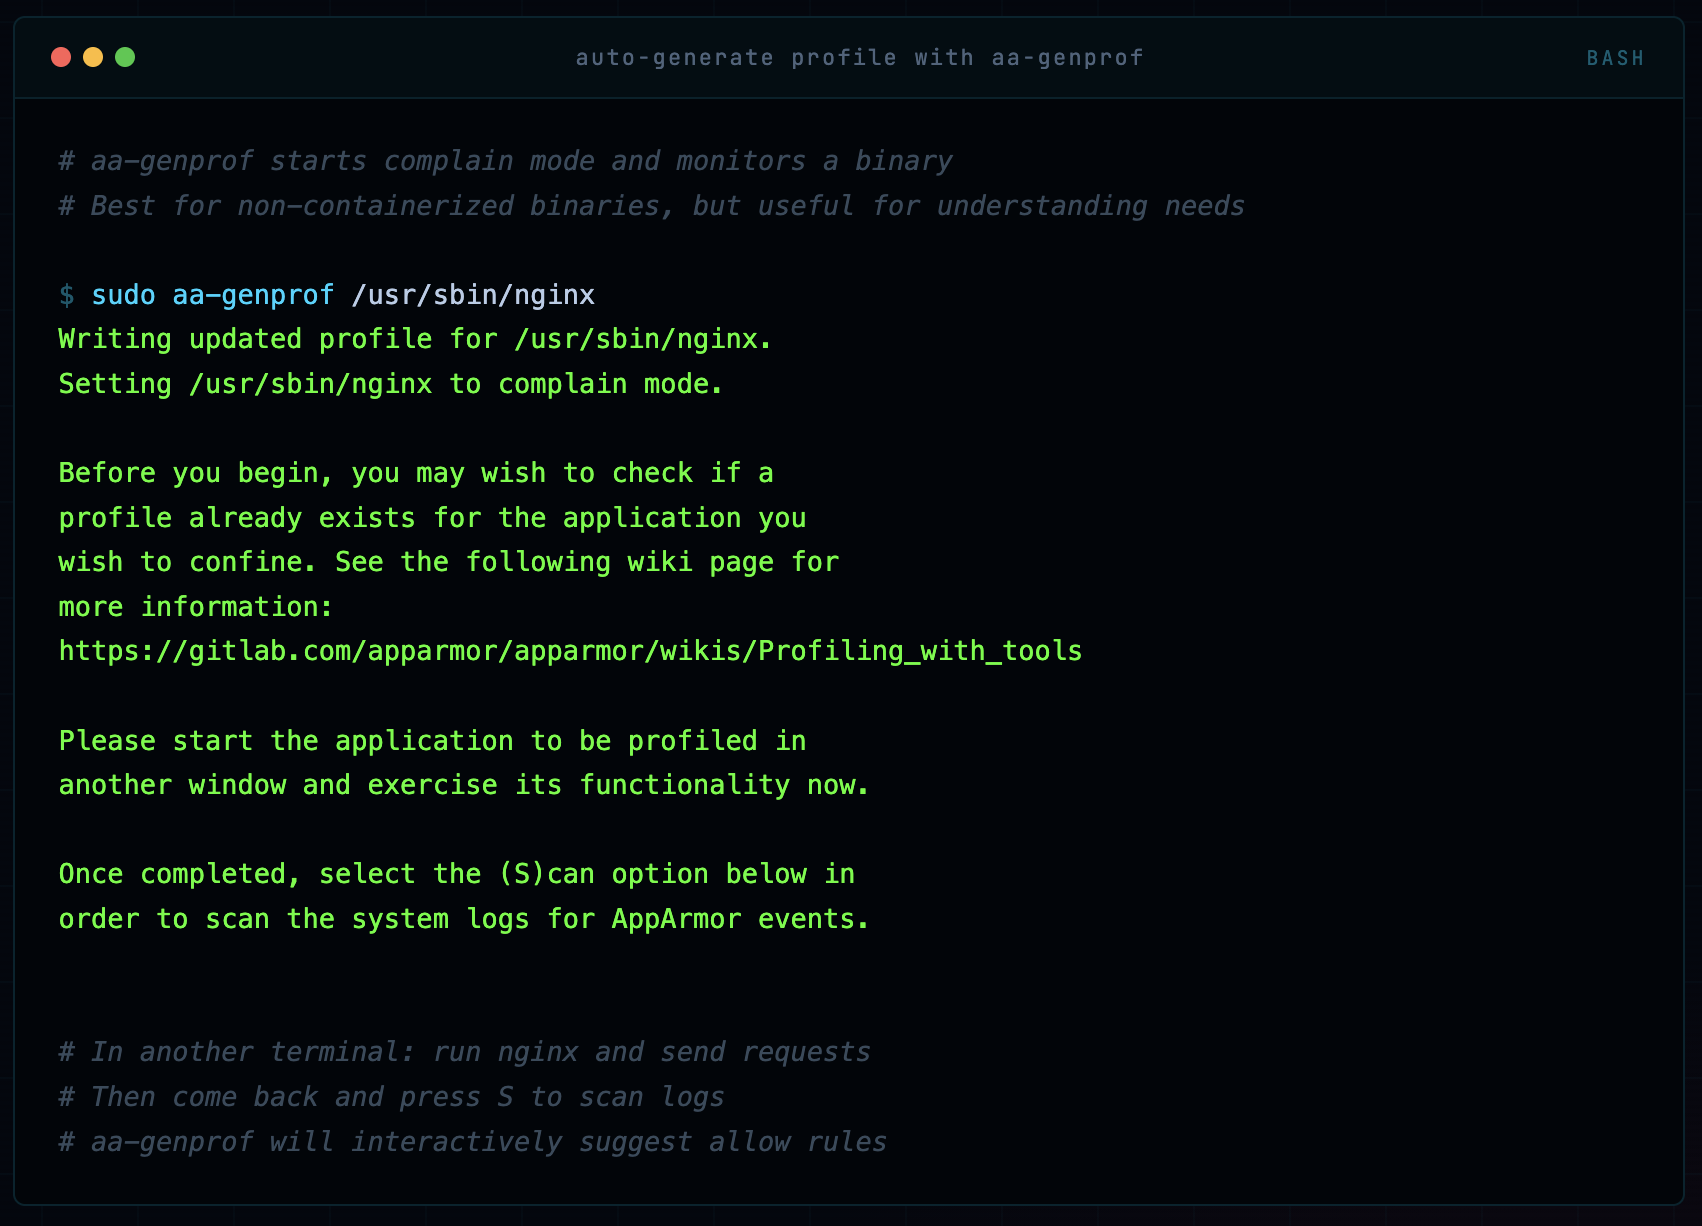
Step 5: Using aa-genprof to Auto-Generate Profiles
# aa-genprof starts complain mode and monitors a binary
# Best for non-containerized binaries, but useful for understanding needs

sudo aa-genprof /usr/sbin/nginx
Writing updated profile for /usr/sbin/nginx.
Setting /usr/sbin/nginx to complain mode.

Before you begin, you may wish to check if a
profile already exists for the application you
wish to confine. See the following wiki page for
more information:
https://gitlab.com/apparmor/apparmor/wikis/Profiling_with_tools

Please start the application to be profiled in
another window and exercise its functionality now.

Once completed, select the (S)can option below in
order to scan the system logs for AppArmor events.


# In another terminal: run nginx and send requests
# Then come back and press S to scan logs
# aa-genprof will interactively suggest allow rules
Step 6: Verify the Profile is Working
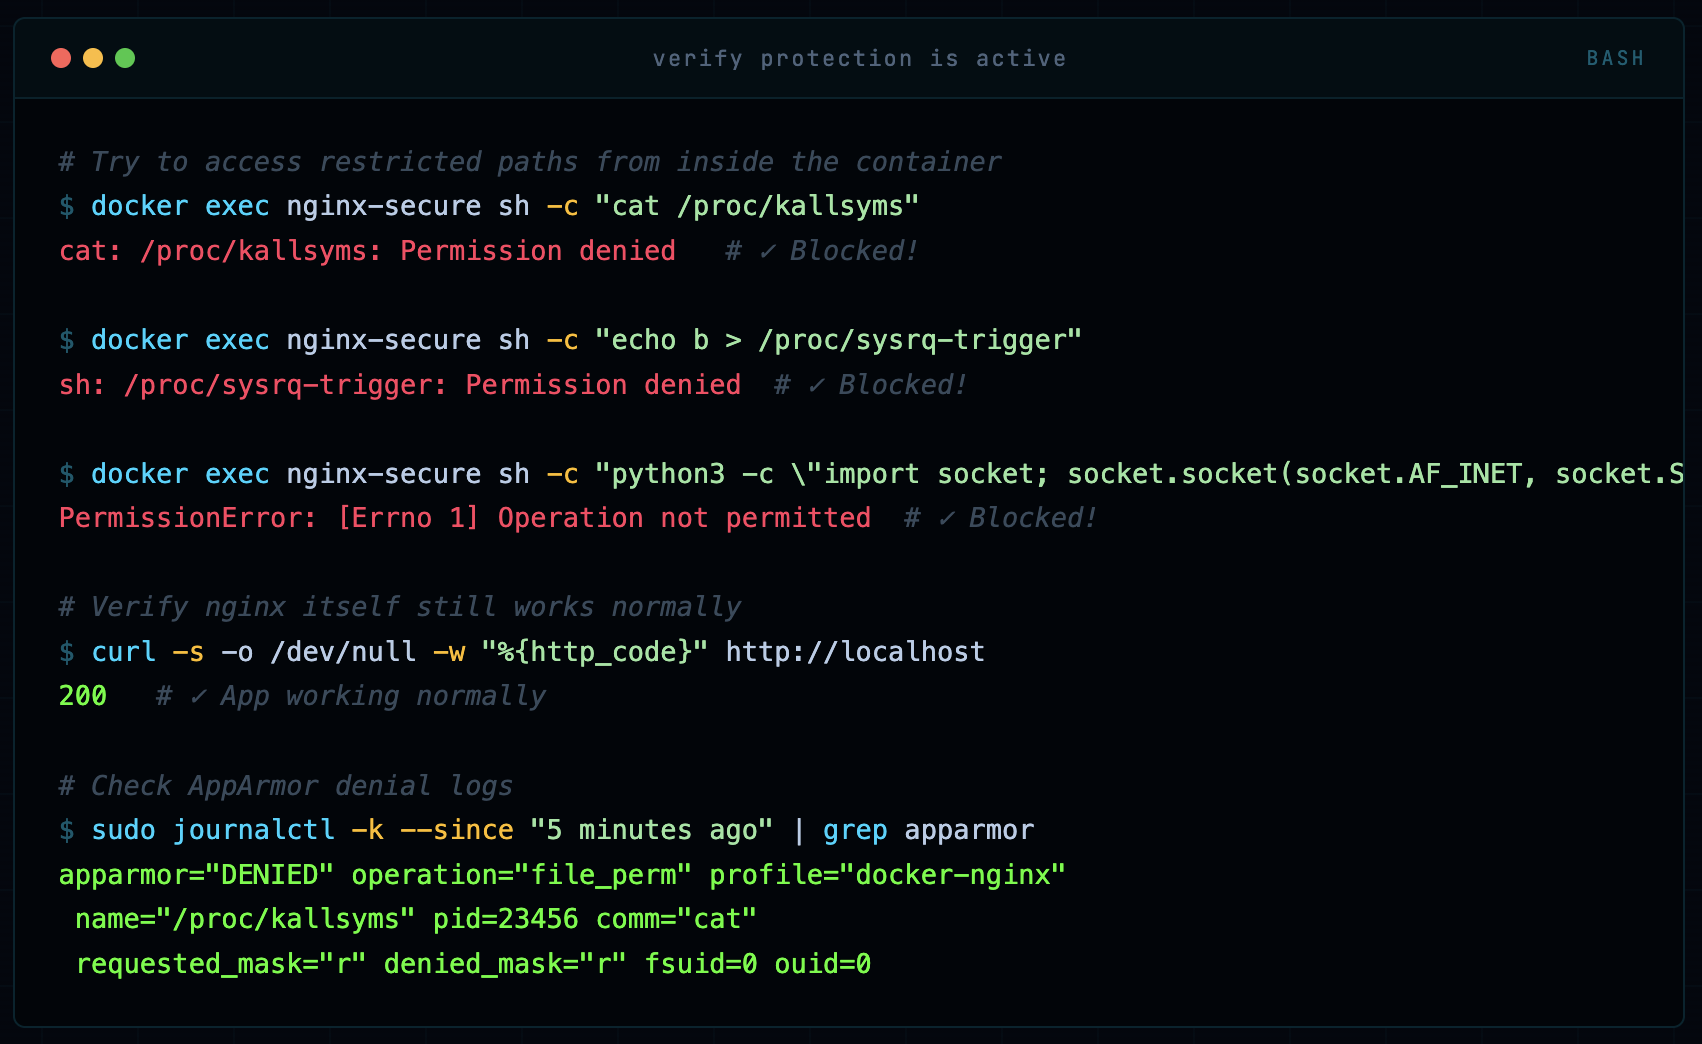
# Try to access restricted paths from inside the container
docker exec nginx-secure sh -c "cat /proc/kallsyms"
cat: /proc/kallsyms: Permission denied   # ✓ Blocked!

docker exec nginx-secure sh -c "echo b > /proc/sysrq-trigger"
sh: /proc/sysrq-trigger: Permission denied  # ✓ Blocked!

docker exec nginx-secure sh -c "python3 -c \"import socket; socket.socket(socket.AF_INET, socket.SOCK_RAW, 6)\""
PermissionError: [Errno 1] Operation not permitted  # ✓ Blocked!

# Verify nginx itself still works normally
curl -s -o /dev/null -w "%{http_code}" http://localhost
200   # ✓ App working normally

# Check AppArmor denial logs
sudo journalctl -k --since "5 minutes ago" | grep apparmor
apparmor="DENIED" operation="file_perm" profile="docker-nginx"
 name="/proc/kallsyms" pid=23456 comm="cat"
 requested_mask="r" denied_mask="r" fsuid=0 ouid=0
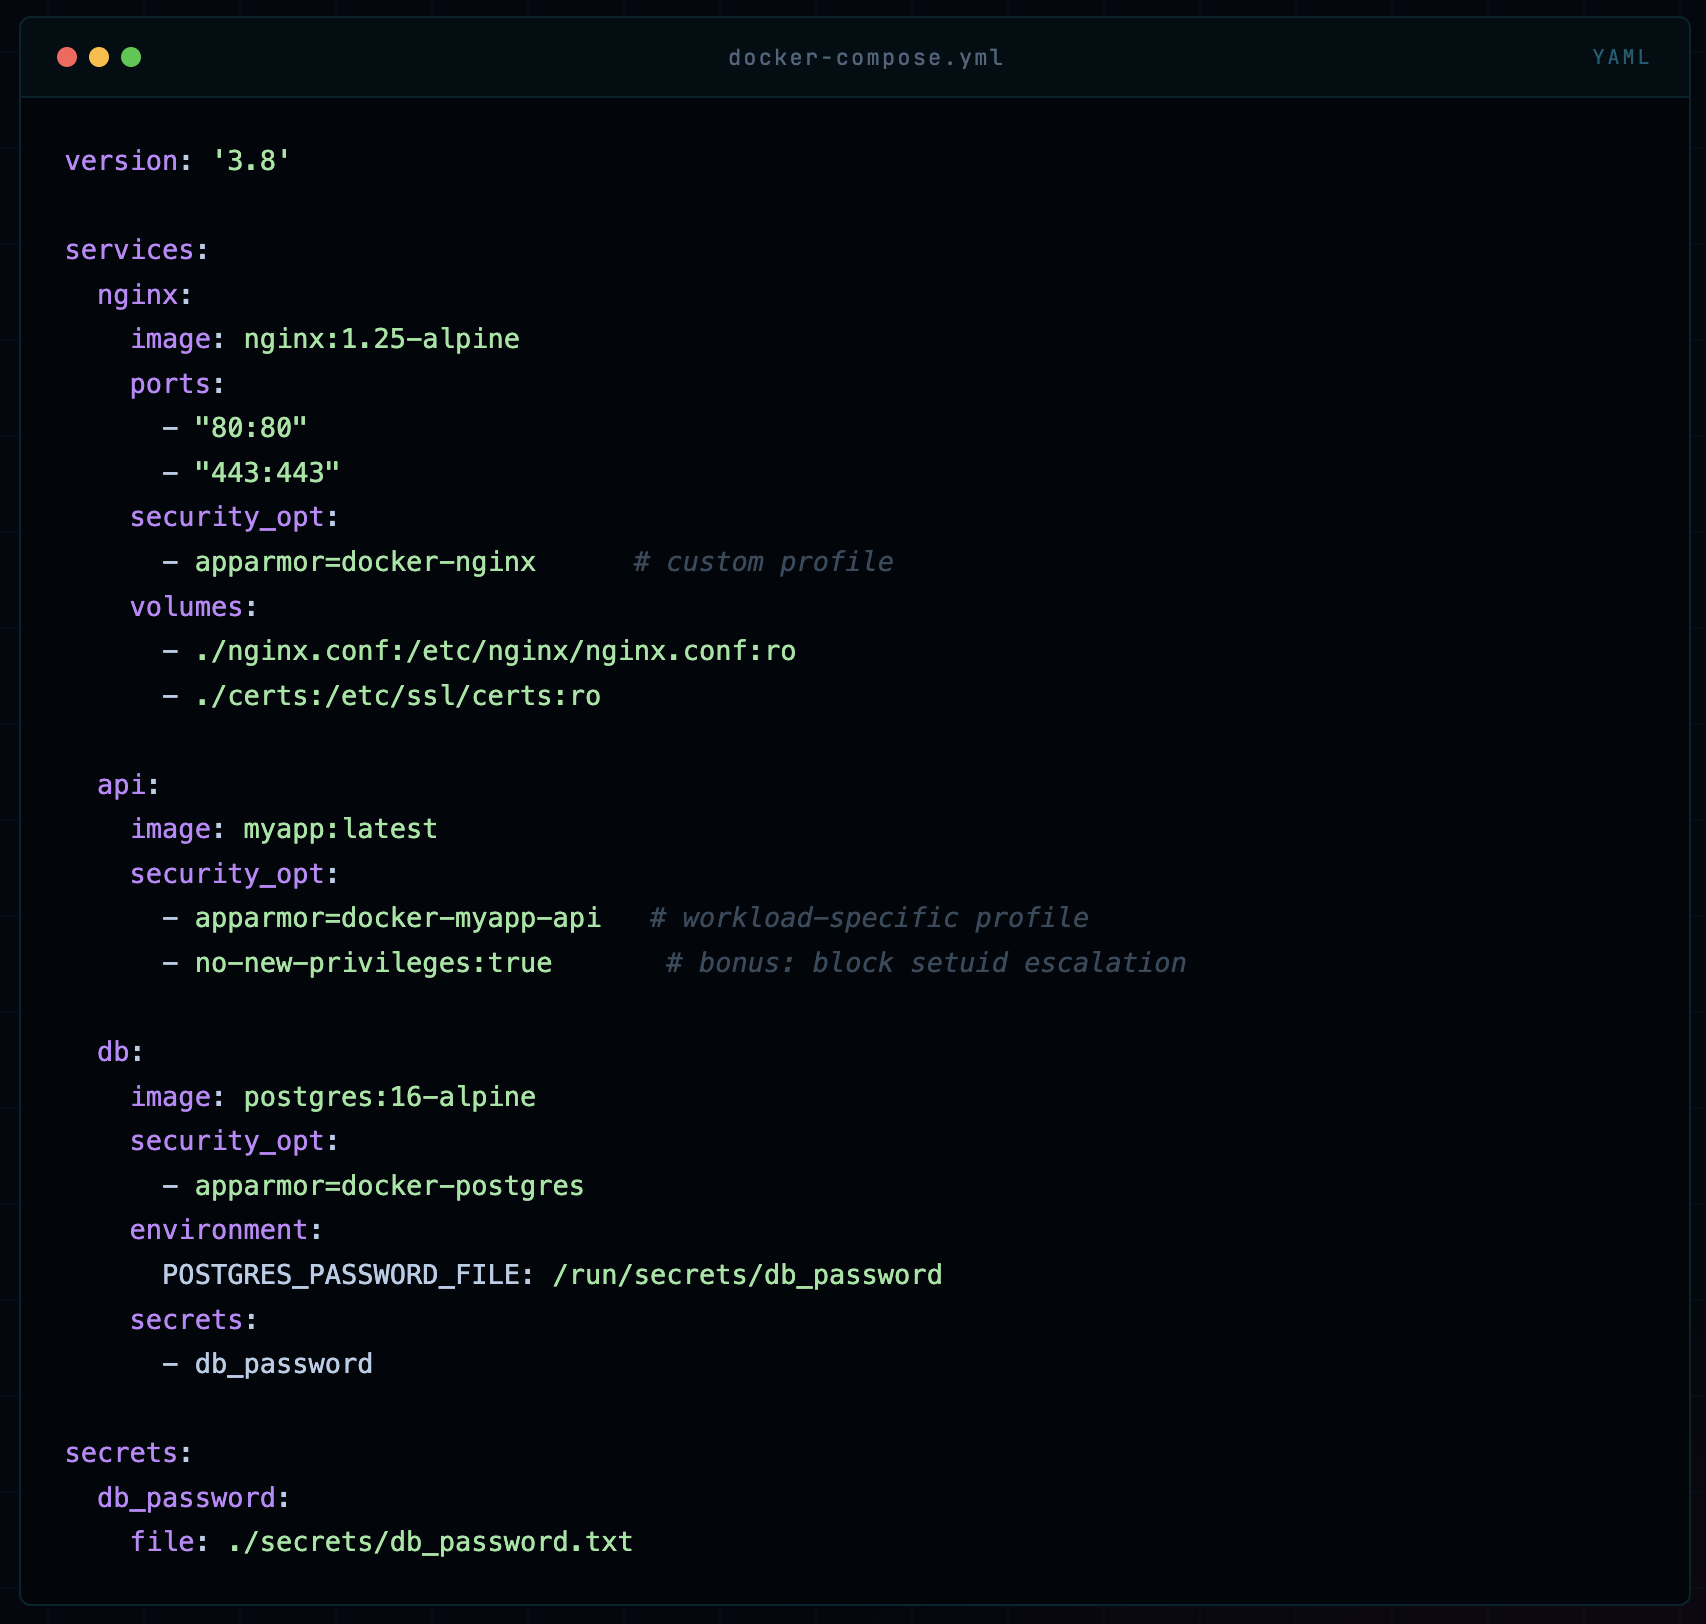
AppArmor in Docker Compose & Kubernetes
Docker Compose
version: '3.8'

services:
  nginx:
    image: nginx:1.25-alpine
    ports:
      - "80:80"
      - "443:443"
    security_opt:
      - apparmor=docker-nginx      # custom profile
    volumes:
      - ./nginx.conf:/etc/nginx/nginx.conf:ro
      - ./certs:/etc/ssl/certs:ro

  api:
    image: myapp:latest
    security_opt:
      - apparmor=docker-myapp-api   # workload-specific profile
      - no-new-privileges:true       # bonus: block setuid escalation

  db:
    image: postgres:16-alpine
    security_opt:
      - apparmor=docker-postgres
    environment:
      POSTGRES_PASSWORD_FILE: /run/secrets/db_password
    secrets:
      - db_password

secrets:
  db_password:
    file: ./secrets/db_password.txt
Kubernetes Pod Security
apiVersion: apps/v1
kind: Deployment
metadata:
  name: nginx-secure
  namespace: production
spec:
  replicas: 3
  selector:
    matchLabels:
      app: nginx-secure
  template:
    metadata:
      labels:
        app: nginx-secure
      annotations:
        # Kubernetes 1.30+ uses securityContext (see below)
        # For older clusters, use annotations:
        container.apparmor.security.beta.kubernetes.io/nginx: localhost/docker-nginx
    spec:
      containers:
        - name: nginx
          image: nginx:1.25-alpine
          securityContext:
            allowPrivilegeEscalation: false
            readOnlyRootFilesystem: true
            runAsNonRoot: true
            runAsUser: 1000
            capabilities:
              drop:
                - ALL
              add:
                - NET_BIND_SERVICE
            # K8s 1.30+: AppArmor in securityContext
            appArmorProfile:
              type: Localhost
              localhostProfile: docker-nginx
          ports:
            - containerPort: 8080
          volumeMounts:
            - name: tmp
              mountPath: /tmp
            - name: nginx-cache
              mountPath: /var/cache/nginx
      volumes:
        - name: tmp
          emptyDir: {}
        - name: nginx-cache
          emptyDir: {}
📝 Kubernetes Note In Kubernetes, AppArmor profiles must be loaded on every node that might run the pod. In managed clusters (EKS, GKE, AKS), this means using a DaemonSet to load profiles, or using tools like Kyverno or OPA Gatekeeper to enforce profile requirements and the Security Profiles Operator (SPO) to manage profile distribution.
Debugging & Audit Mode
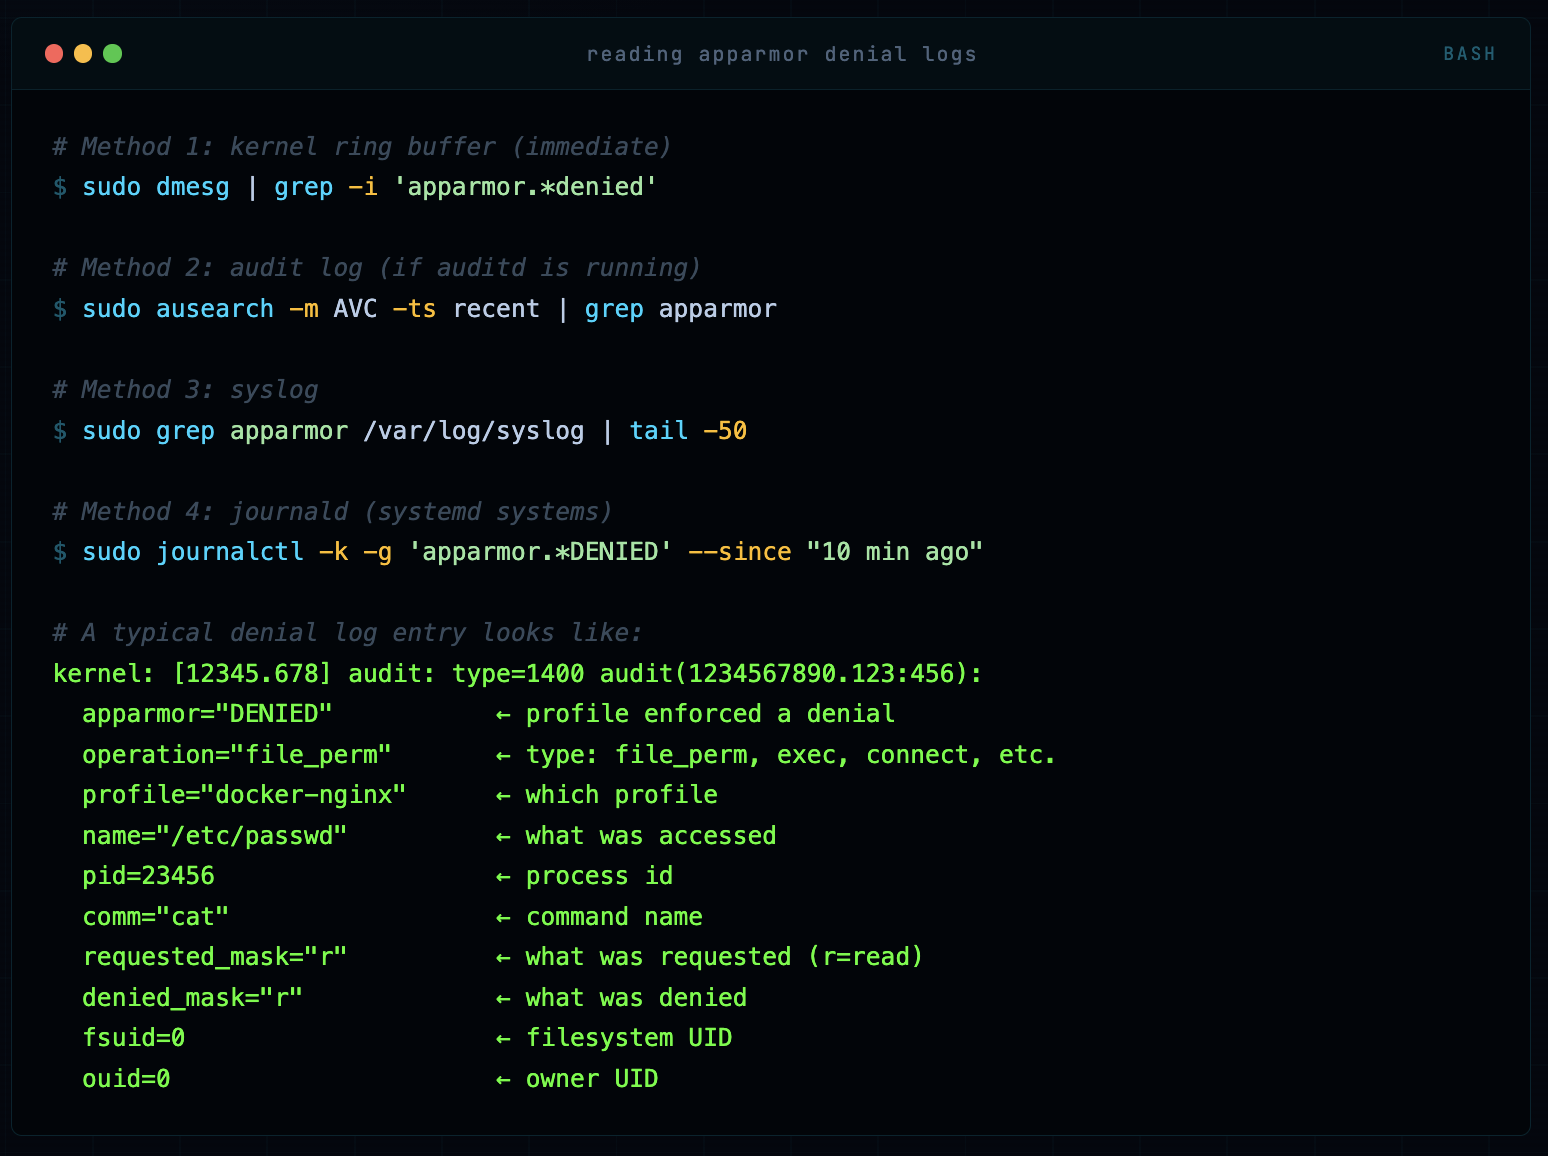
Your app broke after applying an AppArmor profile. This happens. Here’s how I systematically debug it without pulling my hair out.
Step 1: Read the Denial Logs
# Method 1: kernel ring buffer (immediate)
sudo dmesg | grep -i 'apparmor.*denied'

# Method 2: audit log (if auditd is running)
sudo ausearch -m AVC -ts recent | grep apparmor

# Method 3: syslog
sudo grep apparmor /var/log/syslog | tail -50

# Method 4: journald (systemd systems)
sudo journalctl -k -g 'apparmor.*DENIED' --since "10 min ago"

# A typical denial log entry looks like:
kernel: [12345.678] audit: type=1400 audit(1234567890.123:456):
  apparmor="DENIED"           ← profile enforced a denial
  operation="file_perm"       ← type: file_perm, exec, connect, etc.
  profile="docker-nginx"      ← which profile
  name="/etc/passwd"          ← what was accessed
  pid=23456                   ← process id
  comm="cat"                  ← command name
  requested_mask="r"          ← what was requested (r=read)
  denied_mask="r"             ← what was denied
  fsuid=0                     ← filesystem UID
  ouid=0                      ← owner UID
Step 2: Use aa-logprof to Fix Missing Rules
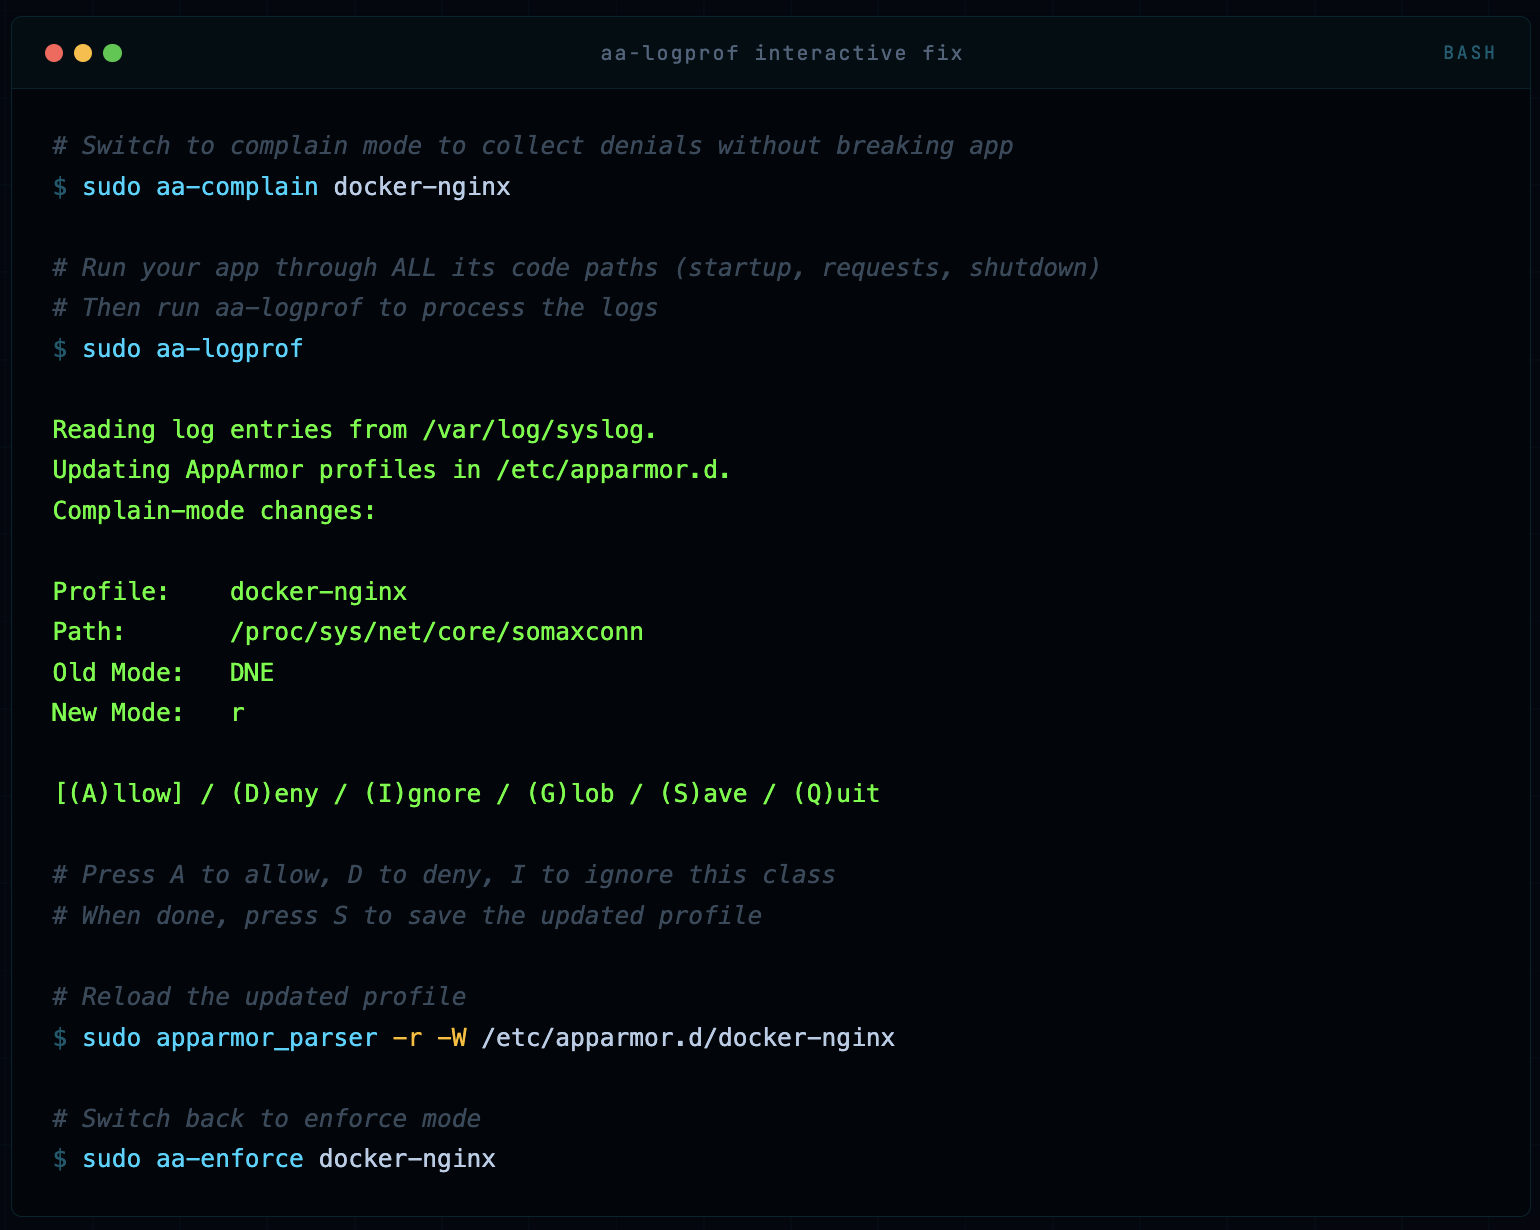
# Switch to complain mode to collect denials without breaking app
sudo aa-complain docker-nginx

# Run your app through ALL its code paths (startup, requests, shutdown)
# Then run aa-logprof to process the logs
sudo aa-logprof

Reading log entries from /var/log/syslog.
Updating AppArmor profiles in /etc/apparmor.d.
Complain-mode changes:

Profile:    docker-nginx
Path:       /proc/sys/net/core/somaxconn
Old Mode:   DNE
New Mode:   r

[(A)llow] / (D)eny / (I)gnore / (G)lob / (S)ave / (Q)uit

# Press A to allow, D to deny, I to ignore this class
# When done, press S to save the updated profile

# Reload the updated profile
sudo apparmor_parser -r -W /etc/apparmor.d/docker-nginx

# Switch back to enforce mode
sudo aa-enforce docker-nginx
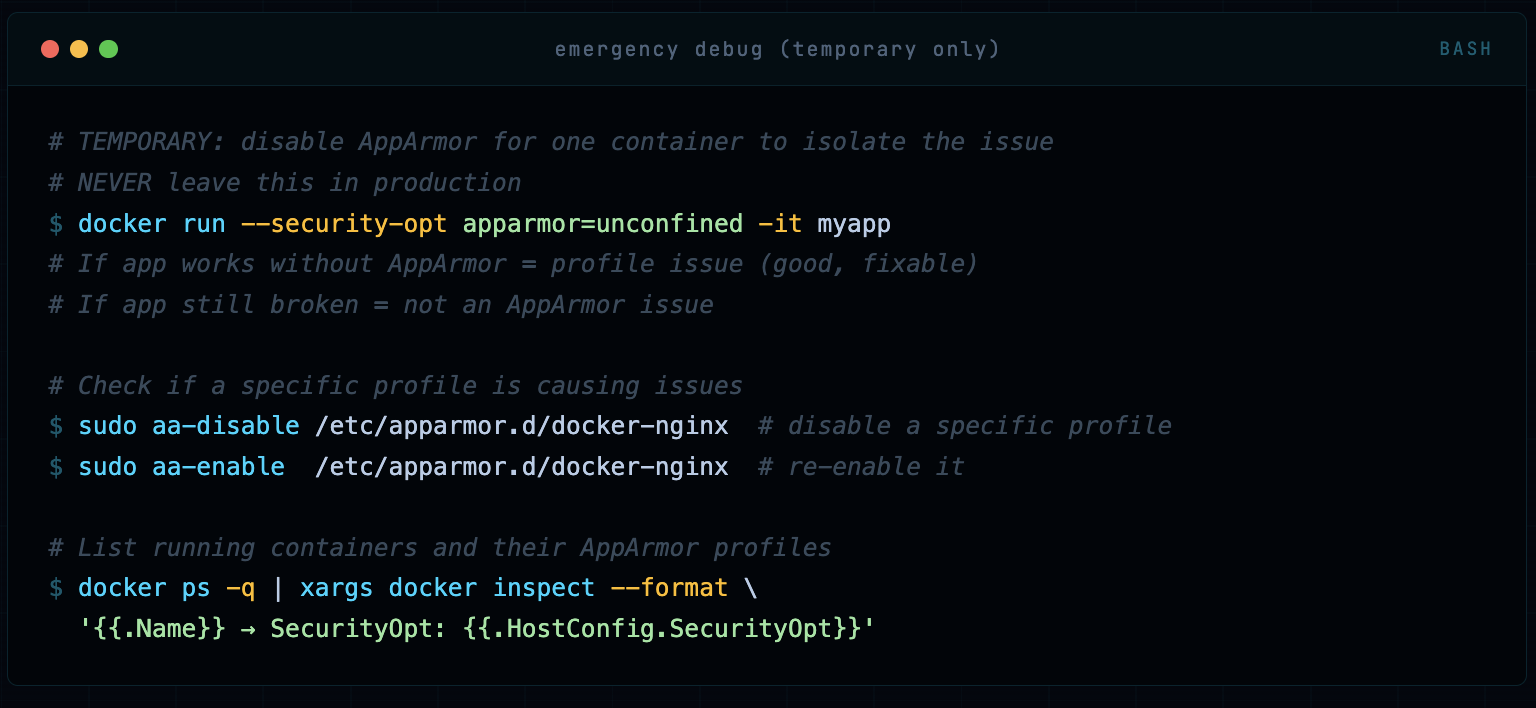
Step 3: Temporary Override for Emergency Debugging
# TEMPORARY: disable AppArmor for one container to isolate the issue
# NEVER leave this in production
docker run --security-opt apparmor=unconfined -it myapp
# If app works without AppArmor = profile issue (good, fixable)
# If app still broken = not an AppArmor issue

# Check if a specific profile is causing issues
sudo aa-disable /etc/apparmor.d/docker-nginx  # disable a specific profile
sudo aa-enable  /etc/apparmor.d/docker-nginx  # re-enable it

# List running containers and their AppArmor profiles
docker ps -q | xargs docker inspect --format \
  '{{.Name}} → SecurityOpt: {{.HostConfig.SecurityOpt}}'
Production Best Practices & Checklist
After hardening hundreds of container deployments, here’s what separates a solid AppArmor implementation from a false-sense-of-security one.
🟢 Never use --security-opt apparmor=unconfined in production. If you think you need to, your profile is wrong - fix the profile. I’ve seen this used as a “quick fix” that became permanent. It’s not a quick fix, it’s removing the control entirely.
🟢 Write per-workload profiles, not one profile for all containers. A web server needs different permissions than a database migration job. Generic profiles provide generic protection - which means specific gaps.
🟢 Always develop in complain mode, deploy in enforce mode. Use aa-logprof to build your allowlist from actual behavior, then switch to enforce. Never guess what an app needs.
🟢 Combine AppArmor with seccomp, capabilities drops, and non-root users. Defense in depth means no single control is your last line. AppArmor + --cap-drop=ALL --cap-add=NET_BIND_SERVICE + USER 1001 in Dockerfile + seccomp = layered protection.
🟢 Monitor and alert on AppArmor denials in production. Ship AppArmor audit logs to your SIEM. A sudden spike in denials from a container is an early warning sign of exploitation or misconfiguration. Don’t let these logs sit silently in syslog.
🟢 Store AppArmor profiles in version control alongside Dockerfiles. Profiles are security-critical infrastructure. Treat them like IaC - review changes, track history, audit diffs. A malicious profile change is as dangerous as a malicious Dockerfile change.
🟢 Test profile changes with apparmor_parser -p before loading. A syntax error in a profile update can cause unexpected behavior. Always parse-check before applying to a running system.
🟢 In Kubernetes: use Security Profiles Operator (SPO) to manage profile distribution. Don’t manually copy profiles to nodes. SPO handles profile lifecycle, versioning, and enforcement across your cluster. It’s the production-grade solution.
🟢 Deny capability sys_admin unless you absolutely, provably need it. This is the nuclear capability. It enables namespace manipulation, device mounting, and dozens of other privileged operations. If a vendor says “run with sys_admin,” push back hard and ask what specifically they need.
🟢 Use no-new-privileges alongside AppArmor. The --security-opt no-new-privileges flag prevents processes from gaining privileges via setuid/setgid binaries. It complements AppArmor’s capability controls and prevents certain escalation paths AppArmor alone might miss.
🟢 Include deny /proc/[0-9]*/mem rwklx in every profile. This blocks process memory injection - a critical vector for both container breakout and lateral movement. Docker’s default profile covers some /proc paths but not all. Always be explicit.
🟢 Regularly re-audit profiles against running containers using complain mode. Applications change. New code paths, new library dependencies, new file accesses. Schedule quarterly complain-mode audits to ensure your profiles stay accurate - not so tight they break the app, not so loose they’re useless.
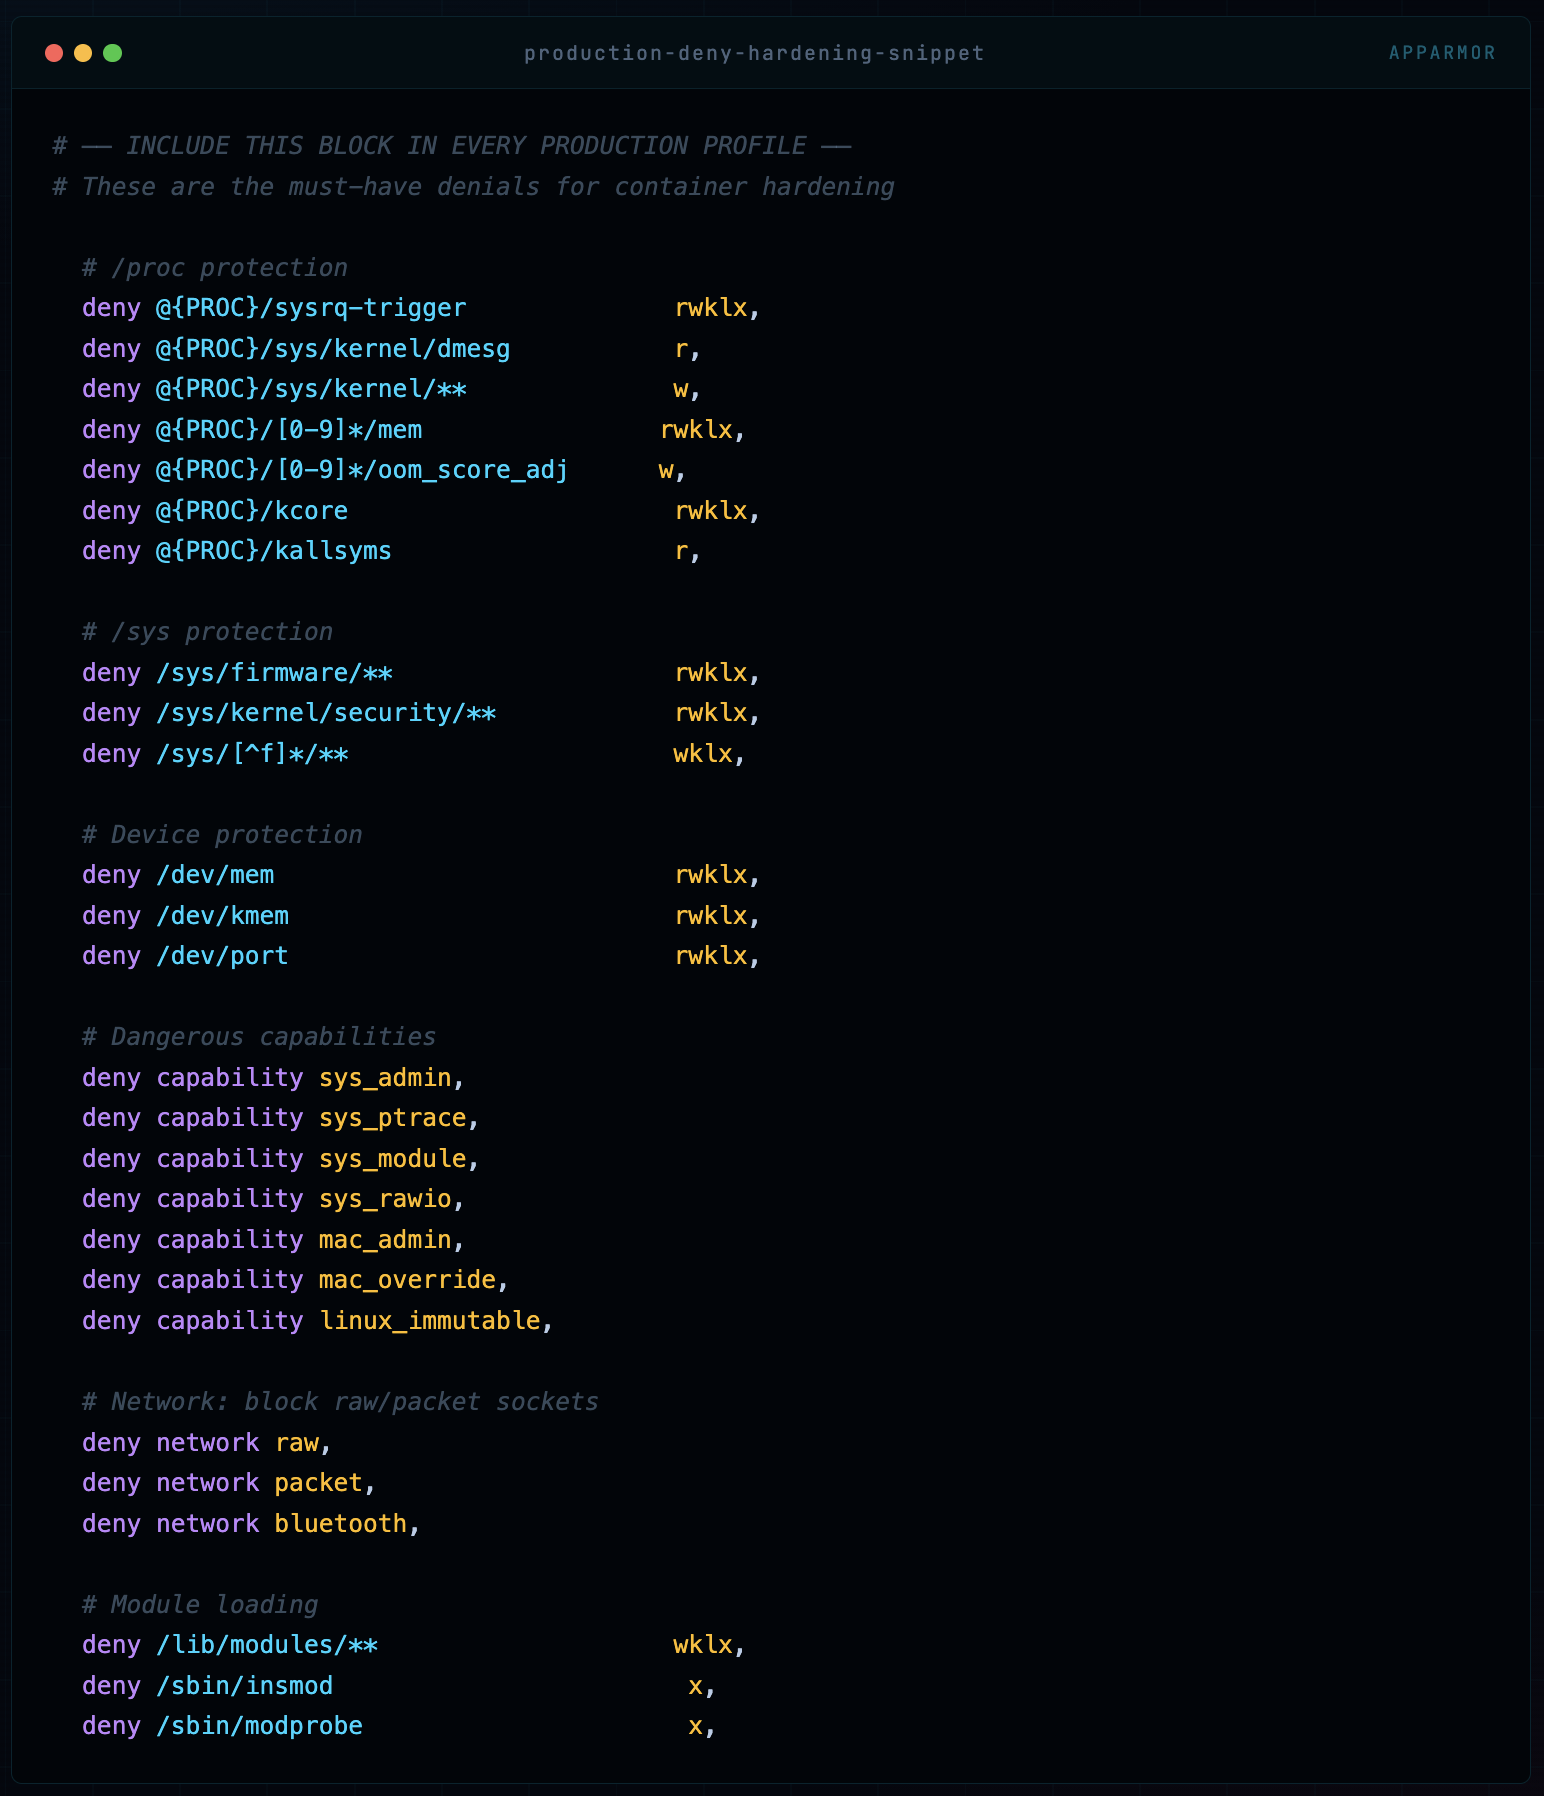
Quick Reference: Essential Deny Rules
# ── INCLUDE THIS BLOCK IN EVERY PRODUCTION PROFILE ──
# These are the must-have denials for container hardening

  # /proc protection
  deny @{PROC}/sysrq-trigger              rwklx,
  deny @{PROC}/sys/kernel/dmesg           r,
  deny @{PROC}/sys/kernel/**              w,
  deny @{PROC}/[0-9]*/mem                rwklx,
  deny @{PROC}/[0-9]*/oom_score_adj      w,
  deny @{PROC}/kcore                      rwklx,
  deny @{PROC}/kallsyms                   r,

  # /sys protection
  deny /sys/firmware/**                   rwklx,
  deny /sys/kernel/security/**            rwklx,
  deny /sys/[^f]*/**                      wklx,

  # Device protection
  deny /dev/mem                           rwklx,
  deny /dev/kmem                          rwklx,
  deny /dev/port                          rwklx,

  # Dangerous capabilities
  deny capability sys_admin,
  deny capability sys_ptrace,
  deny capability sys_module,
  deny capability sys_rawio,
  deny capability mac_admin,
  deny capability mac_override,
  deny capability linux_immutable,

  # Network: block raw/packet sockets
  deny network raw,
  deny network packet,
  deny network bluetooth,

  # Module loading
  deny /lib/modules/**                    wklx,
  deny /sbin/insmod                        x,
  deny /sbin/modprobe                      x,
Where to Go From Here
AppArmor is one layer of a full container security posture. The complete picture includes: Seccomp (syscall filtering), Linux Capabilities (granular root power splitting), User Namespaces (rootless containers), Image scanning (Trivy, Grype), Runtime security (Falco), and Network policies (Cilium, Calico). AppArmor is your MAC enforcement layer - make sure the other layers are in place too.
Comments (0)
No comments yet. Be the first to share your thoughts.
Leave a comment