
🐍 Building a Classic Snake Game with Amazon Q CLI
Prerequisites
- macOS system
- AWS account with Builder ID or IAM identity
Installing Amazon Q on macOS
- Go to the official download page: https://docs.aws.amazon.com/amazonq/latest/qdeveloper-ug/command-line-installing.html
- Download the Mac installer (typically a .dmg file):
- Click the download link for macOS under the Amazon Q Developer section.
- Open the .dmg file once downloaded.
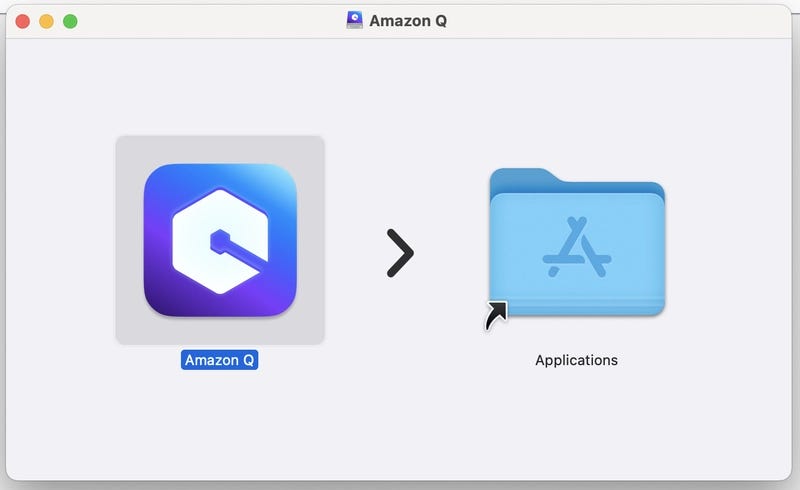
- Drag the Amazon Q app into your Applications folder.
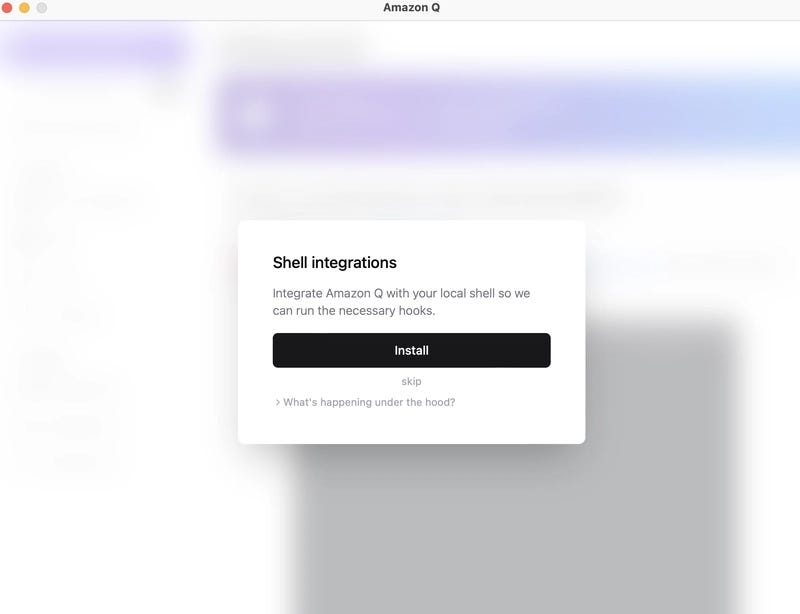
- Enable shell integrations with Amazon Q
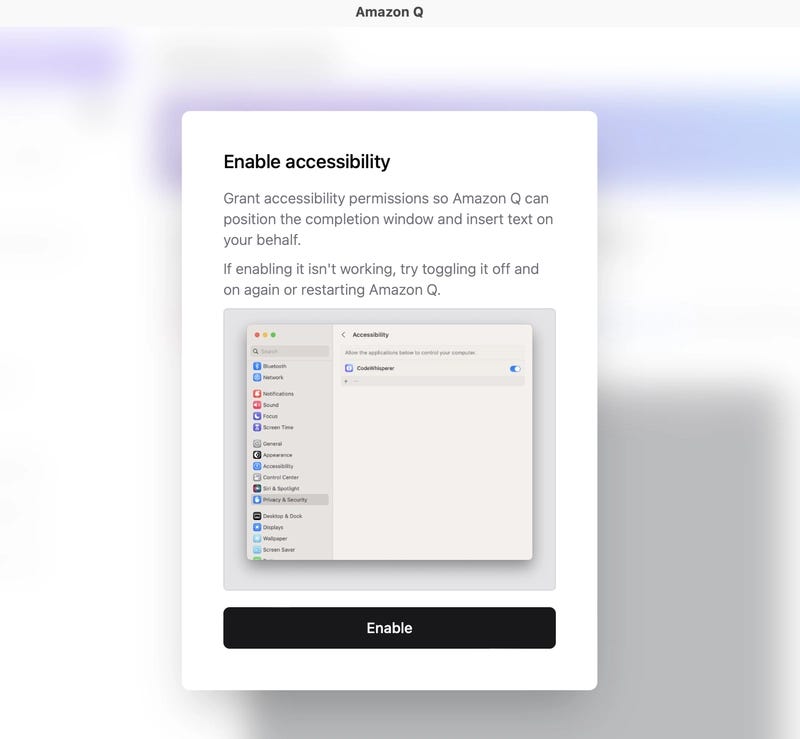
- Grant accessibility permissions so Amazon Q can interact with windows and perform actions.
- After clicking ‘Enable’, you’ll be prompted to activate Amazon Q.

- Open the app and follow the sign-in process using your AWS Builder ID or IAM identity.

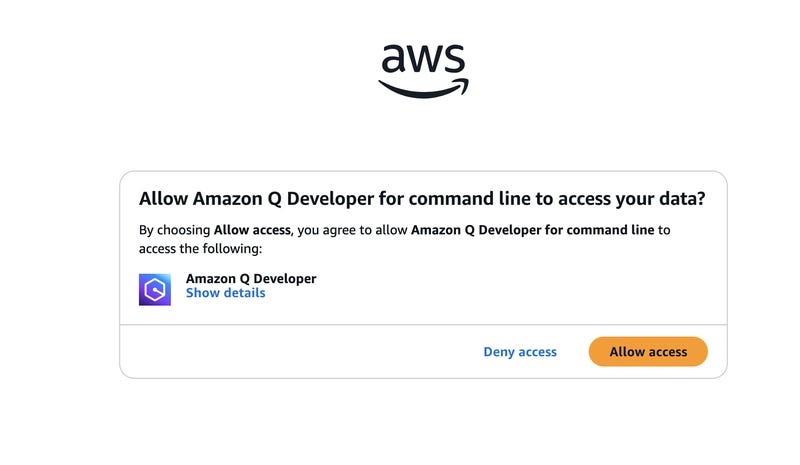
- Click on ‘Allow Access’ to grant Amazon Q command line access.
- After successful installation, you’ll be greeted with the Getting Started page.

-
Click on Integrations and check your favorite terminal enabled or not
-
Copy the code , optional and paste in terminal
q integrations install input-method
Lets Restart the terminal ( Close and Open terminal/iterm using cmd +q )
cmd + q
Lets start integration of Amazon Q ( terminal )
q chat
You will see a page like this
Use commands help
/help
If you want to change model use
/model
Select Enter , so we can use required model
Snake game
Why Snake?
Snake is a timeless game that’s simple to play but surprisingly challenging to code. I picked it because:
- It’s a great way to learn about game loops, collision detection, and user input.
- The rules are simple, making it perfect for a quick project.
- It’s nostalgic and fun!
Effective Prompting Techniques
I found that being clear and specific in my prompts led to the best results. For example, my main prompt was:
Create a basic Snake game in Python using PyGame. The game should have:
- A snake that moves with arrow keys
- Food that appears randomly
- The snake grows when it eats food
- The game ends if the snake hits the wall or itself
- A score displayWhen I wanted to add features, I used prompts like:
- “Add a game over screen that shows the final score.”
- “Make the snake move faster as the score increases.”
How AI Handled Classic Programming Challenges
- Collision Detection: Amazon Q CLI generated code to check if the snake hit itself or the wall.
- Random Food Placement: The AI handled placing food in random locations, avoiding the snake’s body.
- Game Loop: The main loop, event handling, and screen updates were all generated quickly.
Development Automation That Saved Me Time
- Boilerplate Code: Amazon Q CLI wrote the PyGame setup and main loop for me.
- Bug Fixes: When I got errors, I pasted them into the CLI and got instant solutions.
- Feature Additions: Adding new features was as simple as describing them in a prompt.
Interesting AI-Generated Solutions
One clever solution was how the AI managed the snake’s body as a list of coordinates, making it easy to grow the snake and check for collisions.
Example code
import pygame
import random
import sys
from pygame.math import Vector2

# Initialize pygame
pygame.init()

# Game constants
CELL_SIZE = 20
CELL_NUMBER = 20
SCREEN_WIDTH = CELL_SIZE * CELL_NUMBER
SCREEN_HEIGHT = CELL_SIZE * CELL_NUMBER
FPS = 10

# Colors
BLACK = (0, 0, 0)
GREEN = (0, 255, 0)
RED = (255, 0, 0)
WHITE = (255, 255, 255)

class Snake:
    def __init__(self):
        self.body = [Vector2(5, 10), Vector2(4, 10), Vector2(3, 10)]
        self.direction = Vector2(1, 0)
        self.new_block = False

    def draw(self, screen):
        for block in self.body:
            rect = pygame.Rect(block.x * CELL_SIZE, block.y * CELL_SIZE, CELL_SIZE, CELL_SIZE)
            pygame.draw.rect(screen, GREEN, rect)

    def move(self):
        if self.new_block:
            body_copy = self.body[:]
            body_copy.insert(0, body_copy[0] + self.direction)
            self.body = body_copy
            self.new_block = False
        else:
            body_copy = self.body[:-1]
            body_copy.insert(0, body_copy[0] + self.direction)
            self.body = body_copy

    def add_block(self):
        self.new_block = True

    def reset(self):
        self.body = [Vector2(5, 10), Vector2(4, 10), Vector2(3, 10)]
        self.direction = Vector2(1, 0)

    def check_collision(self):
        # Check if snake hits the wall
        if not 0

### Why Egg Shooter?

I chose Egg Shooter because:

- It’s a classic arcade-style game that’s easy to play and addictive.
- It involves interesting mechanics like aiming, shooting, and matching colors.
- It’s a great way to learn about collision detection and grid management.

### Effective Prompting Techniques

I started with a detailed prompt:

> Create a simple "Egg Shooter" game in Python using PyGame. The game should have the following features:

> - The player controls a shooter at the bottom center of the screen that can aim left or right using the arrow keys.

> - When the player presses the spacebar, the shooter fires an egg upwards in the direction it is aiming.

> - There are rows of colored eggs at the top of the screen arranged in a grid.> - When the fired egg collides with eggs at the top, it sticks to them.

> - If three or more eggs of the same color are connected, they disappear and the player scores points.

> - The game ends if the eggs reach the bottom of the screen.> - Display the current score at the top.

> - Use simple colored circles to represent eggs.

> - Include comments in the code explaining each part.When I wanted to tweak the game, I used prompts like:

- “Add sound effects for popping eggs.”
- “Show a game over screen with the final score.”

### How AI Handled Classic Programming Challenges

- Collision Detection: The AI generated code to detect when the fired egg hit the grid.
- Matching Algorithm: It used a flood-fill algorithm to find and remove groups of matching eggs.
- Grid Management: The AI managed the grid of eggs and handled new eggs being added.

### Development Automation That Saved Me Time

- Game Loop and UI: Amazon Q CLI set up the main loop, drawing functions, and event handling.
- Bug Fixes: I pasted error messages and got quick, accurate fixes.
- Feature Requests: Adding new features was as simple as describing them in a prompt.

### Interesting AI-Generated Solutions

The AI’s use of a recursive function to find connected eggs of the same color was both efficient and easy to understand.
import pygame
import sys
import math
import random
from pygame.locals import *
Initialize pygame
pygame.init()
Game constants
SCREEN_WIDTH = 600
SCREEN_HEIGHT = 800
FPS = 60
Colors
WHITE = (255, 255, 255)
BLACK = (0, 0, 0)
RED = (255, 0, 0)
GREEN = (0, 255, 0)
BLUE = (0, 0, 255)
YELLOW = (255, 255, 0)
PURPLE = (255, 0, 255)
CYAN = (0, 255, 255)
List of egg colors
EGG_COLORS = [RED, GREEN, BLUE, YELLOW, PURPLE, CYAN]
Game parameters
EGG_RADIUS = 20
SHOOTER_WIDTH = 40
SHOOTER_HEIGHT = 60
SHOOTER_SPEED = 5
EGG_SPEED = 10
GRID_ROWS = 5
GRID_COLS = 10
GRID_TOP_MARGIN = 50
GRID_HORIZONTAL_MARGIN = 30
class Shooter:
“”“Class representing the player’s shooter”“”
def init(self, x, y):
self.x = x
self.y = y
self.width = SHOOTER_WIDTH
self.height = SHOOTER_HEIGHT
self.angle = 0 # 0 degrees is straight up
self.color = WHITE
# Add next egg color
self.next_egg_color = random.choice(EGG_COLORS)
def move(self, direction):
    """Move the shooter left or right"""
    self.angle += direction * 3
    # Limit the angle to -60 to 60 degrees
    self.angle = max(-60, min(60, self.angle))

def draw(self, surface):
    """Draw the shooter on the screen"""
    # Draw the base of the shooter
    base_rect = pygame.Rect(self.x - self.width//2, self.y - self.height//4,
                           self.width, self.height//4)
    pygame.draw.rect(surface, self.color, base_rect)

    # Draw the barrel of the shooter
    # Calculate the end point of the barrel based on the angle
    angle_rad = math.radians(self.angle)
    end_x = self.x + math.sin(angle_rad) * self.height * 0.75
    end_y = self.y - math.cos(angle_rad) * self.height * 0.75

    pygame.draw.line(surface, self.color, (self.x, self.y - self.height//4),
                    (end_x, end_y), 5)

    # Draw the next egg preview
    preview_x = self.x
    preview_y = self.y - self.height//2
    pygame.draw.circle(surface, self.next_egg_color, (int(preview_x), int(preview_y)), EGG_RADIUS//1.5)
    # Draw a small white highlight to make it look like an egg
    highlight_radius = EGG_RADIUS // 5
    highlight_offset = EGG_RADIUS // 6
    pygame.draw.circle(surface, WHITE,
                      (int(preview_x - highlight_offset), int(preview_y - highlight_offset)),
                      highlight_radius)

def shoot(self):
    """Create a new egg to shoot"""
    angle_rad = math.radians(self.angle)
    direction_x = math.sin(angle_rad)
    direction_y = -math.cos(angle_rad)  # Negative because y increases downward

    # Use the next egg color for the fired egg
    color = self.next_egg_color

    # Generate a new next egg color
    self.next_egg_color = random.choice(EGG_COLORS)

    return Egg(self.x, self.y - self.height//4, direction_x, direction_y, color)
class Egg:
“”“Class representing an egg”“”
def init(self, x, y, dx=0, dy=0, color=None):
self.x = x
self.y = y
self.dx = dx
self.dy = dy
self.radius = EGG_RADIUS
self.color = color if color else random.choice(EGG_COLORS)
self.grid_pos = None # Position in the grid when attached
self.moving = dx != 0 or dy != 0 # Flag to indicate if the egg is moving
def update(self):
    """Update the egg's position if it's moving"""
    if self.moving:
        self.x += self.dx * EGG_SPEED
        self.y += self.dy * EGG_SPEED

        # Check if the egg hits the sides of the screen
        if self.x - self.radius  SCREEN_WIDTH:
            self.dx = -self.dx  # Reverse horizontal direction

        # Check if the egg hits the top of the screen
        if self.y - self.radius = 3:
            to_remove.update(connected)

    # Remove the matched eggs
    score = len(to_remove)
    self.eggs = [egg for egg in self.eggs if egg not in to_remove]

    return score

def find_connected(self, egg):
    """Find all eggs of the same color connected to the given egg"""
    connected = set([egg])
    to_check = [egg]

    while to_check:
        current = to_check.pop()

        # Check all eggs for connections
        for other in self.eggs:
            if other.moving or other in connected:
                continue

            # If the eggs are the same color and adjacent
            if other.color == current.color and self.are_adjacent(current, other):
                connected.add(other)
                to_check.append(other)

    return connected

def are_adjacent(self, egg1, egg2):
    """Check if two eggs are adjacent in the grid"""
    if not egg1.grid_pos or not egg2.grid_pos:
        return False

    row1, col1 = egg1.grid_pos
    row2, col2 = egg2.grid_pos

    # Check if they're neighbors (horizontally, vertically, or diagonally)
    return abs(row1 - row2) = bottom_threshold:
            return True

    return False
class Game:
“”“Main game class”“”
def init(self):
# Set up the display
self.screen = pygame.display.set_mode((SCREEN_WIDTH, SCREEN_HEIGHT))
pygame.display.set_caption(‘Egg Shooter’)
self.clock = pygame.time.Clock()
    # Create game objects
    self.shooter = Shooter(SCREEN_WIDTH // 2, SCREEN_HEIGHT - 50)
    self.grid = EggGrid()
    self.moving_eggs = []

    # Game state
    self.score = 0
    self.game_over = False

    # Font for text
    self.font = pygame.font.SysFont('Arial', 24)

def handle_events(self):
    """Handle user input"""
    for event in pygame.event.get():
        if event.type == QUIT:
            pygame.quit()
            sys.exit()

        if event.type == KEYDOWN:
            if event.key == K_SPACE and not self.game_over:
                # Shoot an egg
                self.moving_eggs.append(self.shooter.shoot())

    # Handle continuous key presses
    if not self.game_over:
        keys = pygame.key.get_pressed()
        if keys[K_LEFT]:
            self.shooter.move(-1)
        if keys[K_RIGHT]:
            self.shooter.move(1)

def update(self):
    """Update game state"""
    if self.game_over:
        return

    # Update moving eggs
    for egg in self.moving_eggs[:]:  # Create a copy of the list to safely modify during iteration
        egg.update()

        # Check for collisions with the grid
        if self.grid.check_collision(egg):
            # Remove the egg from moving eggs
            self.moving_eggs.remove(egg)

            # Check for matches
            points = self.grid.check_matches()
            self.score += points * 10  # 10 points per egg

    # Check if game is over
    if self.grid.check_game_over():
        self.game_over = True

def draw(self):
    """Draw the game"""
    # Clear the screen
    self.screen.fill(BLACK)

    # Draw the grid
    self.grid.draw(self.screen)

    # Draw moving eggs
    for egg in self.moving_eggs:
        egg.draw(self.screen)

    # Draw the shooter
    self.shooter.draw(self.screen)

    # Draw the score
    score_text = self.font.render(f"Score: {self.score}", True, WHITE)
    self.screen.blit(score_text, (10, 10))

    # Draw next egg text
    next_text = self.font.render("Next:", True, WHITE)
    self.screen.blit(next_text, (SCREEN_WIDTH - 100, 10))

    # Draw game over message if game is over
    if self.game_over:
        game_over_text = self.font.render("GAME OVER", True, RED)
        text_rect = game_over_text.get_rect(center=(SCREEN_WIDTH//2, SCREEN_HEIGHT//2))
        self.screen.blit(game_over_text, text_rect)

        restart_text = self.font.render("Press R to restart", True, WHITE)
        restart_rect = restart_text.get_rect(center=(SCREEN_WIDTH//2, SCREEN_HEIGHT//2 + 40))
        self.screen.blit(restart_text, restart_rect)

    # Update the display
    pygame.display.flip()

def run(self):
    """Main game loop"""
    while True:
        self.handle_events()
        self.update()
        self.draw()
        self.clock.tick(FPS)

        # Check for restart
        if self.game_over:
            keys = pygame.key.get_pressed()
            if keys[K_r]:
                self.__init__()  # Reset the game
Start the game
if name == “main”:
game = Game()
game.run()
First i was confused what was the egg shooter ball color and again asked to add ball color to code

### Try It Yourself!

Here’s the prompt I used (copy and paste into Amazon Q CLI):
Create a simple “Egg Shooter” game in Python using PyGame. The game should have the following features:
- The player controls a shooter at the bottom center of the screen that can aim left or right using the arrow keys.
- When the player presses the spacebar, the shooter fires an egg upwards in the direction it is aiming.
- There are rows of colored eggs at the top of the screen arranged in a grid.
- When the fired egg collides with eggs at the top, it sticks to them.
- If three or more eggs of the same color are connected, they disappear and the player scores points.
- The game ends if the eggs reach the bottom of the screen.
- Display the current score at the top.
- Use simple colored circles to represent eggs.
- Include comments in the code explaining each part.
```
My Honest Review of Building with Amazon Q CLI
When I first heard about Amazon Q CLI, I was both curious and a little skeptical. I’ve used various coding assistants before, but the idea of a command-line AI that could help me build entire projects-especially games-sounded almost too good to be true. After spending some real time with it, I want to share my honest thoughts, both the good and the not-so-good, in hopes it helps others considering giving it a try.
First Impressions
Setting up Amazon Q CLI was straightforward. The documentation was clear, and I appreciated that it worked right from my terminal, which is where I’m most comfortable. The interface felt familiar, almost like chatting with a very knowledgeable friend who just happens to live in my command line.
The Experience: Collaboration, Not Just Automation
What struck me most was how collaborative the process felt. Instead of just spitting out code snippets, Amazon Q CLI engaged in a back-and-forth. I’d describe what I wanted, sometimes in very broad strokes, and it would ask clarifying questions or suggest approaches I hadn’t considered. It felt less like using a tool and more like pair programming with someone who never gets tired or frustrated.There were moments when I was genuinely surprised by the AI’s suggestions. Sometimes it would recommend a more efficient algorithm or point out a potential bug before I even ran the code. Other times, it would generate code that was well-structured and commented, making it easy to understand and modify.
Prompting: The Art of Asking
One thing I quickly learned is that the quality of the output depends a lot on the quality of your prompts. Being specific and clear made a huge difference. When I was vague, the results were hit-or-miss, but when I described exactly what I wanted, Amazon Q CLI delivered impressively accurate and relevant code.I also appreciated that I could iterate. If something didn’t work quite right, I could just paste the error message or describe the issue, and the AI would help me debug or refactor. This iterative loop made the development process feel natural and productive.
Where It Shines
- Speed: Tasks that would have taken me hours-like setting up boilerplate code, handling edge cases, or writing documentation-were done in minutes.
- Learning: I found myself learning new techniques and best practices just by reading the code Amazon Q CLI generated. It’s like having a mentor who explains their reasoning as they go.
- Debugging: When I hit a wall, the AI was quick to suggest fixes or alternative approaches, often saving me from long, frustrating debugging sessions.
- Creativity: Sometimes, the AI would suggest features or improvements I hadn’t even thought of, sparking new ideas and directions for my project.
Where It Struggles
- Complex, Multi-Step Tasks: For very complex features that required a lot of context or multiple steps, I sometimes had to break things down into smaller prompts. The AI is great at focused tasks, but can get lost if you ask for too much at once.
- Understanding Ambiguity: If I wasn’t clear in my instructions, the results could be unpredictable. It’s not a mind reader-clear communication is key.
- Occasional Bugs: While most of the code worked out of the box, there were times when I had to tweak or debug the output. This wasn’t a dealbreaker, but it’s important to stay engaged and review the code carefully.
The Human Element
What I appreciated most was how Amazon Q CLI made coding feel less lonely. Even though I was working solo, the AI’s presence made it feel like a team effort. It was encouraging, responsive, and always ready to help-no matter how late at night I was working.I also found myself experimenting more. Knowing I had a safety net made me bolder in trying new ideas, since I could always ask the AI for help if I got stuck.
Final Thoughts
Amazon Q CLI isn’t magic, but it’s the closest thing I’ve experienced to having a tireless, knowledgeable coding partner. It accelerates the boring parts, helps you learn, and makes the creative process more fun and less stressful. Like any tool, it has its limitations, but with clear communication and a willingness to iterate, it can be an incredible asset.If you’re curious about AI-assisted development, I highly recommend giving Amazon Q CLI a try. It won’t replace your skills or creativity, but it will amplify them-and maybe even teach you a few new tricks along the way.


Comments (1)
Nice blog,keep posting
Leave a comment