Why CI/CD - and Why the Manual Way Was Always Temporary
If you completed the manual S3 + CloudFront deploy, you built something real. You understand the infrastructure layer - buckets, distributions, origin access control, cache invalidation. That knowledge doesn’t go away. But the manual workflow has a compounding cost that only shows up over time.
After three months of manually uploading files, you will make this mistake: you’ll upload a stale style.css from the wrong folder. Or you’ll forget to invalidate CloudFront and spend 20 minutes debugging why your “deployed” change isn’t live. Or worse - you’ll push a broken change on a Friday and have no clean rollback path.
This is the problem CI/CD solves. Not convenience - consistency and auditability. Every deploy is reproducible. Every change is tracked. Every rollback is one click.
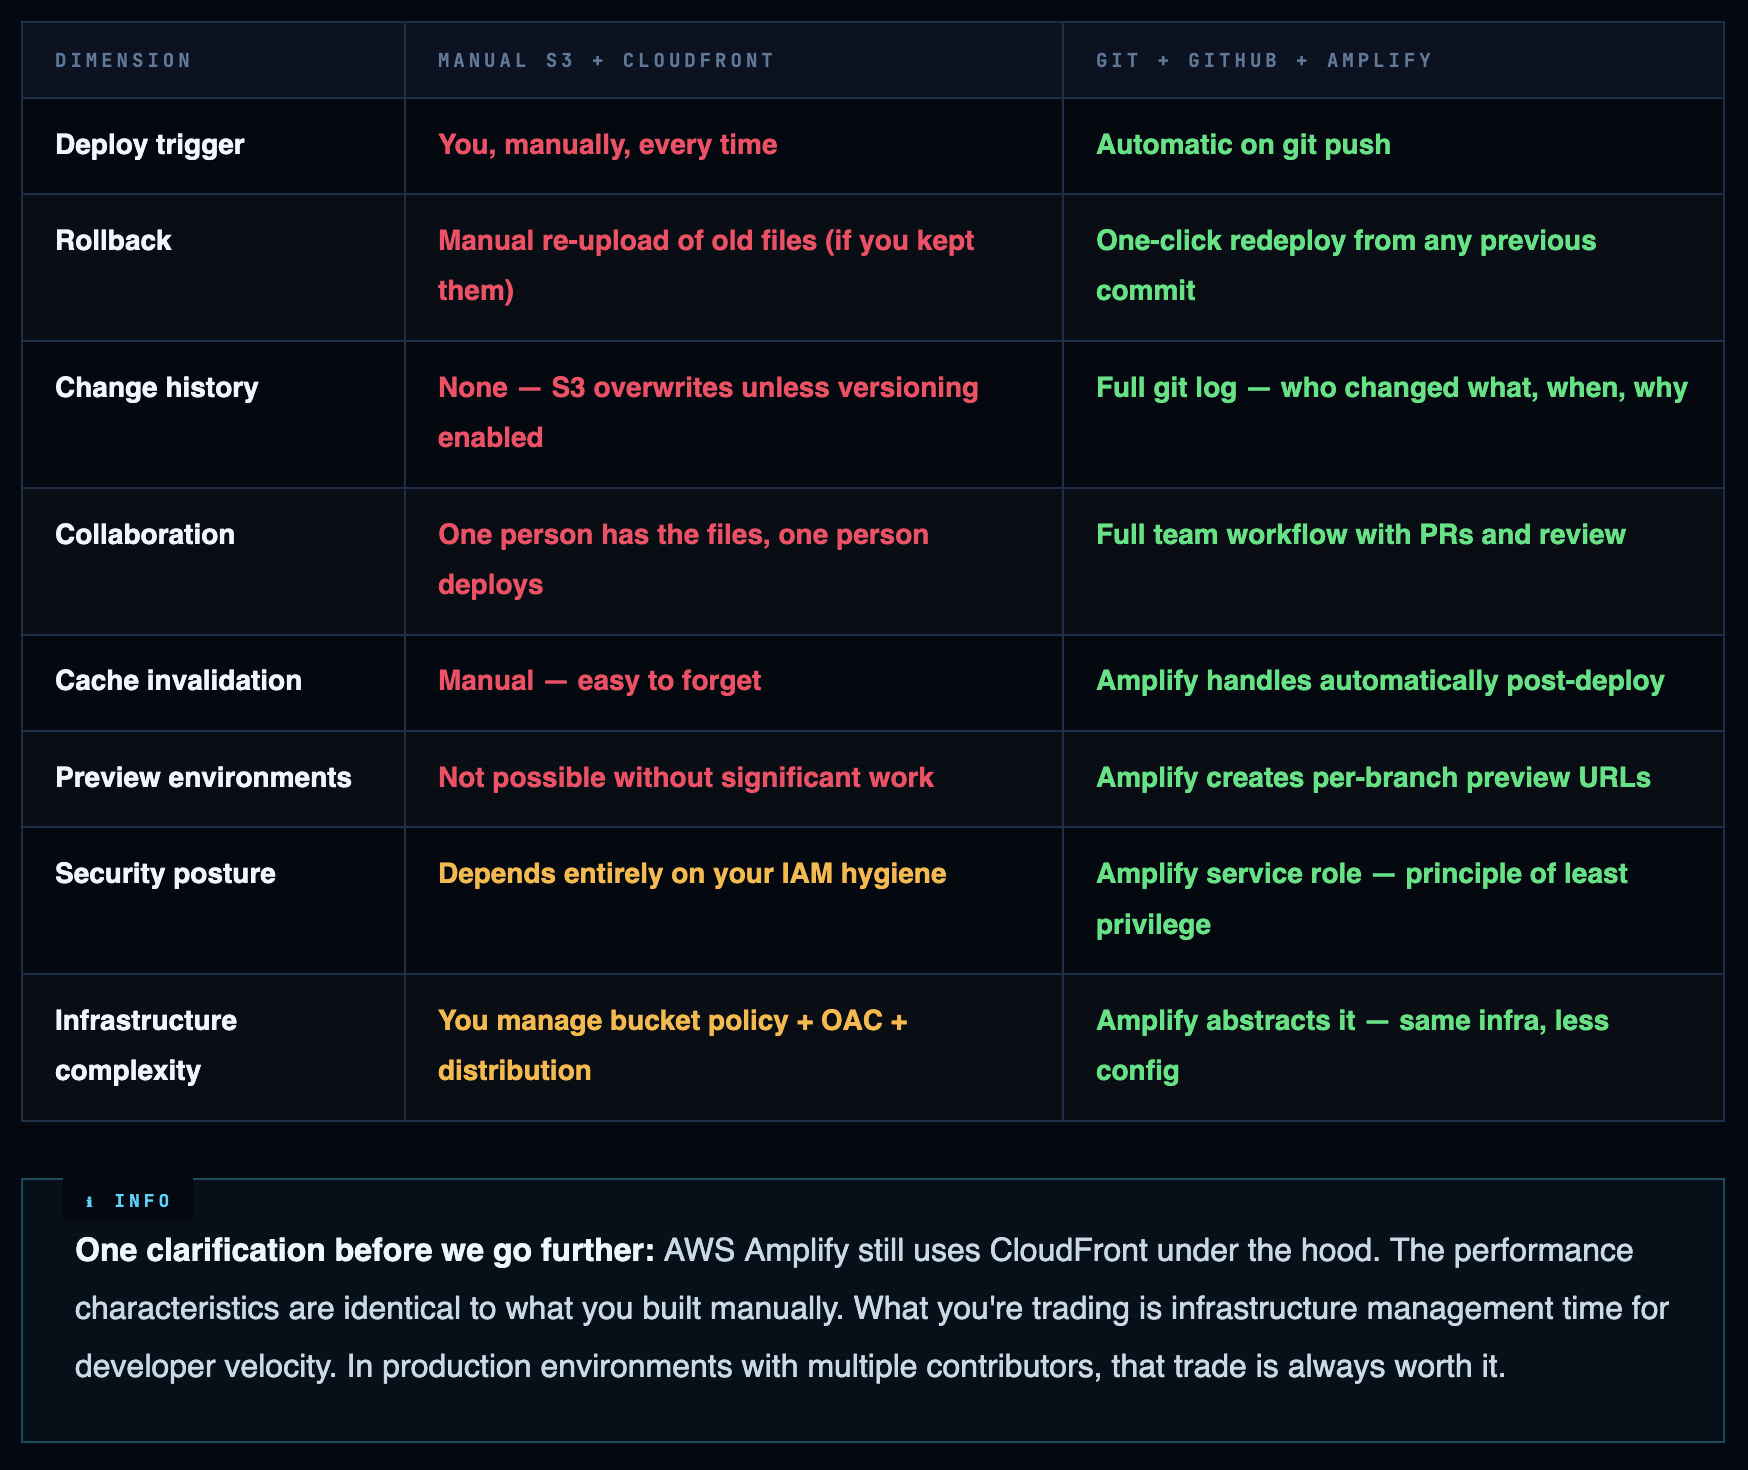
Manual Deploy vs CI/CD - Honest Comparison
Git - What’s Actually Happening Under the Hood
Skip this section if you already work with Git daily. Read it if you’ve been clicking buttons in GitHub’s UI without fully understanding the mechanics - because those mechanics matter when things break at 2am.
The Object Model
Git doesn’t store file diffs. It stores snapshots - complete point-in-time copies of your entire project tree, compressed and content-addressed by SHA-1 hash. Every commit is a pointer to a tree object. Every tree object contains references to blob objects (your files). The efficiency comes from deduplication: if index.html didn’t change between two commits, both commits point to the same blob.

The Three Working States
Every file in a git repo lives in one of three states. Understanding this eliminates most beginner confusion:
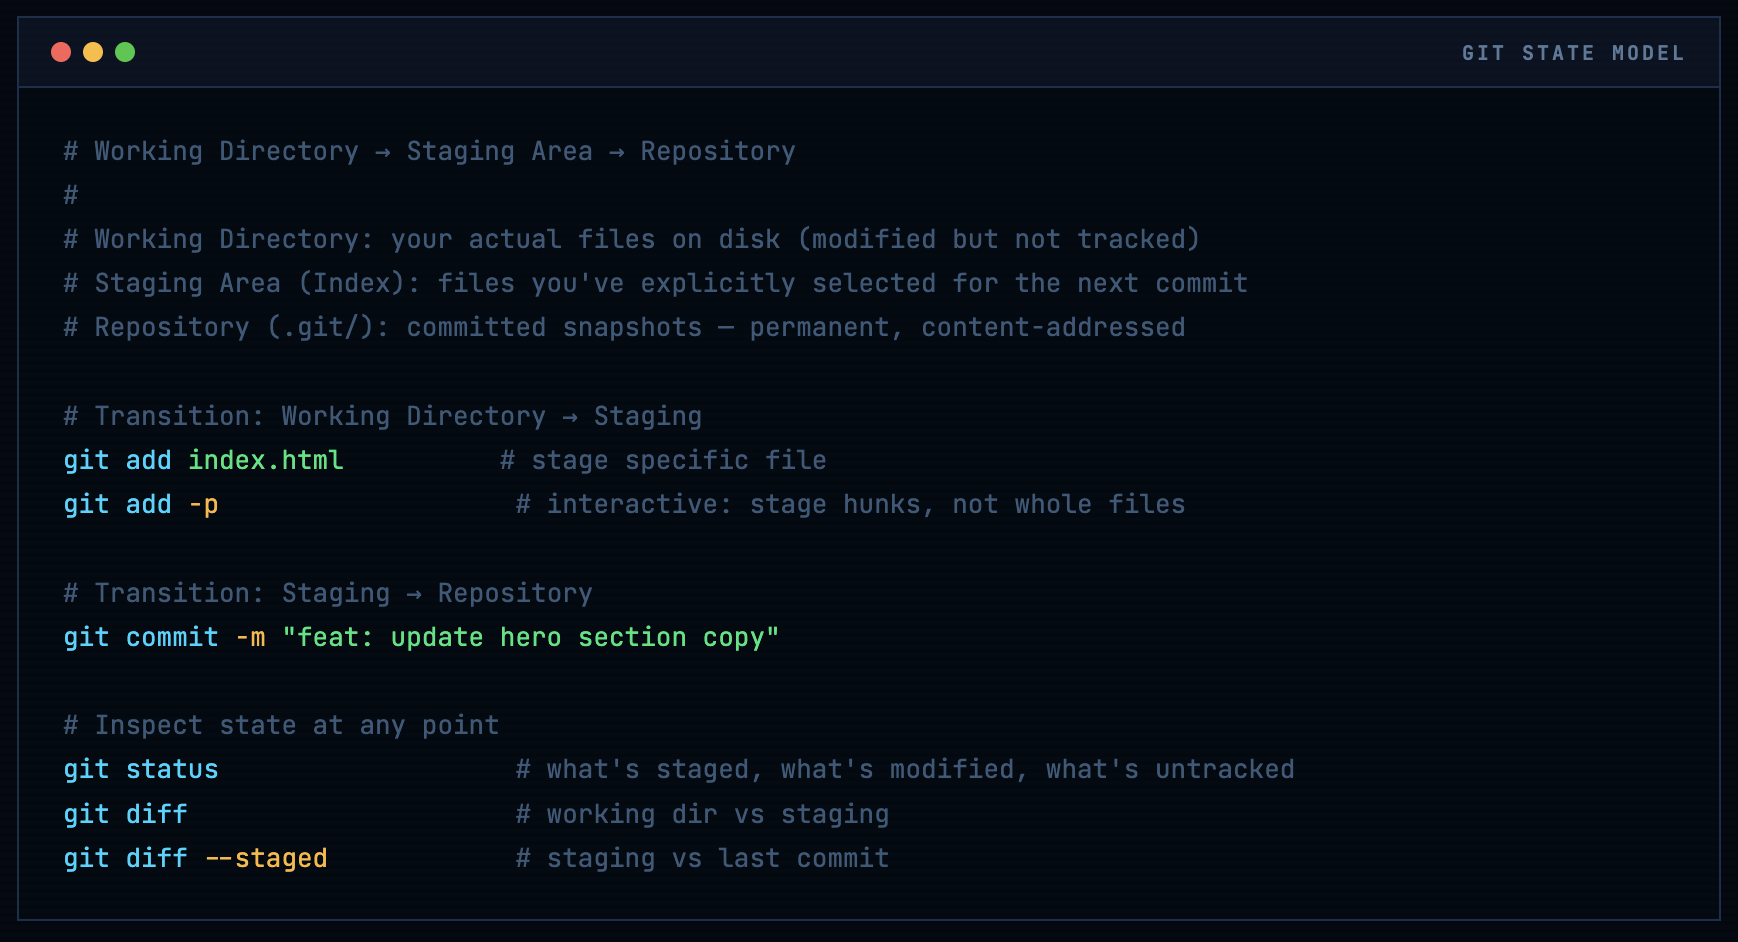
Warning. The staging area is not optional decoration. It exists so you can commit exactly what you intend - not everything you touched. In a CI/CD context, sloppy commits (committing debug logs, credentials, or unfinished work) go straight to production. The git add -p (patch mode) habit will save you from yourself.
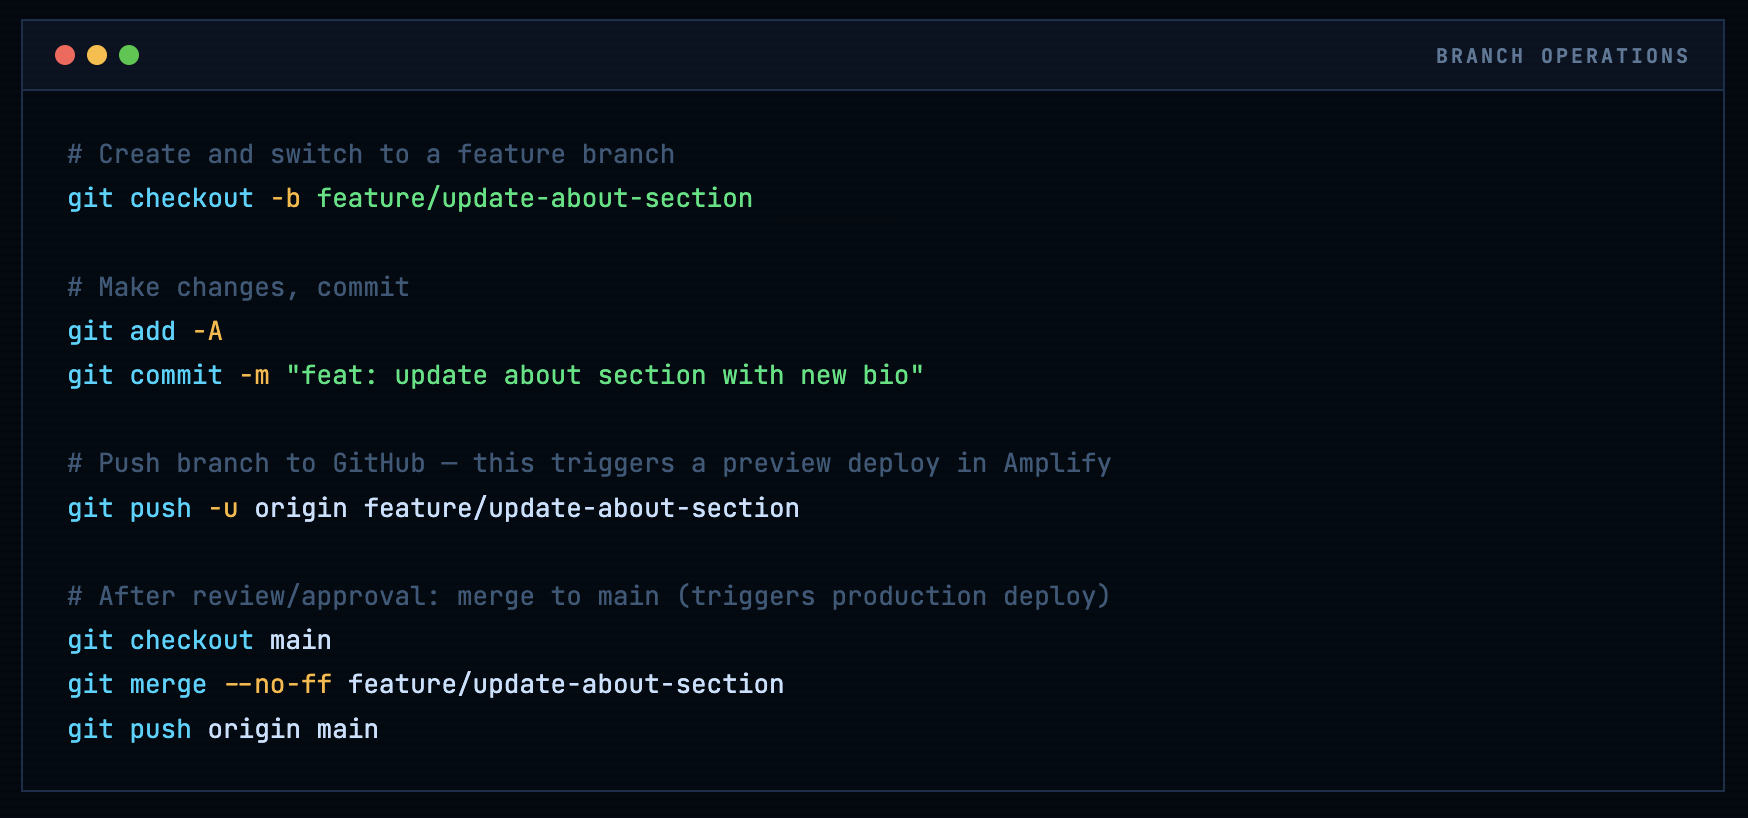
Branches - The Mechanic That Makes CI/CD Work
A branch is nothing more than a named pointer to a commit. That’s it. The entire branch model - feature branches, environment branches, hotfix branches - is built on this single lightweight abstraction.
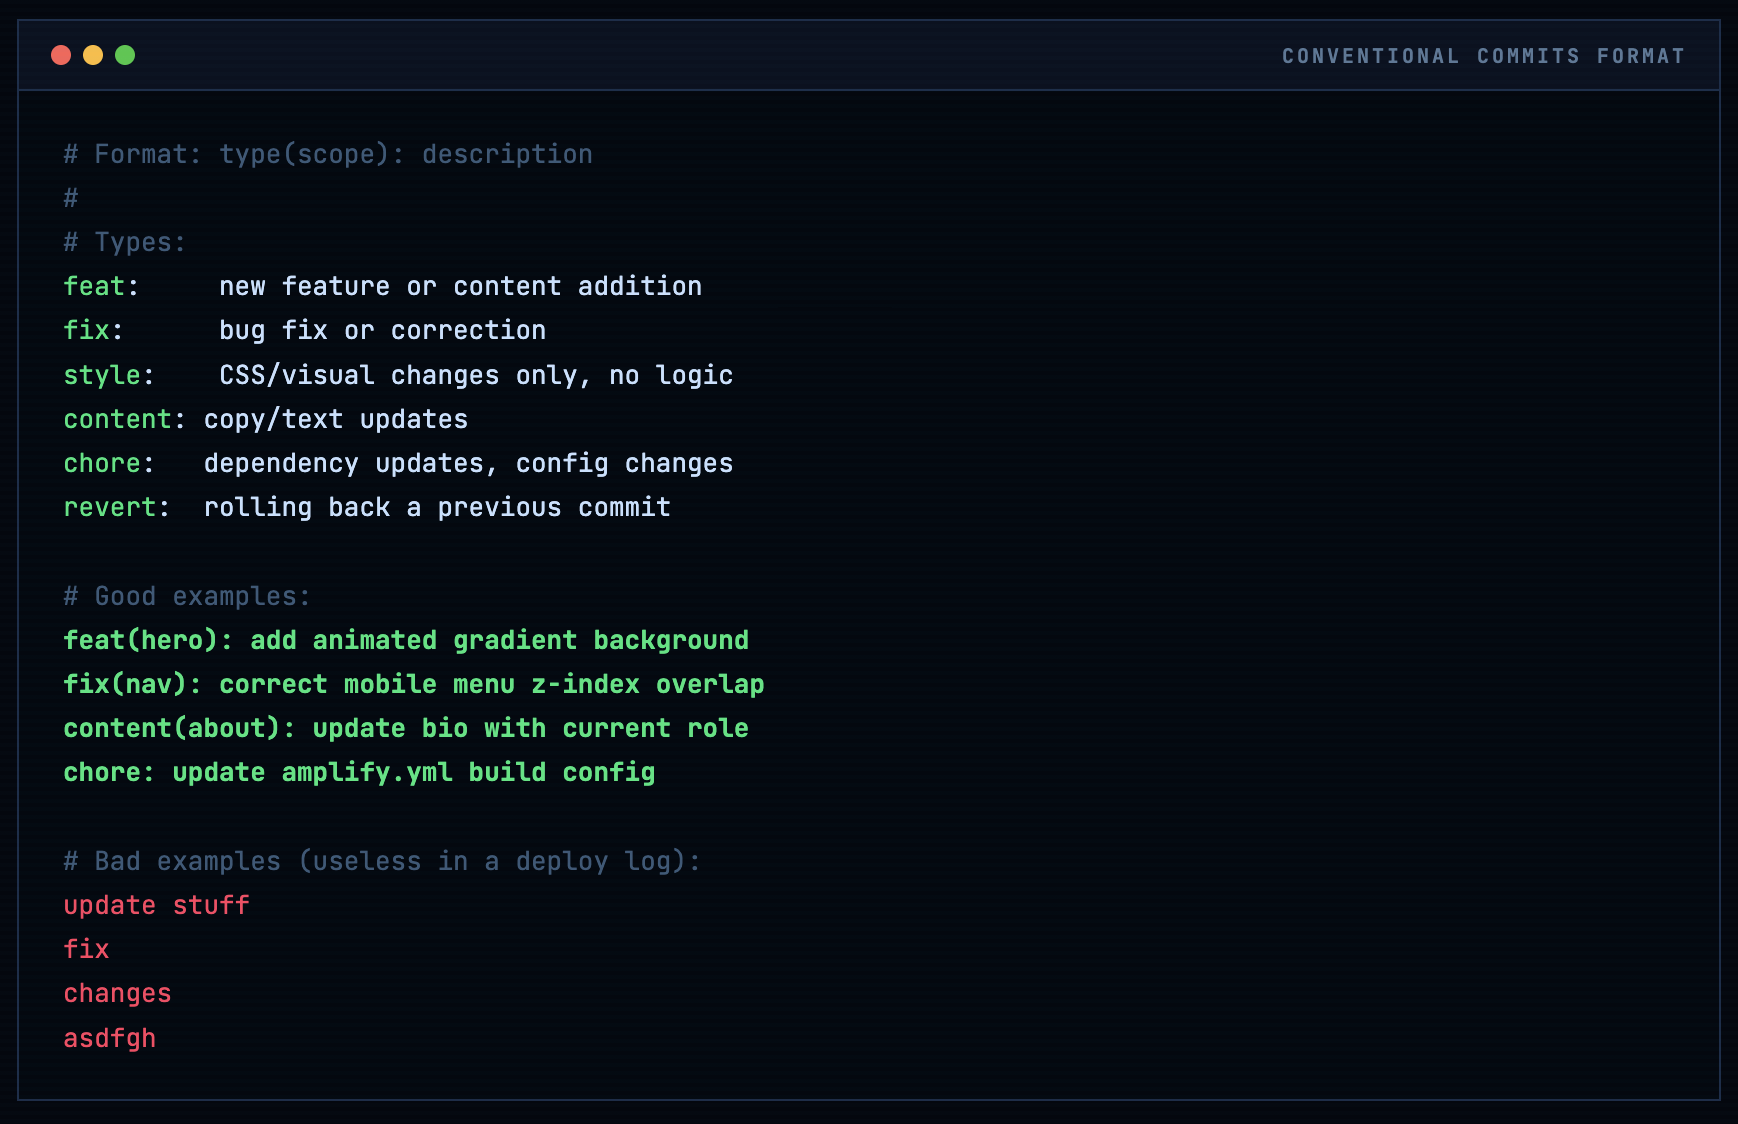
Commit Message Convention - Don’t Skip This
Once Amplify is connected, your commit messages become your deployment log. When something breaks in production, you’ll grep through them to find the causative change. Conventional Commits format pays for itself immediately:
GitHub Account & Repository Setup
If you already have a GitHub account, skip ahead to repository creation. If not: go to github.com, sign up, and choose your username carefully. This username will appear in your repository URLs (github.com/yourusername/repo) and is visible to anyone who views your profile. Your professional identity on GitHub compounds over years - pick something you’ll still use in five years.
Info. Enable 2FA before you do anything else. Go to Settings → Password and authentication → Enable two-factor authentication. GitHub now requires 2FA for any account that contributes to code. Use an authenticator app (Google Authenticator, Authy, 1Password) rather than SMS - SIM-swap attacks are real and SMS-based 2FA is the weakest form. Save your recovery codes somewhere safe (password manager, not a text file on your desktop).
SSH Key Authentication - The Right Way
HTTPS authentication with your GitHub password still works but it’s the legacy path. SSH key authentication is faster, more secure, and doesn’t expire. Do this once and you’ll never enter a password for git operations again:
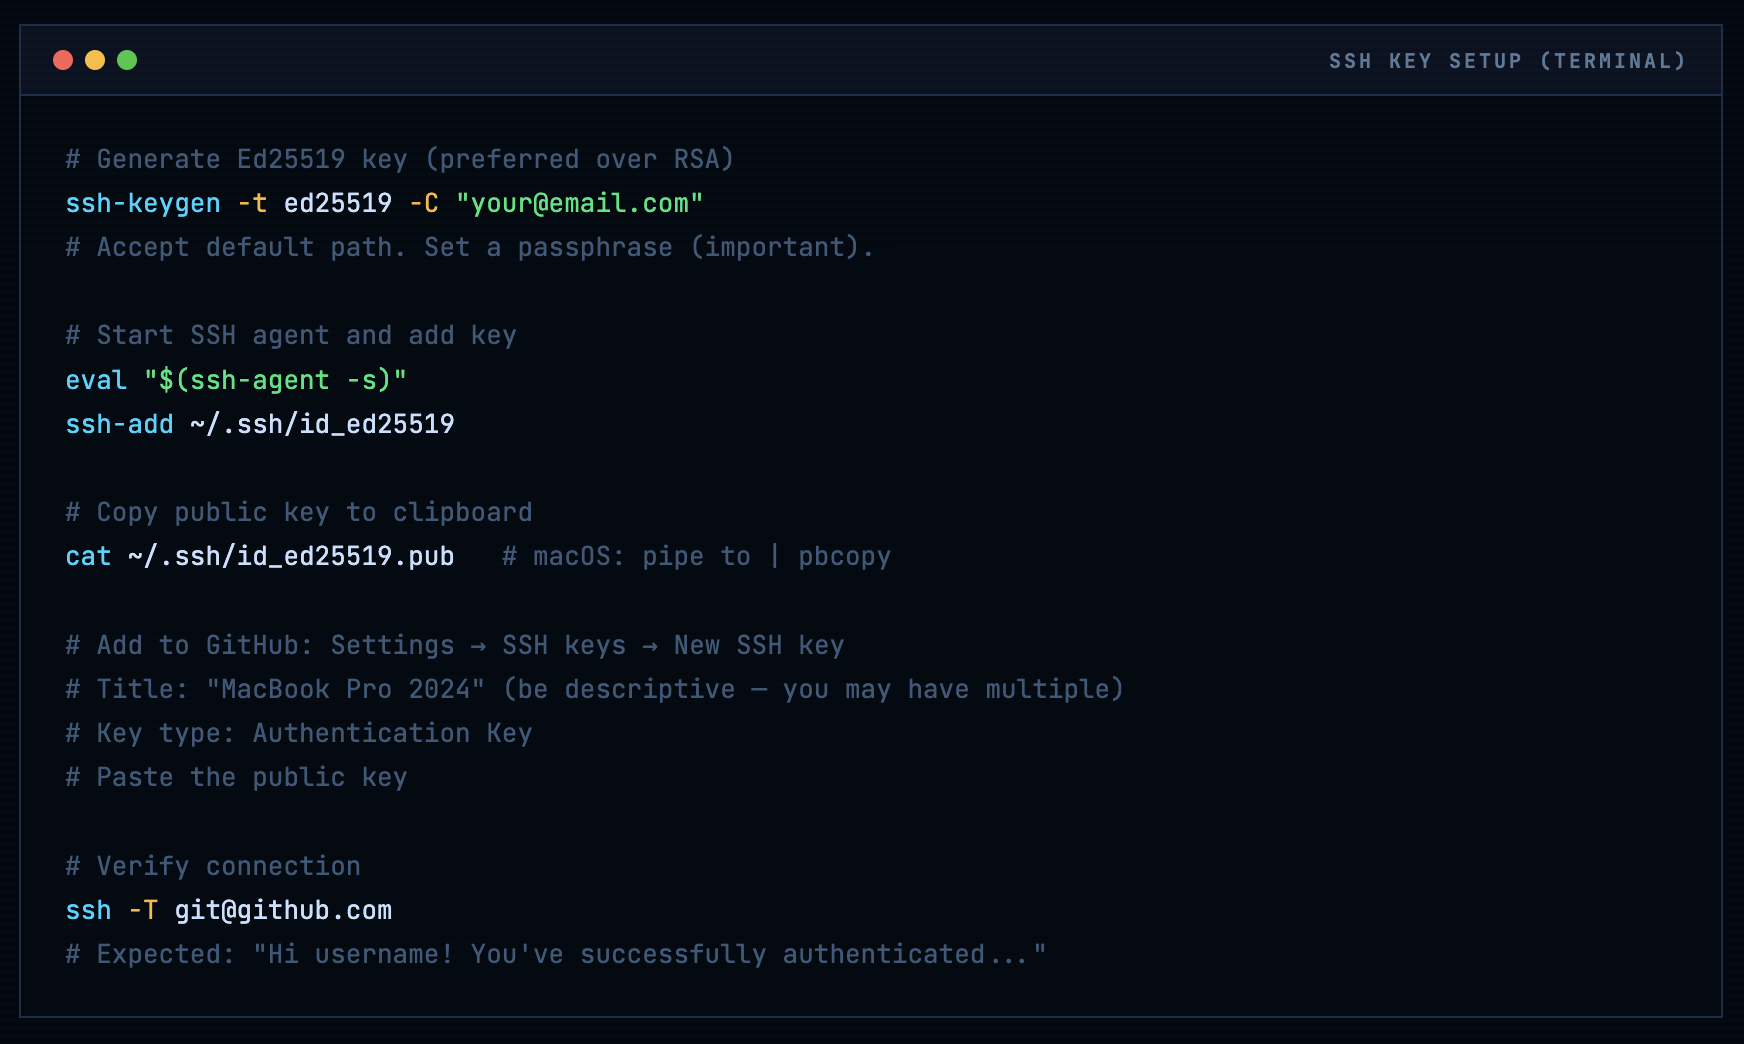
# Generate Ed25519 key (preferred over RSA)
ssh-keygen -t ed25519 -C "your@email.com"
# Accept default path. Set a passphrase (important).

# Start SSH agent and add key
eval "$(ssh-agent -s)"
ssh-add ~/.ssh/id_ed25519

# Copy public key to clipboard
cat ~/.ssh/id_ed25519.pub   # macOS: pipe to | pbcopy

# Add to GitHub: Settings → SSH keys → New SSH key
# Title: "MacBook Pro 2024" (be descriptive - you may have multiple)
# Key type: Authentication Key
# Paste the public key

# Verify connection
ssh -T git@github.com
# Expected: "Hi username! You've successfully authenticated..."
Creating the Repository
Navigate to github.com → New repository (green button, top right, or the + icon).
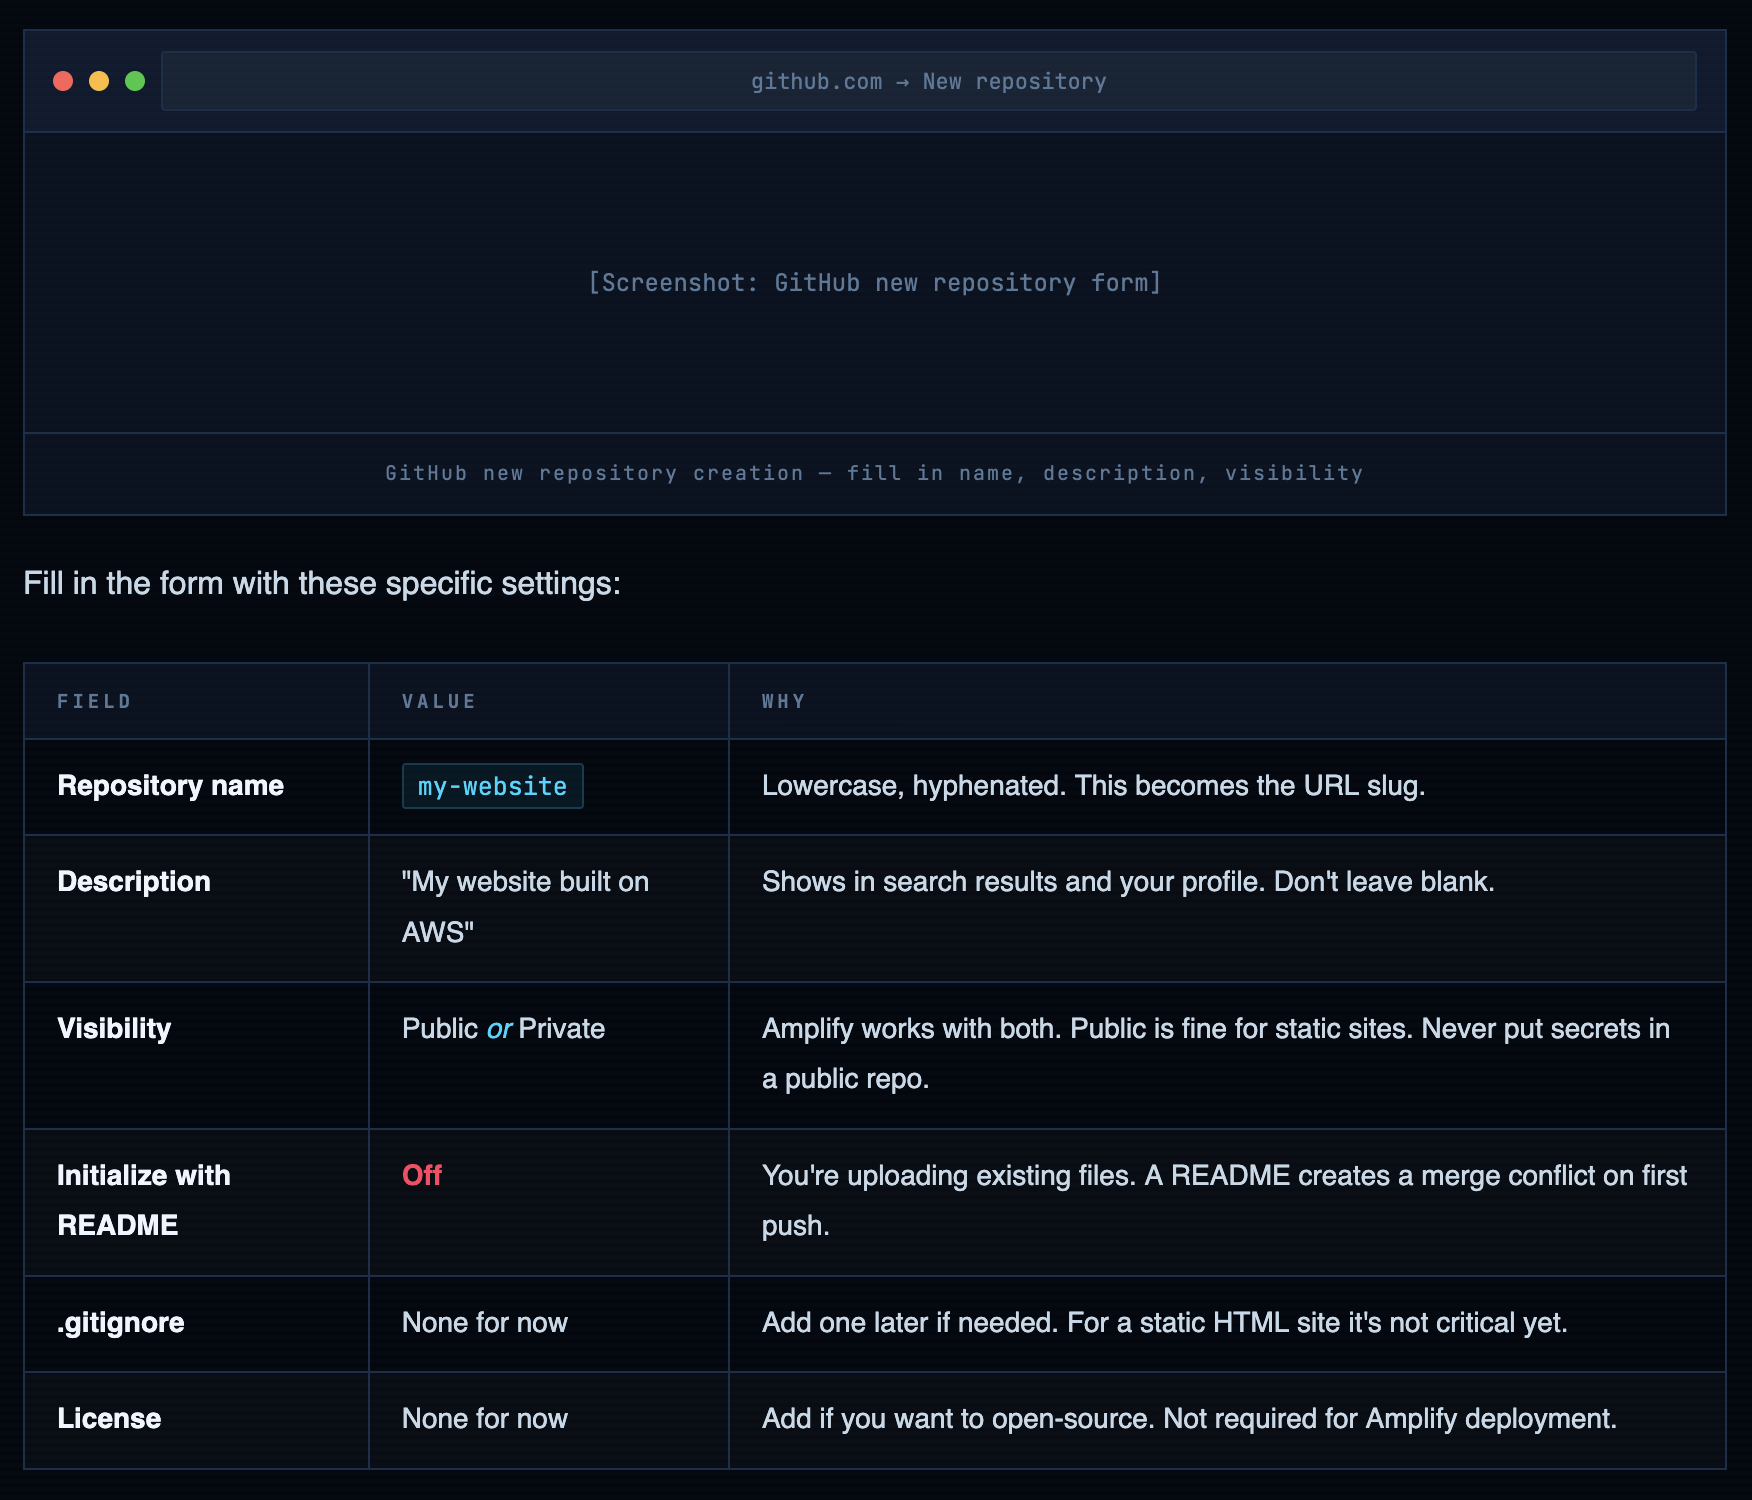
Warning. Never commit credentials, API keys, or secrets to any repository - public or private. Private repos have been accidentally made public. GitHub scans public commits for secrets and notifies service providers who then revoke them. Use environment variables in Amplify's console for any sensitive config. For now with a static HTML site this isn't an issue, but build the habit from day one.
Uploading Your Website Files
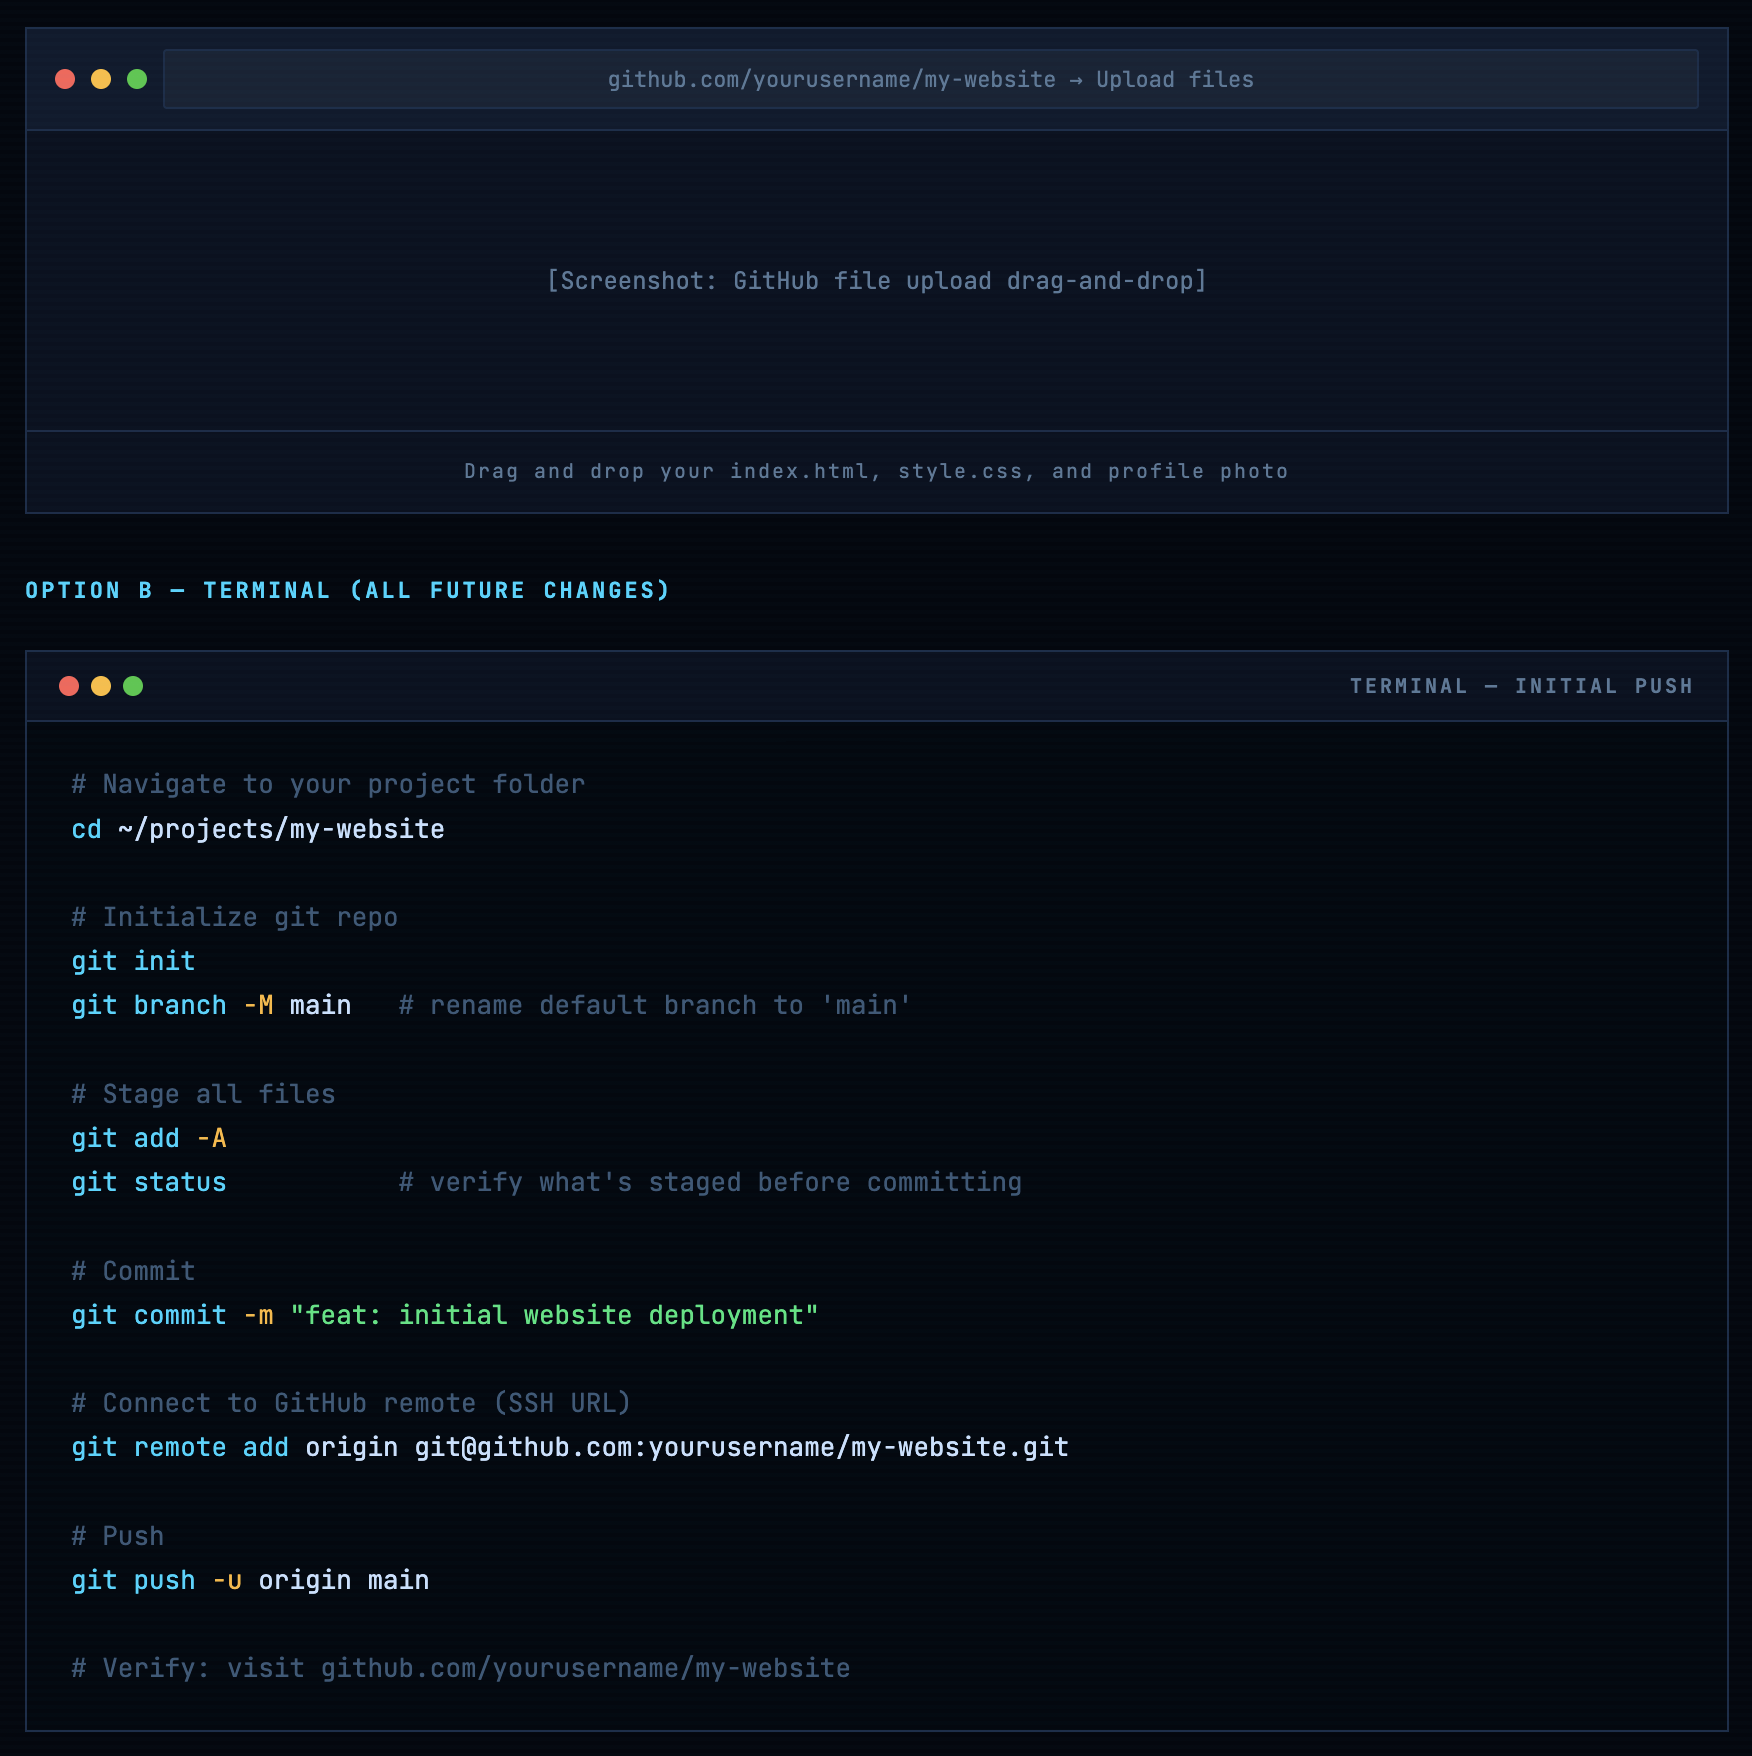
If you’re new to git, the GitHub web UI upload is fine for your first push. For everything after that, use the terminal - it’s faster and you need the muscle memory.
Option A - GitHub Web UI (first time only)
After creating the repo, click Add file → Upload files. Drag and drop index.html, style.css, and your profile photo. In the commit box:
- Commit message: feat: initial website deployment
- Description: “Personal website with HTML, CSS” (optional but good practice)
- Branch: Commit directly to main
Option B - Terminal (all future changes)
# Navigate to your project folder
cd ~/projects/my-website

# Initialize git repo
git init
git branch -M main   # rename default branch to 'main'

# Stage all files
git add -A
git status           # verify what's staged before committing

# Commit
git commit -m "feat: initial website deployment"

# Connect to GitHub remote (SSH URL)
git remote add origin git@github.com:yourusername/my-website.git

# Push
git push -u origin main

# Verify: visit github.com/yourusername/my-website
Connecting AWS Amplify to GitHub
Amplify needs two permissions: read access to your GitHub repository, and an AWS IAM service role to deploy infrastructure. Both happen through the console wizard. Here’s what’s actually being configured at each step.
Navigate to the Amplify Console
From the AWS Management Console, search for “Amplify” or navigate directly. Click “Deploy an app”. Do not click “Build an app” - that’s the full-stack Amplify Gen 2 workflow for React/Next.js apps, not what we need here.
GitHub Authorization - What You’re Actually Granting
When you click “Authorize AWS Amplify”, GitHub’s OAuth flow asks you to grant Amplify access to your repositories. Be deliberate here:
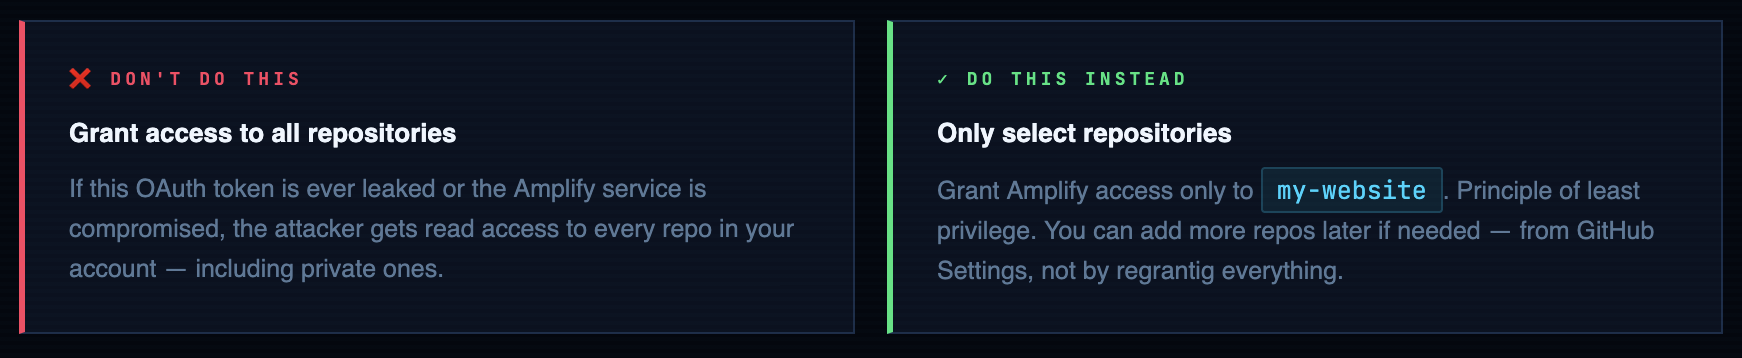
Repository & Branch Selection
Select my-website from the dropdown. Branch: main. Leave “My app is a monorepo” unchecked - that’s for multi-package repos with separate frontend/backend directories.
Build Settings - Understanding amplify.yml
For a plain HTML/CSS/JS site, Amplify’s auto-detected build settings work fine. Accept the defaults. But you should understand what they mean for when you inevitably need to customize:
version: 1
frontend:
  phases:
    preBuild:
      commands:
        - echo "No build dependencies for plain HTML"
    build:
      commands:
        - echo "Static site - no build step required"
  artifacts:
    baseDirectory: /     # deploy from repo root
    files:
      - '**/*'                # include all files recursively
  cache:
    paths: []               # nothing to cache for plain HTML

# For a React/Next.js app this would look like:
# preBuild: npm ci
# build: npm run build
# baseDirectory: .next (or dist, or build)
App Name & Final Deploy
Enter app name: my-builder-challenge-website. Click “Save and deploy”. Amplify will immediately queue your first build. The initial deploy takes 2-4 minutes - you can watch it in real time from the build log panel.
What Amplify Actually Does - The Full Pipeline
Understanding the pipeline means you can debug it when it fails. And it will fail at some point. Here’s exactly what happens from git push to live website:
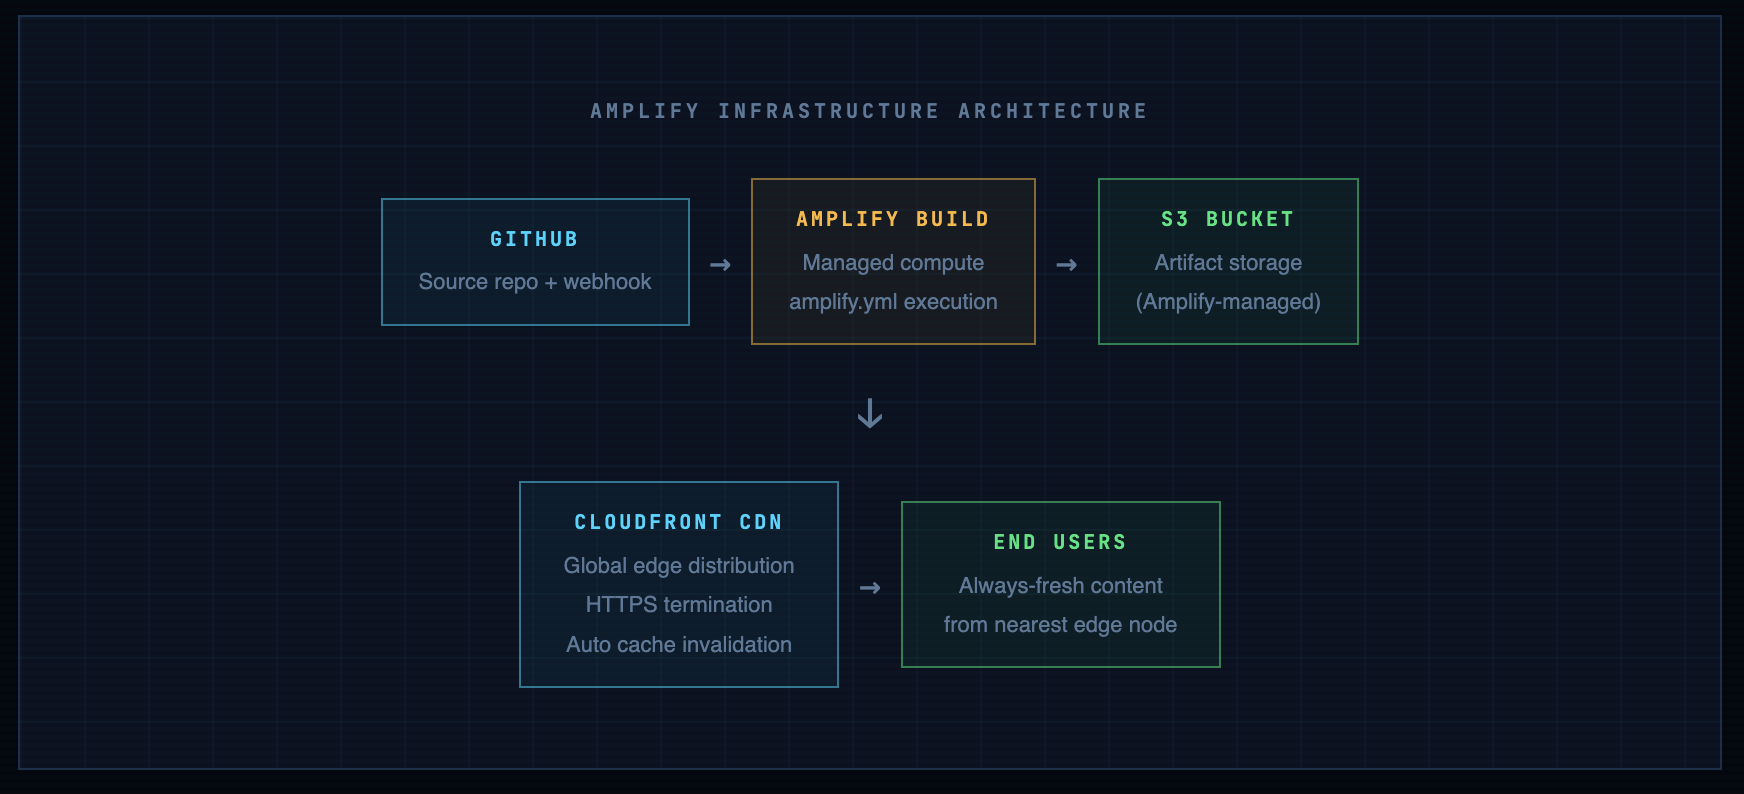
Info. The underlying infra is identical to what you built manually. CloudFront + S3. The difference: Amplify manages the S3 bucket policy, OAC configuration, and cache invalidation. You don't touch them. This is both a productivity win and a slight loss of visibility - understand what's underneath so you can reason about it when something behaves unexpectedly.
Build Logs - Your Primary Debugging Tool
When a deploy fails, the build log is where you go first - not the Amplify console home page, not AWS support. The log shows the exact command that failed and its output. Access it from: Amplify Console → Your App → Build history → Click any build number.
# Successful build looks like:
2024-01-15 14:23:01 [INFO] Starting build phase
2024-01-15 14:23:02 [INFO] Cloning repository: https://github.com/you/my-website
2024-01-15 14:23:05 [INFO] Running preBuild commands
2024-01-15 14:23:05 [INFO] Running build commands
2024-01-15 14:23:06 [INFO] Artifact upload: 3 files uploaded
2024-01-15 14:23:08 [INFO] CloudFront invalidation created: E1ABCDEF12345
2024-01-15 14:23:09 [INFO] Build complete. Status: SUCCEED

# Failed build has a specific error - read it:
2024-01-15 14:23:06 [ERROR] Build failed: No artifacts found
2024-01-15 14:23:06 [ERROR] BaseDirectory '/' contains no matching files
# Fix: check amplify.yml baseDirectory path matches your repo structure
Security Considerations - What Most Guides Skip
A CI/CD pipeline is also an attack surface. When Amplify deploys your code, it does so with an IAM role. That role has AWS permissions. If your GitHub repo is compromised, so is your deploy pipeline. These aren’t hypothetical risks - supply chain attacks through compromised GitHub accounts are how most CI/CD incidents start.
IAM Role Scope - Least Privilege
During setup, Amplify creates an IAM service role automatically. Review it and restrict it to only what’s needed:
# Review in: IAM → Roles → AmplifyConsoleServiceRole-*
# For a static site, Amplify needs at minimum:
{
  "Version": "2012-10-17",
  "Statement": [
    {
      "Effect": "Allow",
      "Action": [
        "s3:GetObject",
        "s3:PutObject",
        "s3:DeleteObject",
        "s3:ListBucket",
        "cloudfront:CreateInvalidation",
        "logs:CreateLogGroup",
        "logs:CreateLogStream",
        "logs:PutLogEvents"
      ],
      "Resource": "*"  # tighten to specific bucket ARN in production
    }
  ]
}
Secrets Management - Never in Source Code
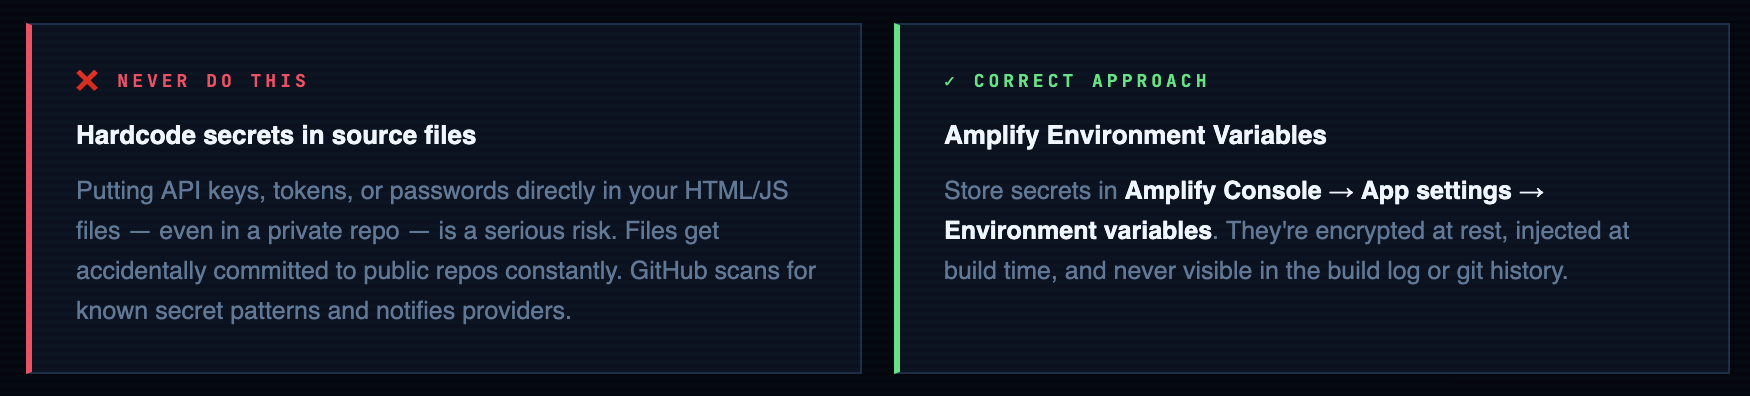
# Set in Amplify Console: App settings → Environment variables
# Reference in build commands with $VARIABLE_NAME

version: 1
frontend:
  phases:
    build:
      commands:
        # Example: inject API endpoint at build time (not hardcoded)
        - echo "API_URL=$API_ENDPOINT" >> .env
        - npm run build
Branch Protection Rules
Once Amplify watches your main branch, every push to main triggers a production deploy. Without branch protection, anyone with write access to the repo can push broken code straight to production. Set this up now:
# GitHub: Settings → Branches → Add branch protection rule
# Branch name pattern: main
#
# Recommended settings for a single-developer project:
✓ Require a pull request before merging
✓ Require status checks to pass before merging  # lock to Amplify build
✓ Require branches to be up to date before merging
✓ Do not allow bypassing the above settings
#
# For solo projects you can bypass these initially,
# but add them before collaborating with anyone else.
Danger. GitHub Personal Access Tokens (PATs) are credentials. If you use HTTPS authentication instead of SSH, your PAT is the key to your entire GitHub account. Store it in your OS keychain or password manager - never in a text file, never in your shell history (history | grep token is a real attacker technique). Use fine-grained PATs with minimum scope over classic PATs with broad permissions.
Branch Strategy - Building for How Real Projects Actually Work
For a solo project you might push to main directly for a while. That’s fine. But as soon as you have a second contributor, or as soon as you need to work on something without breaking the live site, you need a branch strategy. Set it up before you need it.
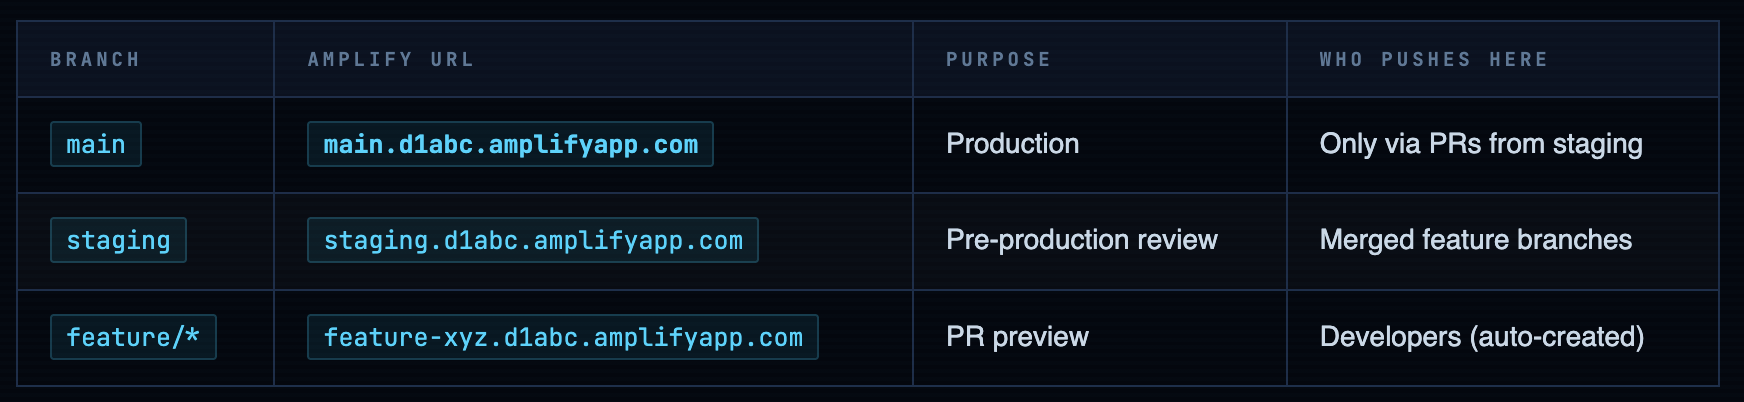
Amplify’s Branch-to-Environment Mapping
One of Amplify’s best features: it can deploy different branches to different URLs automatically. This gives you full staging/production parity with zero extra infrastructure:
# 1. Always start from an up-to-date main
git checkout main
git pull origin main

# 2. Create a feature branch
git checkout -b feature/update-portfolio-section

# 3. Make your changes, commit often
git add -p
git commit -m "feat(portfolio): add 3 new project cards"

# 4. Push to GitHub → Amplify creates a preview deploy automatically
git push -u origin feature/update-portfolio-section
# Amplify preview URL: feature-update-portfolio-section.d1abc.amplifyapp.com

# 5. Review the preview URL. Happy with it? Open a PR on GitHub.
# 6. PR merged to main → production deploy triggers.
# 7. Clean up the feature branch
git branch -d feature/update-portfolio-section
git push origin --delete feature/update-portfolio-section
Common Failures - Diagnosed and Fixed
Build fails: “No artifacts found”
Cause: Your amplify.yml baseDirectory path doesn’t match your repo structure. If your files are in a subfolder (e.g., src/ or public/), the wildcard ‘*/’ from the root won’t find them where Amplify expects.
Deploy succeeds but site shows old content
Cause: CloudFront cache hasn’t propagated yet, or the invalidation failed. Amplify usually handles invalidation automatically, but it can be slow (up to 15 minutes for full global propagation).
Fix: In the Amplify console → Build log, look for CloudFront invalidation created. If it’s missing, manually trigger one from Amplify → Rewrites and redirects → Invalidations, or via CLI
GitHub authorization fails or “Repository not found”
Cause: Amplify’s GitHub OAuth token expired, or you didn’t grant access to the specific repo, or the repo was renamed after authorization.
Fix: In GitHub → Settings → Applications → Authorized OAuth Apps → AWS Amplify → Revoke, then re-authorize from the Amplify console. Make sure to select your repository explicitly during the re-auth flow.
HTTPS shows “Not Secure” or certificate error
Cause: If you’ve added a custom domain, ACM certificate validation may not be complete. The default *.amplifyapp.com domain always has valid HTTPS - this issue only affects custom domains.
Fix: Amplify Console → Domain management → Check certificate status. If it’s pending, the DNS CNAME validation record may not have propagated yet (can take up to 48 hours depending on your DNS provider’s TTL).
Deploy triggered but nothing changed on the site
Cause: Your push was to a branch Amplify isn’t watching, or the webhook wasn’t triggered (network issue), or the build ran but deployed identical content (no actual file changes).
Fix: Confirm the push was to main. In Amplify → Webhooks, verify the webhook payload was received. If not, manually trigger a redeploy from the Amplify console.
Where This Pipeline Goes From Here
You now have a production-grade deployment workflow: version-controlled source, automated deploys on push, CloudFront-distributed delivery, HTTPS out of the box, and a full change history. This is the foundation every real project builds on.
Custom Domain & HTTPS
Your site is live on *.amplifyapp.com. To connect your own domain: Amplify Console → Domain management → Add domain. Amplify provisions an ACM certificate and handles DNS configuration. If your domain is in Route 53, it’s almost automatic. For external DNS providers (Namecheap, Cloudflare, GoDaddy), you’ll add a CNAME record manually.
Performance Monitoring
Enable Amplify’s built-in monitoring from the console. For deeper metrics: CloudWatch dashboards give you request counts, error rates, and cache hit ratios from CloudFront. Set up a CloudWatch alarm for 4xx/5xx error rates so you know when users are hitting broken pages - before they tell you.
Build Notifications
Amplify can notify you on deploy success or failure via email or SNS. Set this up from App settings → Notifications. For team projects, connect to a Slack channel via SNS → Lambda → Slack webhook. Knowing instantly when a deploy fails is non-negotiable on production systems
Best practice. Automate your deploy verification too. A step beyond manual checks: add a simple smoke test to your amplify.yml postBuild phase. Even a curl checking for a known string in your homepage - if it fails, the build fails and the broken deploy never goes live.
postBuild:
  commands:
    # Fail the build if your name isn't on the page
    - grep -q "Your Name" index.html || (echo "Smoke test failed" && exit 1)
You now have a real CI/CD pipeline
Every push to main deploys automatically. Every change is tracked. Every rollback is one click. This is the infrastructure pattern that scales from a personal website to a production SaaS - the fundamentals don’t change, only the complexity of what you’re deploying.
Comments (1)
Sir, I must congratulate you for this wonderful job. So far, your teachings are simple, easy to understand and perform.
Leave a comment