This Blog is inspired by Cloudchamp’s YouTube video
APP REPO https://github.com/Aj7Ay/K8s-voting-app.git
Navigate to Your Aws Console
Click the “Search” field and search For EKS or select directly Elastic Kubernetes Service on the Recently visited tab

Click “Add cluster”

Click “Create”

Click the “Name” field and enter a unique name for the cluster that is anything you want. For example, I used Cloud and version 1.27

Click on Amazon EKS User Guide for New IAM role creation.

You will get the below webpage and
Click “console.aws.amazon.com/iam“

You will be redirected to the IAM dashboard
Click “Roles”

Click “Create role”

Click “Allow AWS services like EC2, Lambda, or others to perform actions in this account.”

Click “Choose a service or use case”

Type “EKS”
Click this radio button with EKS-Cluster

Click “Next” and you will directly redirect to policy and click Next ( we have only one policy for it and it selects by default for EKS) that is AmazonEKSClusterPolicy

Click the “Role name” field and provide the name (myAmazonEKSClusterRole)

Click “Create role”

Click “myAmazonEKSClusterRole” that is created at Cluster Service Role.

Click “Next”

Click “Select security groups” and Use the existing security group or create a new security Group

Click “Next”

Click “Next”
No changes Click “Next” (Default no need to change anything)
No changes Click “Next” (Default no need to change anything)
Click “Create”
In your cluster Click “Add-ons”

Click “Get more add-ons”

Click this checkbox. with Amazon EBS CSI Driver

No changes Click “Next” (Default no need to change anything)
No changes Click “Next” (Default no need to change anything)
Click “Create”
Once your Cluster up to active status

Click “Compute”

Click on “Add node group”

Click the “Name” field.
Write any Name you want (NodeGroup)
Click “Select role” and click on the IAM console

Click “Create role”

Click “Allow AWS services like EC2, Lambda, or others to perform actions in this account.”

Click “Choose a service or use case”

Click “EC2”

Click “Next”
Click the “Search” field.

Search these Policy Names and make it check
AmazonEC2ContainerRegistryReadOnly
AmazonEKS_CNI_Policy
AmazonEBSCSIDriverPolicy
AmazonEKSWorkerNodePolicy


Click “Next”
Click the “Role name” field.
Add Role name as myAmazonNodeGroupPolicy
Click “Create role”

Add a role that was created before “myAmazonNodeGroupPolicy“

Click “Next”
On the next page remove t3.medium and add t2.medium as instance type.

Select t2.medium

Click “Next”

Click “Next”

Click “Create”

Node Groups will take some time to create, Click “EC2” or Search for Ec2

Click “Launch instance”

Add Name and AMI as Amazon Linux

Take instance type as t2.micro and select keypair with default security Group.
Click “Advanced details”

Click on the IAM instance Profile and Create a New IAM profile.

Click “Create role”

Click “Choose a service or use case”

Click “EC2”
Click the “Search” field.
Type “EBS”
Click this checkbox with the policy name AmazonEBSCSIDriverPolicy.

Click “Next”
Click the “Role name” field and provide the name as EKSaccess.

Click “Create role”
Click on the newly created role “EKSaccess”

Click “Add permissions”

Click “Create inline policy”

Click “JSON”

REMOVE EVERYTHING FROM THE POLICY EDITOR
And add this
{
    "Version": "2012-10-17",
    "Statement": [{
        "Effect": "Allow",
        "Action": [
            "eks:DescribeCluster",
            "eks:ListClusters",
            "eks:DescribeNodegroup",
            "eks:ListNodegroups",
            "eks:ListUpdates",
            "eks:AccessKubernetesApi"
        ],
        "Resource": "*"
    }]
}

Click “Next”

Click the “Policy name” field and add the name as eksaccesspolicy
click on create policy.
Add That Role to your instance and launch the instance

Once the instance comes up copy the SSH client to connect to Putty.
ssh -i "m.pem" ec2-user@```

Install git on the instance
sudo yum install git -y

Once Git is installed, install Kubectl on the instance
installs kubectl on instance
curl -O https://s3.us-west-2.amazonaws.com/amazon-eks/1.24.11/2023-03-17/bin/linux/amd64/kubectl
chmod +x ./kubectl
sudo cp ./kubectl /usr/local/bin
export PATH=/usr/local/bin:$PATH

to check version
kubectl version --client

Install AWS CLI on the instance
install awscli
curl “https://awscli.amazonaws.com/awscli-exe-linux-x86_64.zip” -o “awscliv2.zip”
unzip awscliv2.zip
sudo ./aws/install

check awscli version
aws --version

Now check whether nodes are up or not
kubectl get nodes

You will get a refused error because we haven't set up the context yet. lets set context
aws eks update-kubeconfig --name EKS_CLUSTER_NAME --region CLUSTER_REGION
aws eks update-kubeconfig --name Cloud --region ap-south-1

The `aws eks update-kubeconfig` command updates the Kubernetes configuration file with details for connecting to an Amazon EKS cluster.
Specifically:
- `--name EKS_CLUSTER_NAME` provides the name of the EKS cluster to configure access for. This should be replaced with your actual cluster name.
- `--Region us-west-2` specifies the AWS region where the EKS cluster is located. You should update this if your cluster is in a different region.
- This will update your local kubeconfig file (usually located at ~/.kube/config) with the endpoint and certificate authority data to allow kubectl to communicate with your EKS cluster.
Let's check again whether nodes are up or not from instance.
kubectl get nodes

We will get an error that `You must be logged in to the server (unauthorized)`
The error message "You must be logged in to the server (Unauthorized)" in Kubernetes indicates that the user or service account trying to access the cluster does not have the necessary permissions. This error typically occurs when the authentication and authorization mechanisms in Kubernetes deny access.
Let's Resolve the issue
Go to Aws console
Click on the AWS cloud shell icon on the top right

click on connect
First set context by providing the following command
aws eks update-kubeconfig --name EKS_CLUSTER_NAME --region CLUSTER_REGION
aws eks update-kubeconfig --name Cloud --region ap-south-1
Edit the config map for access
kubectl edit configmap aws-auth --namespace kube-system

Go to your Iam roles and copy the arn of iam role of ec2 instance that is attached
Add your Role arn to the config map
`EKSaccess role is added to the Instance (While creating the instance)`

- rolearn: arn:aws:iam::XXXXXXXXXXXX:role/testrole #change arn of your instance role arn
username: testrole #rolename
groups:- system:masters
example
- rolearn: arn:aws:iam::672618677785:role/EKSaccess #change arn
username: EKSaccess # iam role name
groups:- system:masters

save and exit
Esc --> shift+:
wq!
You will get this output (aws-auth edited)

Check now whether nodes are up or not
`(Not only in cloud shell you will get output like this in putty also)`
kubectl get nodes

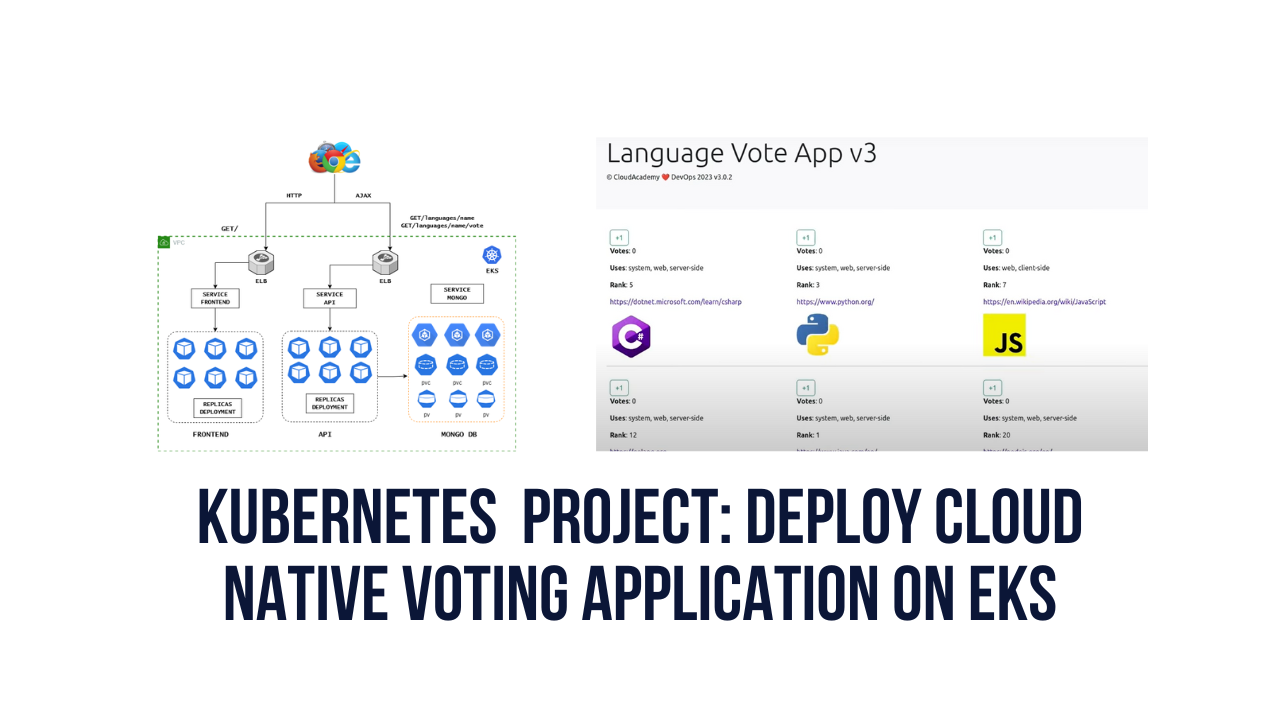
Let's clone our Project Repository
git clone

Go inside the K8s-voting app once it is cloned.
cd K8s-voting-app
cd manifests
ls
cat api-deployment.yaml
In the API deployment, we used a namespace as cloudchamp. By default we get 4 namespaces only, we have to create cloudchamp namespace.

default namespaces
kubectl get ns

Let's create our cloudchamp namespace.
kubectl create ns cloudchamp
kubectl get ns

when you want to work within a specific namespace for your Kubernetes operations.
We have to set our namespace as current
kubectl config set-context --current --namespace cloudchamp
- 
- `kubectl config set-context`: This is the main command for configuring your kubectl context.
- `--Current`: This flag indicates that you want to modify the current context.
- `--namespace cloudchamp`: This specifies the namespace you want to set as the current namespace for your kubectl context. In this case, it sets the namespace to "cloudchamp."
After running this command, any subsequent kubectl commands you execute will be scoped to the "cloudchamp" namespace, unless you specify a different namespace explicitly in your commands. This can be particularly useful when you have multiple namespaces in your Kubernetes cluster, and you want to ensure that your operations are isolated to a specific namespace.
### MONGO Database Setup
To create a Mongo stateful set with Persistent volumes, run the command in the manifests folder:
to apply manifest file
kubectl apply -f mongo-statefulset.yaml
to check pods
kubectl get pods (or)
kubectl get pods -n cloudchamp -w
kubectl get all

Go to Aws console and click on nodes and storage You can see now new 1Gb storage has been added to both nodes

Check whether persistent volumes are created or not
kubectl get pv -n cloudchamp
kubectl get pvc -n cloudchamp

create Mongo Service
kubectl apply -f mongo-service.yaml
kubectl get svc

Now let's go inside the mongo-0 pod and we have to initialise the Mongo database Replica set.
kubectl get pods
kubectl exec -it mongo-0 -- mongo

In the terminal run the following command:
rs.initiate();
sleep(2000);
rs.add(“mongo-1.mongo:27017”);
sleep(2000);
rs.add(“mongo-2.mongo:27017”);
sleep(2000);
cfg = rs.conf();
cfg.members[0].host = “mongo-0.mongo:27017”;
rs.reconfig(cfg, {force: true});
sleep(5000);

Note: Wait until this command completes successfully, it typically takes 10-15 seconds to finish and completes with the message: bye
Load the Data in the database by running this command:
use langdb

db.languages.insert({“name” : “csharp”, “codedetail” : { “usecase” : “system, web, server-side”, “rank” : 5, “compiled” : false, “homepage” : “https://dotnet.microsoft.com/learn/csharp”, “download” : “https://dotnet.microsoft.com/download/”, “votes” : 0}});
db.languages.insert({“name” : “python”, “codedetail” : { “usecase” : “system, web, server-side”, “rank” : 3, “script” : false, “homepage” : “https://www.python.org/”, “download” : “https://www.python.org/downloads/”, “votes” : 0}});
db.languages.insert({“name” : “javascript”, “codedetail” : { “usecase” : “web, client-side”, “rank” : 7, “script” : false, “homepage” : “https://en.wikipedia.org/wiki/JavaScript”, “download” : “n/a”, “votes” : 0}});
db.languages.insert({“name” : “go”, “codedetail” : { “usecase” : “system, web, server-side”, “rank” : 12, “compiled” : true, “homepage” : “https://golang.org”, “download” : “https://golang.org/dl/”, “votes” : 0}});
db.languages.insert({“name” : “java”, “codedetail” : { “usecase” : “system, web, server-side”, “rank” : 1, “compiled” : true, “homepage” : “https://www.java.com/en/”, “download” : “https://www.java.com/en/download/”, “votes” : 0}});
db.languages.insert({“name” : “nodejs”, “codedetail” : { “usecase” : “system, web, server-side”, “rank” : 20, “script” : false, “homepage” : “https://nodejs.org/en/”, “download” : “https://nodejs.org/en/download/”, “votes” : 0}});

db.languages.find().pretty();
exit #exit from conatiner
To confirm run this in the terminal:
kubectl exec -it mongo-0 -- mongo --eval “rs.status()” | grep “PRIMARY|SECONDARY”
Create Mongo secret:
kubectl apply -f mongo-secret.yaml

### API Setup
Create GO API deployment by running the following command:
kubectl apply -f api-deployment.yaml
kubectl get all

Expose API deployment through service using the following command:
kubectl expose deploy api \
--name=api \
--type=LoadBalancer \
--port=80 \
--target-port=8080
kubectl get svc

One load Balancer will be created in your AWS account

Next, set the environment variable:
{
API_ELB_PUBLIC_FQDN=$(kubectl get svc api -ojsonpath=”{.status.loadBalancer.ingress[0].hostname}”)
until nslookup $API_ELB_PUBLIC_FQDN >/dev/null 2>&1; do sleep 2 && echo waiting for DNS to propagate…; done
curl $API_ELB_PUBLIC_FQDN/ok
echo
}

Test and confirm that the API route URL /languages, and /languages/{name} endpoints can be called successfully. In the terminal run any of the following commands:
#in browser
In the browser, you have to use your external IP of Api to see this output

If everything works fine, go ahead with the Frontend setup.
### Frontend setup
kubectl apply -f frontend-deployment.yaml
kubectl get pods

kubectl get all

Expose API deployment through service using the following command:
kubectl expose deploy frontend \
--name=frontend \
--type=LoadBalancer \
--port=80 \
--target-port=8080

kubectl get svc

Next, set the environment variable:
{
FRONTEND_ELB_PUBLIC_FQDN=$(kubectl get svc frontend -ojsonpath=”{.status.loadBalancer.ingress[0].hostname}”)
until nslookup $FRONTEND_ELB_PUBLIC_FQDN >/dev/null 2>&1; do sleep 2 && echo waiting for DNS to propagate…; done
curl -I $FRONTEND_ELB_PUBLIC_FQDN
}

Generate the Frontend URL for browsing. In the terminal run the following command:
echo http://$FRONTEND_ELB_PUBLIC_FQDN
Test the full end-to-end cloud-native application
frontend external ip in browser

If you get output like this, Delete the service of frontend and deployment
kubectl delete -f frontend-service.yaml
kubectl delete -f frontend-deployment.yaml
Now copy your API External service ip
kubectl get svc

Now open your frontend-deployment. yaml file
sudo vi frontend-deployment.yaml

Update the frontend-deployment.yaml file with your api-ip

esc --shift+:
wq!
Now again deploy the frontend
kubectl apply -f frontend-deployment.yaml
and now expose the frontend-service
kubectl expose deploy frontend \
--name=frontend \
--type=LoadBalancer \
--port=80 \
--target-port=8080
Copy your external ip of the frontend service and paste it into the browser You will get an application like this

Using your local workstation's browser - browse to the URL created in the previous output.
After the voting application has loaded successfully, vote by clicking on several of the **+1** buttons, This will generate AJAX traffic which will be sent back to the API via the API's assigned ELB.
Query the MongoDB database directly to observe the updated vote data. In the terminal execute the following command:
kubectl exec -it mongo-0 -- mongo langdb --eval “db.languages.find().pretty()”
```

Thanks for Reading my Blog.
Comments (0)
No comments yet. Be the first to share your thoughts.
Leave a comment