In today’s digital landscape, user engagement is key to the success of any application. From websites to mobile apps, providing users with interactive and personalized experiences is essential. That’s why we’re thrilled to announce our latest endeavor:
What is ChatBOT?
ChatBOT is an AI language model trained on vast amounts of human conversation data. It’s capable of generating human-like text responses based on the input it receives. From answering questions to engaging in conversation, ChatBOT can simulate natural language interactions with users, making it an invaluable tool for enhancing user engagement.
Why ChatBOT?
- Personalized Interactions: ChatBOT can understand and respond to user queries in a natural and conversational manner, creating personalized interactions that keep users engaged.
- 24/7 Availability: Unlike human agents, ChatBOT is available 24/7 to assist users, providing instant responses to their queries and ensuring a seamless user experience.
- Scalability: With ChatBOT deployed in our application, we can handle a large volume of user interactions without compromising performance, ensuring scalability as our user base grows.
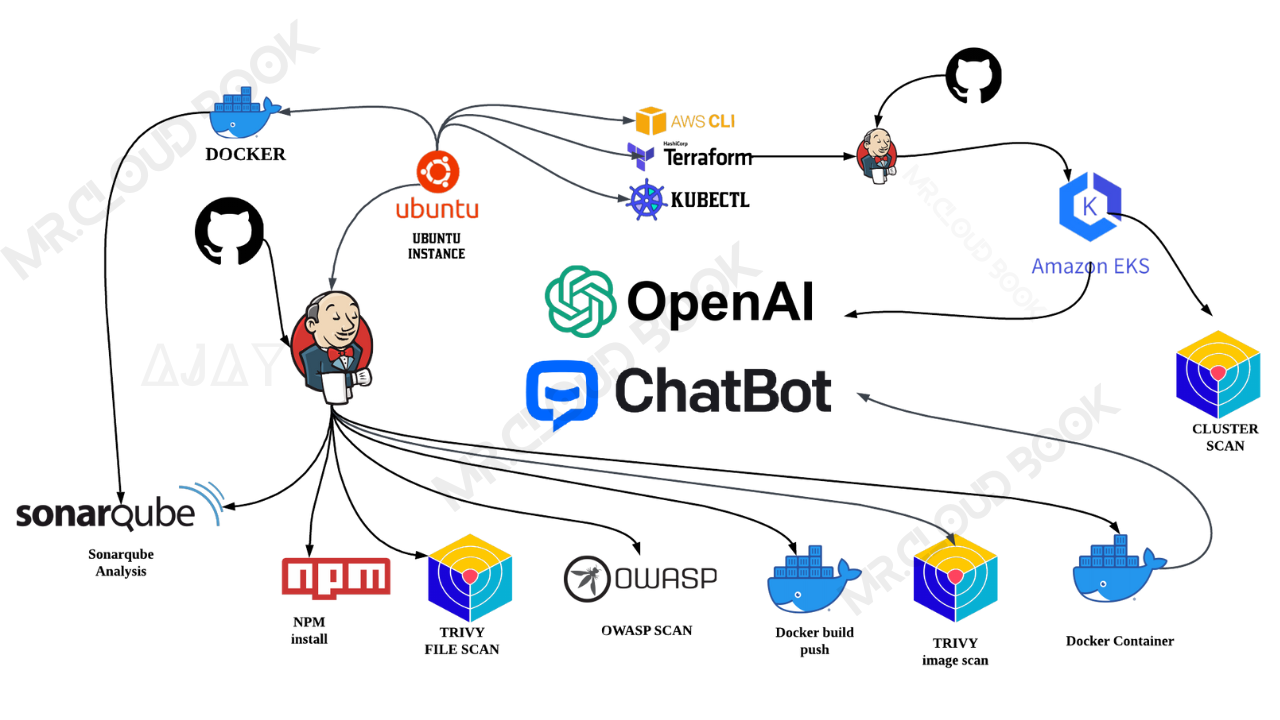
How We’re Deploying ChatBOT
To deploy ChatBOT on our EKS, we’re leveraging Jenkins as our CICD (Continuous Integration/Continuous Deployment) tool and deploying the chatbot within a Docker container. This approach allows us to automate the deployment process, ensuring efficient and reliable delivery of updates and enhancements to our users.
HERE IS MY REPO WITH TERRAFORM FILES IN LEGACY BRANCH EKS_TERRAFORM
Special thanks to McKay Wrigley, the owner of Open Source, for his dedication to fostering innovation and collaboration in the open-source community.
We are grateful for his contributions to the development of technology and for making projects like ChatBOT UI possible.
Now, let’s get started and dig deeper into each of these steps:-
Launch an Ubuntu(22.04) T2 Large Instance
Launch an AWS T2 Large Instance. Use the image as Ubuntu. You can create a new key pair or use an existing one. Enable HTTP and HTTPS settings in the Security Group and open all ports (not best case to open all ports but just for learning purposes it’s okay).

Create IAM role
Search for IAM in the search bar of AWS and click on roles.

Click on Create Role

Select entity type as AWS service
Use case as EC2 and click on Next.

For permission policy select Administrator Access (Just for learning purpose), click Next.

Provide a Name for Role and click on Create role,you can use any name for role.

Role is created.

Now Attach this role to Ec2 instance that we created earlier, so we can provision cluster from that instance.
Go to EC2 Dashboard and select the instance.
Click on Actions --> Security --> Modify IAM role.

Select the Role that created earlier and click on Update IAM role.

Connect the instance to Mobaxtreme or Putty
Install Jenkins, Docker and Trivy
To Install Jenkins
Connect to your console, and enter these commands to Install Jenkins
vi jenkins.sh
#!/bin/bash
sudo apt update -y
wget -O - https://packages.adoptium.net/artifactory/api/gpg/key/public | tee /etc/apt/keyrings/adoptium.asc
echo "deb [signed-by=/etc/apt/keyrings/adoptium.asc] https://packages.adoptium.net/artifactory/deb $(awk -F= '/^VERSION_CODENAME/{print$2}' /etc/os-release) main" | tee /etc/apt/sources.list.d/adoptium.list
sudo apt update -y
sudo apt install temurin-17-jdk -y
/usr/bin/java --version
curl -fsSL https://pkg.jenkins.io/debian-stable/jenkins.io-2023.key | sudo tee \
                  /usr/share/keyrings/jenkins-keyring.asc > /dev/null
echo deb [signed-by=/usr/share/keyrings/jenkins-keyring.asc] \
                  https://pkg.jenkins.io/debian-stable binary/ | sudo tee \
                              /etc/apt/sources.list.d/jenkins.list > /dev/null
sudo apt-get update -y
sudo apt-get install jenkins -y
sudo systemctl start jenkins
sudo chmod 777 jenkins.sh
sudo su   #move into root and run
./jenkins.sh    # this will installl jenkins
Once Jenkins is installed, you will need to go to your AWS EC2 Security Group and open Inbound Port 8080, since Jenkins works on Port 8080.
Now, grab your Public IP Address
EC2 Public IP Address:8080&
sudo cat /var/lib/jenkins/secrets/initialAdminPassword

Unlock Jenkins using an administrative password and install the suggested plugins.

Jenkins will now get installed and install all the libraries.

Create a user click on save and continue.
Jenkins Getting Started Screen.

Install Docker
sudo apt-get update
sudo apt-get install docker.io -y
sudo usermod -aG docker $USER   #my case is ubuntu
newgrp docker
sudo chmod 777 /var/run/docker.sock
After the docker installation, we create a sonarqube container (Remember to add 9000 ports in the security group).
docker run -d --name sonar -p 9000:9000 sonarqube:lts-community

Now our Sonarqube is up and running

Enter username and password, click on login and change password
username admin
password admin
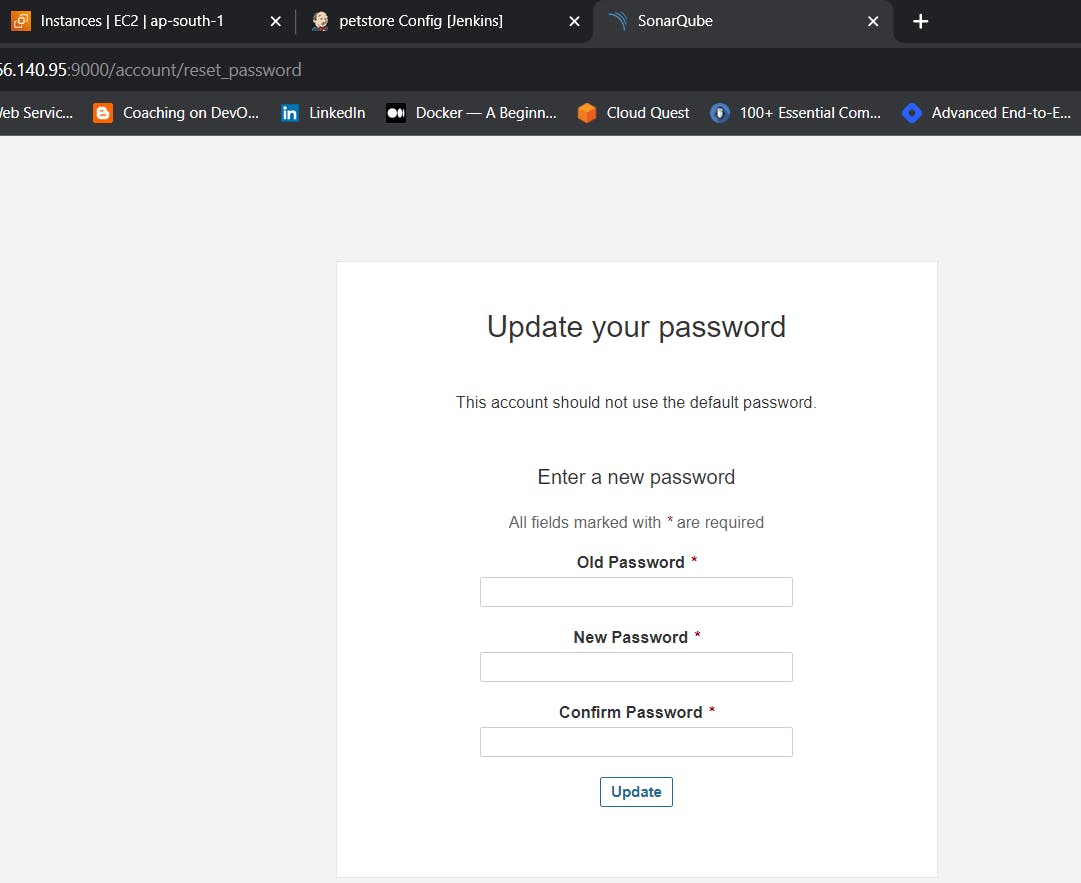
Update New password, This is Sonar Dashboard.

Install Trivy, Kubectl,Terraform
vi script.sh
sudo apt-get install wget apt-transport-https gnupg lsb-release -y
wget -qO - https://aquasecurity.github.io/trivy-repo/deb/public.key | gpg --dearmor | sudo tee /usr/share/keyrings/trivy.gpg > /dev/null
echo "deb [signed-by=/usr/share/keyrings/trivy.gpg] https://aquasecurity.github.io/trivy-repo/deb $(lsb_release -sc) main" | sudo tee -a /etc/apt/sources.list.d/trivy.list
sudo apt-get update
sudo apt-get install trivy -y

# Install Terraform
sudo apt install wget -y
wget -O- https://apt.releases.hashicorp.com/gpg | sudo gpg --dearmor -o /usr/share/keyrings/hashicorp-archive-keyring.gpg
echo "deb [signed-by=/usr/share/keyrings/hashicorp-archive-keyring.gpg] https://apt.releases.hashicorp.com $(lsb_release -cs) main" | sudo tee /etc/apt/sources.list.d/hashicorp.list
sudo apt update && sudo apt install terraform

# Install kubectl
sudo apt update
sudo apt install curl -y
curl -LO https://dl.k8s.io/release/$(curl -L -s https://dl.k8s.io/release/stable.txt)/bin/linux/amd64/kubectl
sudo install -o root -g root -m 0755 kubectl /usr/local/bin/kubectl
kubectl version --client

# Install AWS CLI
curl "https://awscli.amazonaws.com/awscli-exe-linux-x86_64.zip" -o "awscliv2.zip"
sudo apt-get install unzip -y
unzip awscliv2.zip
sudo ./aws/install
Give permissions and run script
sudo chmod 777 script.sh
./script.sh
Next, we will log in to Jenkins and start to configure our Pipeline in Jenkins
Install Plugins like JDK, Sonarqube Scanner, NodeJs, OWASP Dependency Check
Install Plugin
Goto Manage Jenkins →Plugins → Available Plugins →
Install below plugins
Blue ocean
1 → Eclipse Temurin Installer
2 → SonarQube Scanner
3 → NodeJs Plugin
4 → Docker
5 → Docker commons
6 → Docker pipeline
7 → Docker API
8 → Docker Build step
9 → Owasp Dependency Check
10 → Kubernetes
11 → Kubernetes CLI
12 → Kubernetes Client API
13 → Kubernetes Pipeline DevOps steps


Configure Java and Nodejs in Global Tool Configuratio
Goto Manage Jenkins → Tools → Install JDK(17) and NodeJs(19)→ Click on Apply and Save


Grab the Public IP Address of your EC2 Instance, Sonarqube works on Port 9000, so
Click on Administration → Security → Users → Click on Tokens and Update Token → Give it a name → and click on Generate Token

click on update Token

Create a token with a name and generate

copy Token
Go to Jenkins Dashboard → Manage Jenkins → Credentials → Add Secret Text. It should look like this

You will this page once you click on create

Now, go to Dashboard → Manage Jenkins → System and Add like the below image.

Click on Apply and Save
The Configure System option is used in Jenkins to configure different server
Global Tool Configuration is used to configure different tools that we install using Plugins
We will install a sonar scanner in the tools.
Manage Jenkins --> Tools --> SonarQube Scanner

In the Sonarqube Dashboard add a quality gate also
Administration--> Configuration-->Webhooks

Click on Create

Add details
#in url section of quality gate
http://jenkins-public-ip:8080/sonarqube-webhook/

To see the report, you can go to Sonarqube Server and go to Projects.
First, we configured the Plugin and next, we had to configure the Tool
Goto Dashboard → Manage Jenkins → Tools →

Click on Apply and Save here.
Now, goto Dashboard → Manage Jenkins → Tools →

Tools --> Terraform add this
In Jenkins
which terraform

Go to manage Jenkins --> Credentials
Add DockerHub Username and Password under Global Credentials

Create EKS Cluster from Jenkins
Go to Legacy Branch in Git Repository
There you can find folder called Eks-terrafrom there you can find backend file
CHANGE YOUR S3 BUCKET NAME IN THE BACKEND.TF
Now create a new job for the Eks provision

I want to do this with build parameters to apply and destroy while building only.
you have to add this inside job like the below image

Let’s add a pipeline
pipeline{
    agent any
    stages {
        stage('Checkout from Git'){
            steps{
                git branch: 'legacy', url: 'https://github.com/Aj7Ay/chatbot-ui.git'
            }
        }
        stage('Terraform version'){
             steps{
                 sh 'terraform --version'
             }
        }
        stage('Terraform init'){
             steps{
                 dir('Eks-terraform') {
                      sh 'terraform init'
                   }
             }
        }
        stage('Terraform validate'){
             steps{
                 dir('Eks-terraform') {
                      sh 'terraform validate'
                   }
             }
        }
        stage('Terraform plan'){
             steps{
                 dir('Eks-terraform') {
                      sh 'terraform plan'
                   }
             }
        }
        stage('Terraform apply/destroy'){
             steps{
                 dir('Eks-terraform') {
                      sh 'terraform ${action} --auto-approve'
                   }
             }
        }
    }
}
Let’s apply and save and Build with parameters and select action as apply

Stage view it will take max 10mins to provision
Blue ocean output

Check in Your Aws console whether it created EKS or not.

Ec2 instance is created for the Node group

Create Job for chatbot clone
Add this stage to Pipeline Script
pipeline{
    agent any
    tools{
        jdk 'jdk17'
        nodejs 'node19'
    }
    environment {
        SCANNER_HOME=tool 'sonar-scanner'
    }
    stages {
        stage('Checkout from Git'){
            steps{
                git branch: 'legacy', url: 'https://github.com/Aj7Ay/chatbot-ui.git'
            }
        }
        stage('Install Dependencies') {
            steps {
                sh "npm install"
            }
        }
        stage("Sonarqube Analysis "){
            steps{
                withSonarQubeEnv('sonar-server') {
                    sh ''' $SCANNER_HOME/bin/sonar-scanner -Dsonar.projectName=Chatbot \
                    -Dsonar.projectKey=Chatbot '''
                }
            }
        }
        stage("quality gate"){
           steps {
                script {
                    waitForQualityGate abortPipeline: false, credentialsId: 'Sonar-token'
                }
            }
        }
        stage('OWASP FS SCAN') {
            steps {
                dependencyCheck additionalArguments: '--scan ./ --disableYarnAudit --disableNodeAudit', odcInstallation: 'DP-Check'
                dependencyCheckPublisher pattern: '**/dependency-check-report.xml'
            }
        }
        stage('TRIVY FS SCAN') {
            steps {
                sh "trivy fs . > trivyfs.json"
            }
        }
        stage("Docker Build & Push"){
            steps{
                script{
                   withDockerRegistry(credentialsId: 'docker', toolName: 'docker'){
                       sh "docker build -t chatbot ."
                       sh "docker tag chatbot sevenajay/chatbot:latest "
                       sh "docker push sevenajay/chatbot:latest "
                    }
                }
            }
        }
        stage("TRIVY"){
            steps{
                sh "trivy image sevenajay/chatbot:latest > trivy.json"
            }
        }
        stage ("Remove container") {
            steps{
                sh "docker stop chatbot | true"
                sh "docker rm chatbot | true"
             }
        }
        stage('Deploy to container'){
            steps{
                sh 'docker run -d --name chatbot -p 3000:3000 sevenajay/chatbot:latest'
            }
        }
    }
Apply and Save and click on Build
stage view


You can see the report has been generated and the status shows as passed. You can see that there are 5.3k lines it scanned. To see a detailed report, you can go to issues.
You will see that in status, a graph will also be generated and Vulnerabilities.

Trivy Container scan report

Trivy File scan report

<Jenkins-public-ip:3000>
You will get this output

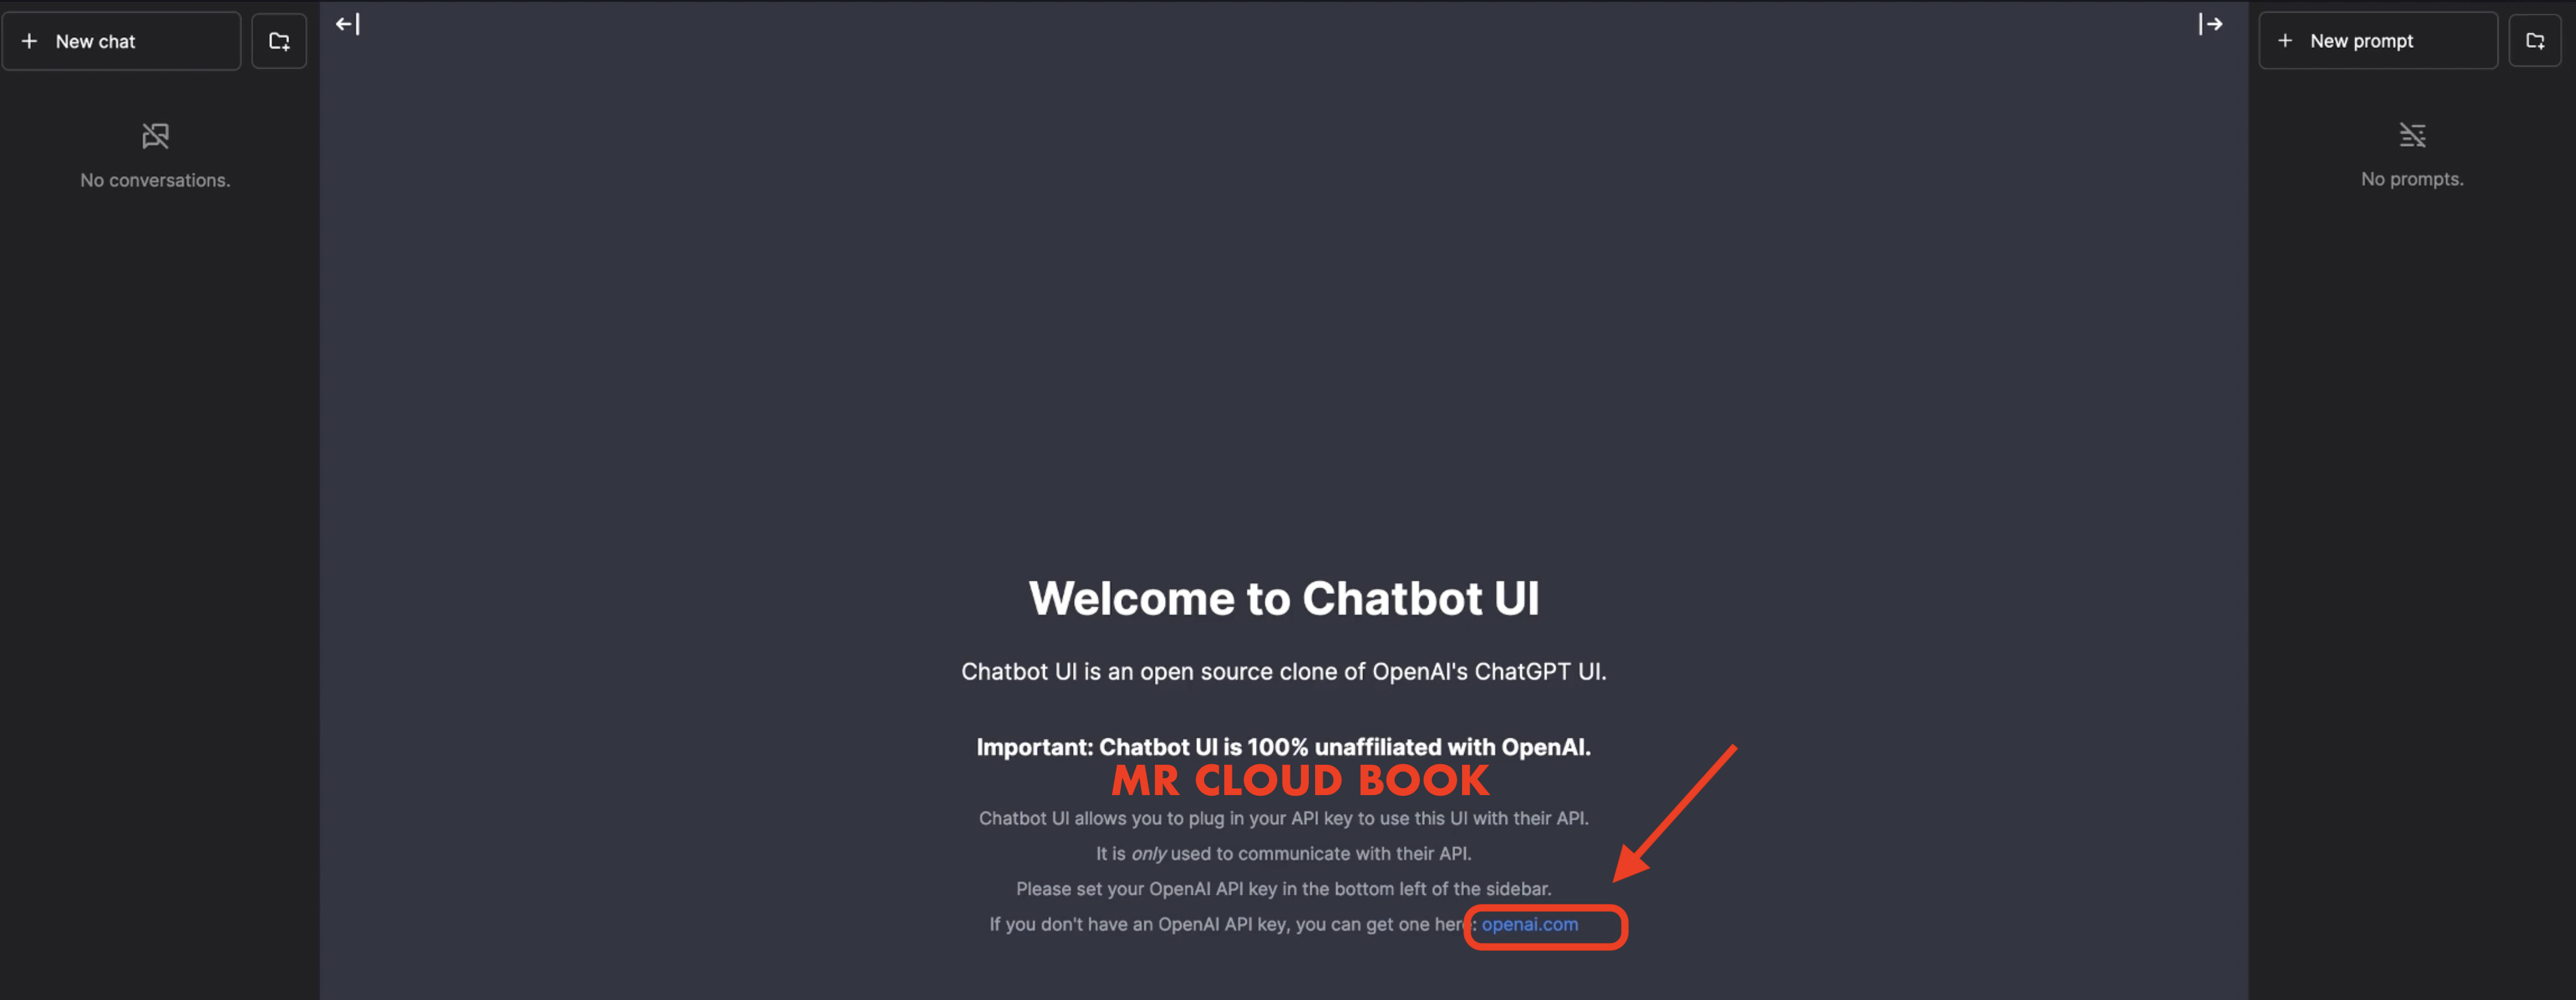
Click on openai.com to generate the API TOKEN
Click on Create new secret key

Give Name and click on Create

Copy Token and use

Come back to chatbot UI that we deployed and bottom of the page you will see OpenAI API key and give the Generated key and click on save (RIGHT MARK)

You will see page like this
You can ask questions Now

Or you can generate from Rapidapi.com
https://rapidapi.com/hub
Now In the Jenkins Instance
Give this command
aws eks update-kubeconfig --name --region
It will Generate an Kubernetes configuration file
Here is the path for config file
cd .kube
cat config

copy the file that generates
Save it in your local file explorer, at your desired location with any name as text file.

If you Have any doubts refer the YouTube video
time stamp 39m:20 secs
Let’s add the Final script with Kubernetes
Go to manage Jenkins --> manage credentials --> Click on Jenkins global --> add credentials
Select Kind as Secret file and choose the file that you saved in your local for kubernetes configuration.

stage('Deploy to kubernets'){
            steps{
                script{
                    withKubeConfig(caCertificate: '', clusterName: '', contextName: '', credentialsId: 'k8s', namespace: '', restrictKubeConfigAccess: false, serverUrl: '') {
                       sh 'kubectl apply -f k8s/chatbot-ui.yaml'
                  }
                }
            }
        }
Complete script
Dont forgot to update the Image in chatbot-ui yml file
pipeline{
    agent any
    tools{
        jdk 'jdk17'
        nodejs 'node19'
    }
    environment {
        SCANNER_HOME=tool 'sonar-scanner'
    }
    stages {
        stage('Checkout from Git'){
            steps{
                git branch: 'legacy', url: 'https://github.com/Aj7Ay/chatbot-ui.git'
            }
        }
        stage('Install Dependencies') {
            steps {
                sh "npm install"
            }
        }
        stage("Sonarqube Analysis "){
            steps{
                withSonarQubeEnv('sonar-server') {
                    sh ''' $SCANNER_HOME/bin/sonar-scanner -Dsonar.projectName=Chatbot \
                    -Dsonar.projectKey=Chatbot '''
                }
            }
        }
        stage("quality gate"){
           steps {
                script {
                    waitForQualityGate abortPipeline: false, credentialsId: 'Sonar-token'
                }
            }
        }
        stage('OWASP FS SCAN') {
            steps {
                dependencyCheck additionalArguments: '--scan ./ --disableYarnAudit --disableNodeAudit', odcInstallation: 'DP-Check'
                dependencyCheckPublisher pattern: '**/dependency-check-report.xml'
            }
        }
        stage('TRIVY FS SCAN') {
            steps {
                sh "trivy fs . > trivyfs.json"
            }
        }
        stage("Docker Build & Push"){
            steps{
                script{
                   withDockerRegistry(credentialsId: 'docker', toolName: 'docker'){
                       sh "docker build -t chatbot ."
                       sh "docker tag chatbot sevenajay/chatbot:latest "
                       sh "docker push sevenajay/chatbot:latest "
                    }
                }
            }
        }
        stage("TRIVY"){
            steps{
                sh "trivy image sevenajay/chatbot:latest > trivy.json"
            }
        }
        stage ("Remove container") {
            steps{
                sh "docker stop chatbot | true"
                sh "docker rm chatbot | true"
             }
        }
        stage('Deploy to container'){
            steps{
                sh 'docker run -d --name chatbot -p 3000:3000 sevenajay/chatbot:latest'
            }
        }
        stage('Deploy to kubernets'){
            steps{
                script{
                    withKubeConfig(caCertificate: '', clusterName: '', contextName: '', credentialsId: 'k8s', namespace: '', restrictKubeConfigAccess: false, serverUrl: '') {
                       sh 'kubectl apply -f k8s/chatbot-ui.yaml'
                  }
                }
            }
        }
    }
Apply and save , Run the build to deploy to eks

In the Jenkins give this command
kubectl get all
kubectl get svc #use anyone

Here it will generate loadbalancer DNS dont forgot

Open the load-balancer port to the Cluster EC2 instance
otherwise it wont give output
EXTERNAL IP IN browser gives output
output:
Do the same process and add key to get output
Here is sample query output i used

DESTRUCTION
Update the pipeline with this code and Run again to remove the deployment and container
pipeline{
    agent any
    stages {
        stage ("Remove container") {
            steps{
                sh "docker stop chatbot | true"
                sh "docker rm chatbot | true"
             }
        }
        stage('Deploy to kubernets'){
            steps{
                script{
                    withKubeConfig(caCertificate: '', clusterName: '', contextName: '', credentialsId: 'k8s', namespace: '', restrictKubeConfigAccess: false, serverUrl: '') {
                       sh 'kubectl delete -f k8s/chatbot-ui.yaml'
                  }
                }
            }
        }
        stage('scan cluster'){
            steps{
                script{
                    withKubeConfig(caCertificate: '', clusterName: '', contextName: '', credentialsId: 'k8s', namespace: '', restrictKubeConfigAccess: false, serverUrl: '') {
                       sh 'trivy k8s --report summary cluster'
                  }
                }
            }
        }
    }
The above Script will remove Loadbalancer from Ec2 and removes deployment.
Go to EKS job to destroy cluster
Select Build with parameters and select destory and build
It will Take 6 Minutes to remove the EKS
Delete the EC2 instance at End.
Together, we’re shaping the future of user engagement and paving the way for innovative solutions in the world of technology.
Thanks for Reading the blog.
Comments (12)
Really helpful and clear explanation to the project.
Really helpful and clear explanation to the project.Thank you
E0322 07:54:41.409163 20196 memcache.go:265] couldn't get current server API group list: the server has asked for the client to provide credentials E0322 07:54:42.248879 20196 memcache.go:265] couldn't get current server API group list: the server has asked for the client to provide credentials E0322 07:54:43.063662 20196 memcache.go:265] couldn't get current server API group list: the server has asked for the client to provide credentials E0322 07:54:43.891800 20196 memcache.go:265] couldn't get current server API group list: the server has asked for the client to provide credentials E0322 07:54:44.700283 20196 memcache.go:265] couldn't get current server API group list: the server has asked for the client to provide credentials error: You must be logged in to the server (the server has asked for the client to provide credentials) ---------------------------------------------------------------------------------------------------------------------- This a good project and I have followed the entire procedure but I'm getting the above error message.What could I be missing? Thank you!
Your writing is both insightful and accessible. I really enjoyed reading your article.
What a compelling read! Your points are well-articulated and thought-provoking.
Your post is a goldmine of information. It's evident you've put a lot of research and effort into it.
I'm always excited to read your posts, and this one exceeded my expectations. Excellent work!
Your post was not just informative, but also beautifully written. Your talent is evident.
Thank you for amazing project. but in repo there is no Dockerfile is available sir. can you please provide that one.
Thanks for the blog.
Did u find a solution for it???
which one ?
Leave a comment