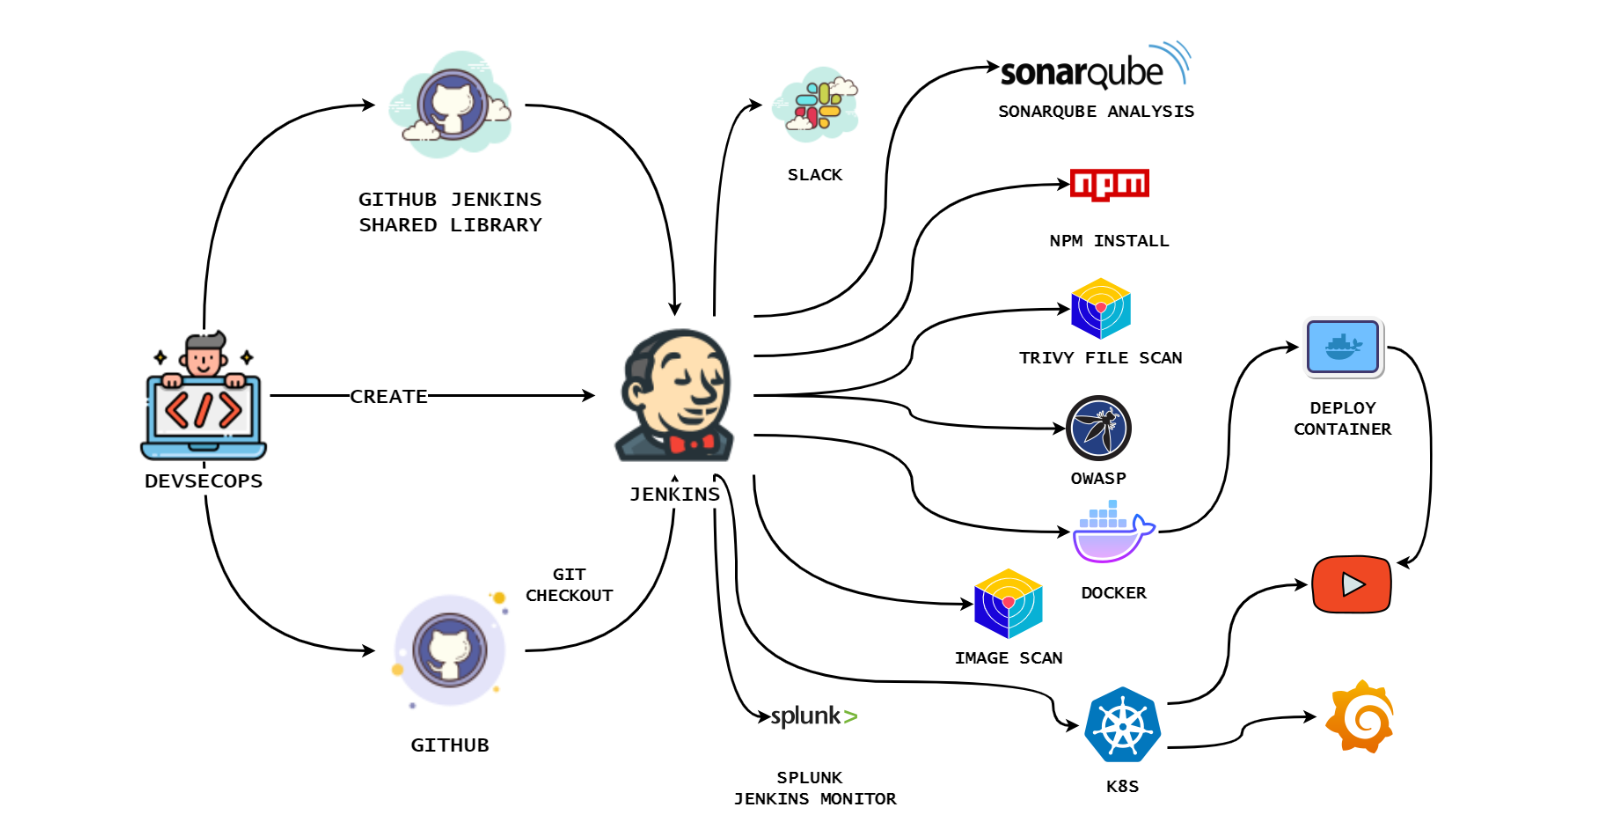
Hello and welcome! 🌟 Ready to create a YouTube clone that’s rock-solid and feature-rich? 🔒

This blog is your gateway to a secure DevSecOps pipeline for your project. With Kubernetes, Docker, SonarQube, Trivy, OWASP Dependency Check, Prometheus, Grafana, Jenkins (and a shared library), Splunk, Rapid API, Slack notifications, and efficient parameters for creating and destroying your environment, we’ve got you covered.
Let’s build a YouTube clone that’s not just cutting-edge but also protected. Join us on this journey! 💪📽️
Github Repo: https://github.com/Aj7Ay/Youtube-clone-app.git
video on youtube:
It will automatically provide your mail and select a mail to create an account

Account is created

Now in the search bar search for YouTube and select YouTube v3

Copy API and use it in the groovy file
docker build --build-arg REACT_APP_RAPID_API_KEY=

Create a shared library file for dockerBuild.groovy
def call(String dockerHubUsername, String imageName) {
    // Build the Docker image
    sh "docker build --build-arg REACT_APP_RAPID_API_KEY=f0ead79813mshb0aa -t ${imageName} ."
     // Tag the Docker image
    sh "docker tag ${imageName} ${dockerHubUsername}/${imageName}:latest"
    // Push the Docker image
    withDockerRegistry([url: 'https://index.docker.io/v1/', credentialsId: 'docker']) {
        sh "docker push ${dockerHubUsername}/${imageName}:latest"
    }
}
Create another file for trivyImage.groovy
def call() {
    sh 'trivy image sevenajay/youtube:latest > trivyimage.txt'
}
Push the above files to the GitHub shared library.
git add .
git commit -m "message"
git push origin main
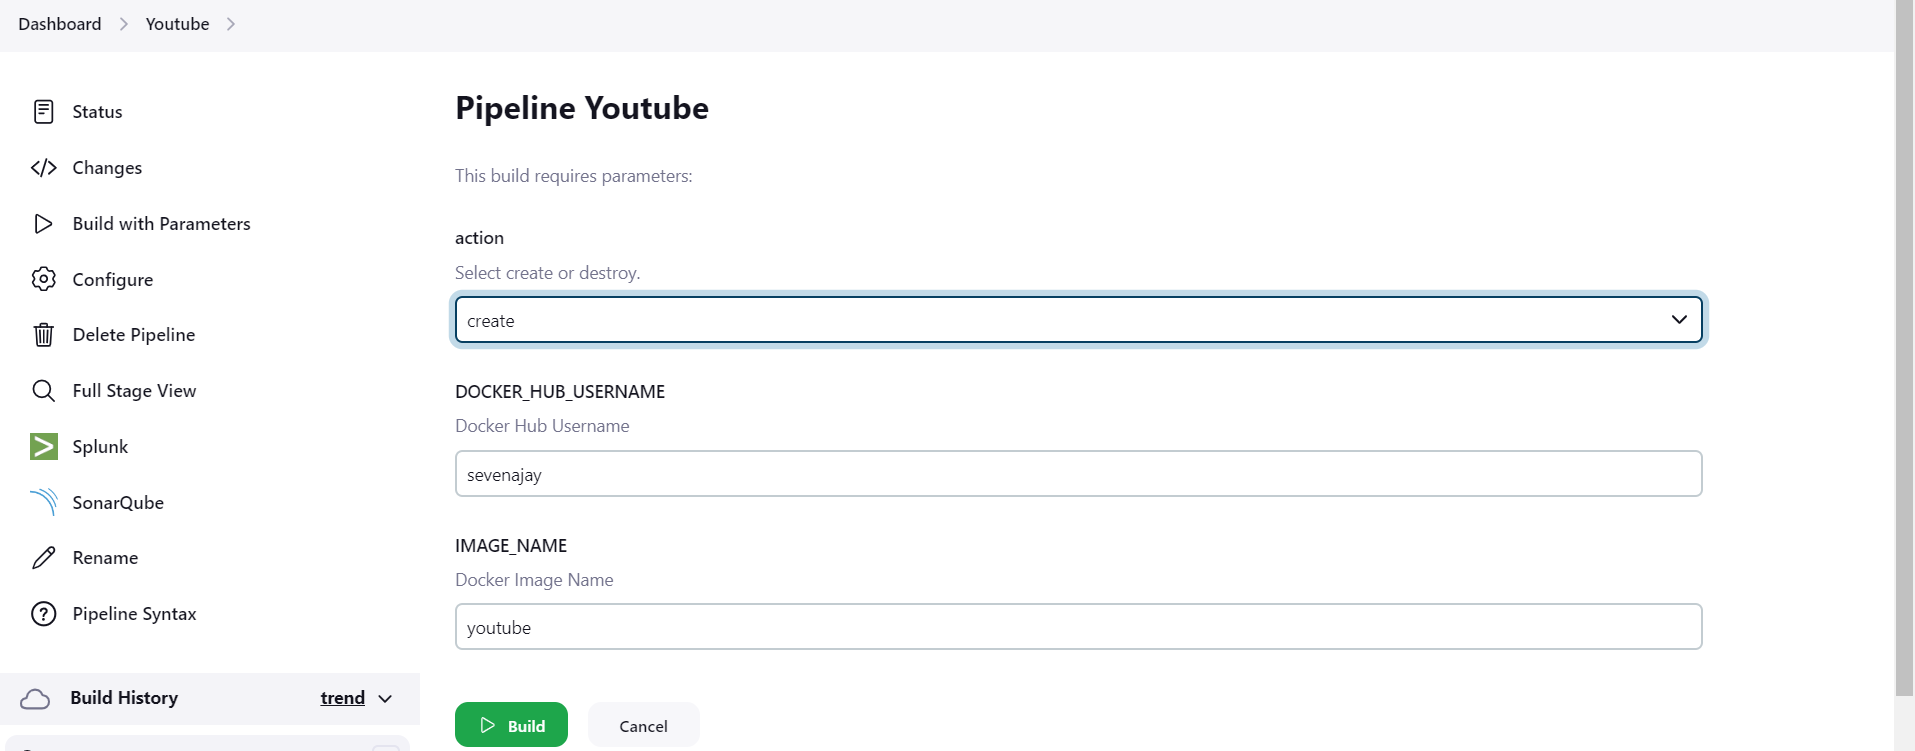
Add this stage to your pipeline with parameters
#add inside parameter
 string(name: 'DOCKER_HUB_USERNAME', defaultValue: 'sevenajay', description: 'Docker Hub Username')
 string(name: 'IMAGE_NAME', defaultValue: 'youtube', description: 'Docker Image Name')
#stage
stage('Docker Build'){
        when { expression { params.action == 'create'}}
            steps{
                script{
                   def dockerHubUsername = params.DOCKER_HUB_USERNAME
                   def imageName = params.IMAGE_NAME
                   dockerBuild(dockerHubUsername, imageName)
                }
            }
        }
        stage('Trivy iamge'){
        when { expression { params.action == 'create'}}
            steps{
                trivyImage()
            }
        }
Build now with parameters

When you log in to Dockerhub, you will see a new image is created

Step8C: Run the Docker container
Create a new file runContainer.groovy
def call(){
    sh "docker run -d --name youtube1 -p 3000:3000 sevenajay/youtube:latest"
}
Create Another file to remove container removeContainer.groovy
def call(){
    sh 'docker stop youtube1'
    sh 'docker rm youtube1'
}
Push them to the Shared library GitHub repo
git add .
git commit -m "message"
git push origin main
Add the below stages to the Pipeline
stage('Run container'){
        when { expression { params.action == 'create'}}
            steps{
                runContainer()
            }
        }
        stage('Remove container'){
        when { expression { params.action == 'delete'}}
            steps{
                removeContainer()
            }
        }
Build with parameters ‘create’

Stage view

It will start the container
Output:

Build with parameters ‘delete’

It will stop and remove the Container


Step9A: Kubernetes Setup
Connect your machines to Putty or Mobaxtreme
Take-Two Ubuntu 20.04(t2.medium) instances one for k8s master and the other one for worker.
Install Kubectl on Jenkins machine also.
Step9B: Kubectl is to be installed on Jenkins
Connect your Jenkins machine
Create a shell script file kube.sh
sudo vi kube.sh
Paste the below commands
sudo apt update
sudo apt install curl -y
curl -LO https://dl.k8s.io/release/$(curl -L -s https://dl.k8s.io/release/stable.txt)/bin/linux/amd64/kubectl
sudo install -o root -g root -m 0755 kubectl /usr/local/bin/kubectl
kubectl version --client
Step9C: K8S Master-Slave setup
Part 1 ----------Master Node------------
sudo hostnamectl set-hostname K8s-Master

----------Worker Node------------
sudo hostnamectl set-hostname K8s-Worker

Part 2 ------------Both Master & Node ------------
sudo apt-get update
sudo apt-get install -y docker.io
sudo usermod -aG docker Ubuntu
newgrp docker
sudo chmod 777 /var/run/docker.sock
sudo apt-get update
# apt-transport-https may be a dummy package; if so, you can skip that package
sudo apt-get install -y apt-transport-https ca-certificates curl gpg
curl -fsSL https://pkgs.k8s.io/core:/stable:/v1.29/deb/Release.key | sudo gpg --dearmor -o /etc/apt/keyrings/kubernetes-apt-keyring.gpg
echo 'deb [signed-by=/etc/apt/keyrings/kubernetes-apt-keyring.gpg] https://pkgs.k8s.io/core:/stable:/v1.29/deb/ /' | sudo tee /etc/apt/sources.list.d/kubernetes.list
sudo apt-get update
sudo apt-get install -y kubelet kubeadm kubectl
sudo apt-mark hold kubelet kubeadm kubectl sudo snap install kube-apiserver
Part 3 --------------- Master ---------------
sudo kubeadm init --pod-network-cidr=10.244.0.0/16
# in case your in root exit from it and run below commands
mkdir -p $HOME/.kube
sudo cp -i /etc/kubernetes/admin.conf $HOME/.kube/config
sudo chown $(id -u):$(id -g) $HOME/.kube/config
kubectl apply -f https://raw.githubusercontent.com/coreos/flannel/master/Documentation/kube-flannel.yml
----------Worker Node------------
sudo kubeadm join : --token --discovery-token-ca-cert-hash

Copy the config file to Jenkins master or the local file manager and save it

copy it and save it in documents or another folder save it as secret-file.txt
Note: create a secret-file.txt in your file explorer save the config in it and use this at the kubernetes credential section.
Install Kubernetes Plugin, Once it’s installed successfully

goto manage Jenkins --> manage credentials --> Click on Jenkins global --> add credentials

Step9D: Install Helm & Monitoring K8S using Prometheus and Grafana
On Kubernetes Master install the helm
curl -fsSL -o get_helm.sh https://raw.githubusercontent.com/helm/helm/main/scripts/get-helm-3
chmod 700 get_helm.sh
./get_helm.sh


See the Helm version
helm version --client

We need to add the Helm Stable Charts for your local client. Execute the below command:
helm repo add stable https://charts.helm.sh/stable

Add Prometheus Helm repo
helm repo add prometheus-community https://prometheus-community.github.io/helm-charts

Create Prometheus namespace
kubectl create namespace prometheus

Install kube-Prometheus-stack
Below is the command to install kube-prometheus-stack. The helm repo kube-stack-Prometheus (formerly Prometheus-operator) comes with a Grafana deployment embedded.
helm install stable prometheus-community/kube-prometheus-stack -n prometheus

Let’s check if the Prometheus and Grafana pods are running or not
kubectl get pods -n prometheus

Now See the services
kubectl get svc -n prometheus

This confirms that Prometheus and grafana have been installed successfully using Helm.
To make Prometheus and grafana available outside the cluster, use LoadBalancer or NodePort instead of ClusterIP.
Edit Prometheus Service
kubectl edit svc stable-kube-prometheus-sta-prometheus -n prometheus


Edit Grafana Service
kubectl edit svc stable-grafana -n prometheus


Verify if the service is changed to LoadBalancer and also get the Load BalancerPorts.
kubectl get svc -n prometheus

Access Grafana UI in the browser
Get the external IP from the above screenshot and put it in the browser


Login to Grafana
UserName: admin
Password: prom-operator
Create a Dashboard in Grafana
In Grafana, we can create various kinds of dashboards as per our needs.
How to Create Kubernetes Monitoring Dashboard?
For creating a dashboard to monitor the cluster:
Click the ‘+’ button on the left panel and select ‘Import’.
Enter the 15661 dashboard id under Grafana.com Dashboard.
Click ‘Load’.

Select ‘Prometheus’ as the endpoint under the Prometheus data sources drop-down.

Click ‘Import’.
This will show the monitoring dashboard for all cluster nodes

How to Create Kubernetes Cluster Monitoring Dashboard?
For creating a dashboard to monitor the cluster:
Click the ‘+’ button on the left panel and select ‘Import’.
Enter 3119 dashboard ID under Grafana.com Dashboard.
Click ‘Load’.
Select ‘Prometheus’ as the endpoint under the Prometheus data sources drop-down.
Click ‘Import’.
This will show the monitoring dashboard for all cluster nodes

Create a POD Monitoring Dashboard
For creating a dashboard to monitor the cluster:
Click the ‘+’ button on the left panel and select ‘Import’.
Enter 6417 dashboard ID under Grafana.com Dashboard.
Click ‘Load’.
Select ‘Prometheus’ as the endpoint under the Prometheus data sources drop-down.
Click ‘Import’.

Step9E: K8S Deployment
Let’s Create a Shared Jenkins library file for K8s deploy and delete
Name kubeDeploy.groovy
def call() {
    withKubeConfig(caCertificate: '', clusterName: '', contextName: '', credentialsId: 'k8s', namespace: '', restrictKubeConfigAccess: false, serverUrl: '') {
        sh "kubectl apply -f deployment.yml"
    }
}
To delete deployment
Name kubeDelete.groovy
def call() {
    withKubeConfig(caCertificate: '', clusterName: '', contextName: '', credentialsId: 'k8s', namespace: '', restrictKubeConfigAccess: false, serverUrl: '') {
        sh "kubectl delete -f deployment.yml"
    }
}
Let’s push them to GitHub
git add .
git commit -m "message"
git push origin main
The final stage of the Pipeline
stage('Kube deploy'){
        when { expression { params.action == 'create'}}
            steps{
                kubeDeploy()
            }
        }
        stage('kube deleter'){
        when { expression { params.action == 'delete'}}
            steps{
                kubeDelete()
            }
        }
Build Now with parameters ‘create’
It will apply the deployment
stage view

kubectl get all (or)
kubectl get svc

output:


Build with parameter ‘delete’
It will destroy Container and Kubernetes deployment.

Slack Notifications

Splunk


Pipeline
@Library('Jenkins_shared_library') _
def COLOR_MAP = [
    'FAILURE' : 'danger',
    'SUCCESS' : 'good'
]
pipeline{
    agent any
    parameters {
        choice(name: 'action', choices: 'create\ndelete', description: 'Select create or destroy.')
        string(name: 'DOCKER_HUB_USERNAME', defaultValue: 'sevenajay', description: 'Docker Hub Username')
        string(name: 'IMAGE_NAME', defaultValue: 'youtube', description: 'Docker Image Name')
    }
    tools{
        jdk 'jdk17'
        nodejs 'node16'
    }
    environment {
        SCANNER_HOME=tool 'sonar-scanner'
    }
    stages{
        stage('clean workspace'){
            steps{
                cleanWorkspace()
            }
        }
        stage('checkout from Git'){
            steps{
                checkoutGit('https://github.com/Aj7Ay/Youtube-clone-app.git', 'main')
            }
        }
        stage('sonarqube Analysis'){
        when { expression { params.action == 'create'}}
            steps{
                sonarqubeAnalysis()
            }
        }
        stage('sonarqube QualitGate'){
        when { expression { params.action == 'create'}}
            steps{
                script{
                    def credentialsId = 'Sonar-token'
                    qualityGate(credentialsId)
                }
            }
        }
        stage('Npm'){
        when { expression { params.action == 'create'}}
            steps{
                npmInstall()
            }
        }
        stage('Trivy file scan'){
        when { expression { params.action == 'create'}}
            steps{
                trivyFs()
            }
        }
        stage('OWASP FS SCAN') {
            steps {
                dependencyCheck additionalArguments: '--scan ./ --disableYarnAudit --disableNodeAudit', odcInstallation: 'DP-Check'
                dependencyCheckPublisher pattern: '**/dependency-check-report.xml'
            }
        }
        stage('Docker Build'){
        when { expression { params.action == 'create'}}
            steps{
                script{
                   def dockerHubUsername = params.DOCKER_HUB_USERNAME
                   def imageName = params.IMAGE_NAME
                   dockerBuild(dockerHubUsername, imageName)
                }
            }
        }
        stage('Trivy iamge'){
        when { expression { params.action == 'create'}}
            steps{
                trivyImage()
            }
        }
        stage('Run container'){
        when { expression { params.action == 'create'}}
            steps{
                runContainer()
            }
        }
        stage('Remove container'){
        when { expression { params.action == 'delete'}}
            steps{
                removeContainer()
            }
        }
        stage('Kube deploy'){
        when { expression { params.action == 'create'}}
            steps{
                kubeDeploy()
            }
        }
        stage('kube deleter'){
        when { expression { params.action == 'delete'}}
            steps{
                kubeDelete()
            }
        }
    }
    post {
    always {
        echo 'Slack Notifications'
        slackSend (
            channel: '#channel name',   #change your channel name
            color: COLOR_MAP[currentBuild.currentResult],
            message: "*${currentBuild.currentResult}:* Job ${env.JOB_NAME} \n build ${env.BUILD_NUMBER} \n More info at: ${env.BUILD_URL}"
        )
    }
}
}
In conclusion, deploying a YouTube clone app on Docker and Kubernetes with a strong DevSecOps approach and Jenkins Shared Library is a powerful combination that can take your application deployment to the next level. It provides the security, scalability, and efficiency needed to ensure a smooth transition to production.
By implementing DevSecOps practices from the very beginning and utilizing the orchestration capabilities of Kubernetes, your app will be more secure and ready to handle the demands of your growing user base. Docker containers will give you the flexibility to move your app across different environments with ease, ensuring consistency and reducing deployment-related issues.
Jenkins Shared Library is your key to streamlined, automated, and standardized CI/CD workflows, simplifying the deployment process and making it reproducible and consistent. With these tools and practices in your arsenal, you’ll be well-prepared to face the challenges of modern application deployment.
We hope this tutorial has been valuable in helping you understand the essential components of a DevSecOps-driven deployment. As you embark on your journey to deploy your own YouTube clone app, remember that learning and refining these skills takes time and practice. Don’t be discouraged by challenges; instead, see them as opportunities to grow and improve your expertise.
If you found this tutorial helpful, please share it with your network, and consider subscribing to our blog or channel for more in-depth technical guides. We’re here to support you and answer any questions you may have along the way.
Thank you for joining us on this deployment journey. We wish you the best of luck in your application deployment endeavours. Stay curious, keep learning, and continue to explore the exciting world of DevSecOps, containers, and orchestration!
Here’s to your success in the world of tech and DevSecOps!
Comments (2)
Hi, This was great. I learned a lot here. Keep up the good work.
Thank you very much, I learned a lot.
Leave a comment