What is OpenClaw?
OpenClaw (formerly ClawdBot / MoltBot) is an open-source, self-hosted AI agent gateway. It runs as a persistent background daemon on your server - not a web app you visit, but a process that stays alive, connects to your messaging apps, and executes tasks on your behalf 24/7.
Think of it as your own private Jarvis. You chat with it over Discord, and it talks to whatever LLM you configure - Claude, GPT-4, Gemini, or a local Ollama model. It can run shell commands, manage files, restart containers, check server health, and more.
The architecture is two-part: the Brain (reasoning engine - LLM API calls, orchestration, memory) and the Hands (execution environment - shell access, file ops, container management). Your config, credentials, and memory live in ~/.openclaw/.
Warning. OpenClaw is a high-privilege, long-running, network-accessible agent. It is not a toy. It has shell access. It has file access. Treat it with the same seriousness as any production service - or pay the price later. The security section of this post is not optional reading.

Prerequisites
- A fresh Ubuntu 24.04 LTS server (VPS, EC2, bare metal, or VM)
- Minimum 2 vCPU / 4 GB RAM - 8 GB+ if running local models via Ollama
- A non-root sudo user (you should never be running this as root)
- An API key from Anthropic, OpenAI, or a local Ollama instance
- A Discord account + a Discord server where you have admin rights (for testing)
Start with a fresh OS, not a marketplace “AI ready” 1-click image. Pre-baked images often have extra software, changed configs, or unknown prior state. Always start from a clean Ubuntu LTS base and install everything yourself.
# Update everything first
sudo apt update && sudo apt upgrade -y

# Install essential tools
sudo apt install -y curl git wget build-essential ufw fail2ban

# Verify your username (should NOT be root)
whoami
# Expected output: your-username (not root)

Install Node.js 22
OpenClaw requires Node.js 22 or newer. Ubuntu 24.04’s default apt repos ship an older version, so we pull from NodeSource directly. We recommend nvm for the cleanest install - no sudo required for npm globals, easy version switching.
Install nvm (Node Version Manager)
# Download and install nvm
curl -o- https://raw.githubusercontent.com/nvm-sh/nvm/v0.40.1/install.sh | bash

# Reload shell config (or open a new terminal)
source ~/.bashrc

# Verify nvm is installed
nvm --version
# Expected: 0.40.1 (or similar)

Install Node.js 22 via nvm
# Install Node.js 22 LTS
nvm install 22
nvm use 22
nvm alias default 22

# Verify versions
node --version
# Expected: v22.x.x

npm --version
# Expected: 10.x.x

Info. If you prefer the direct NodeSource approach instead of nvm, use: curl -fsSL https://deb.nodesource.com/setup_22.x | sudo -E bash - sudo apt install -y nodejs Both work. nvm is preferred for per-user installs - no sudo needed for npm globals.
Install OpenClaw ( Do not onboard for now, we have steps below )
OpenClaw offers three install paths. The installer script is the recommended route - it handles Node detection, installs the CLI, and launches the onboarding wizard in one step.
Option A - Official Installer Script (Recommended)
# The official installer - handles everything including onboarding
curl -fsSL https://openclaw.ai/install.sh | bash

# --- OR --- install binary only, skip onboarding wizard:
curl -fsSL https://openclaw.ai/install.sh | bash -s -- --no-onboard


· Updating plugins
No npm-installed plugins to update.

🦞 OpenClaw 2026.3.8 (3caab92) - I'm not saying your workflow is chaotic... I'm just bringing a linter and a helmet.

Dashboard URL: http://127.0.0.1:18789/
Copy to clipboard unavailable.
No GUI detected. Open from your computer:
ssh -N -L 18789:127.0.0.1:18789 ubuntu@172.3.3.227
Then open:
http://localhost:18789/
Docs:
https://docs.openclaw.ai/gateway/remote
https://docs.openclaw.ai/web/control-ui

FAQ: https://docs.openclaw.ai/start/faq
ubuntu@ip-172-31-36-227:~$
Option B - npm (if you already have Node 22+)
# Install globally via npm
npm install -g openclaw@latest

# Run onboarding and register as daemon
openclaw onboard --install-daemon
Option C - Docker (Isolated, Recommended for Production)
# Pull the official OpenClaw image
docker pull ghcr.io/openclaw/openclaw:latest

# Run with persistent volumes
docker run -d \
  --name openclaw \
  -v ~/.openclaw:/root/.openclaw \
  -v ~/openclaw-workspace:/workspace \
  -p 127.0.0.1:18789:18789 \
  ghcr.io/openclaw/openclaw:latest

# If permission errors on mounted volumes:
sudo chown -R 1000:1000 ~/.openclaw ~/openclaw-workspace
The Docker route is strongly recommended for production servers - it isolates the agent’s filesystem access to the mounted volumes only, prevents it from touching your host system, and makes upgrades a single docker pull.
Verify the Installation
# Check the version
openclaw --version
# Expected: openclaw/2026.x.x linux-x64 node-v22.x.x

# If command not found after install:
export PATH="$(npm prefix -g)/bin:$PATH"
echo 'export PATH="$(npm prefix -g)/bin:$PATH"' >> ~/.bashrc
Create Your Telegram Bot via BotFather
Telegram bots are created entirely inside Telegram itself - no website, no developer portal, no account required beyond your existing Telegram login. The whole process takes under two minutes through @BotFather, Telegram’s official bot management bot.
Warning. Use a dedicated private chat, not a group. OpenClaw should talk to you directly in a one-on-one chat, not in a group or channel. Keep it private. If you ever add it to a group later, configure allowed_users first - otherwise every member of that group can trigger it..
open @BotFather and Create a New Bot
# Start a conversation with BotFather
/start

# Create a new bot
/newbot

# BotFather asks: What's the name of your bot?
# This is the display name shown in Telegram
MyServerAgent

# BotFather asks: What username? (must end in "bot")
# This is the @handle people use to find it
myserver_openclaw_bot

# BotFather replies with your bot token:
# 7123456789:AAFxxxxxxxxxxxxxxxxxxxxxxxxxxxxxxxxxxx
# Copy this - you need it in Step 4


Danger. The bot token = full control over your bot. Anyone who has it can send and receive messages as your bot, and since your bot has shell access via OpenClaw, it means access to your server. Treat it like an SSH private key. Never share it. If you accidentally paste it anywhere, go back to BotFather → /mybots → your bot → API Token → Revoke current token immediately.
Get Your Telegram User ID
OpenClaw’s allowlist uses numeric user IDs, not usernames. Usernames can change - IDs cannot. Get yours from @userinfobot:
# In searchbar and use anyone of info
# Open @userinfobot in Telegram and send any message
# It replies with your profile info including your numeric ID:
#
# Id: 987654321
# First: Ajay
# Username: @yourhandle
#
# Write down the number next to "Id:" - that's what goes in your config

Optional - Configure Bot Privacy and Description
Back in @BotFather, a few tweaks worth making before connecting:
# Disable group privacy mode if you plan to use it in groups
# (leave it ON for private-only use - default is ON, which is safer)
/setprivacy
# → Choose your bot → Enable (bot only sees commands, not all messages)

# Set a description shown when someone opens the bot
/setdescription
# → "Private server management agent. Authorised users only."

# Optionally disable joining groups entirely
/setjoingroups
# → Disable (prevents the bot from being added to any group)
Info. Start a chat with your own bot now. Before Step 4, open your new bot in Telegram (search for the @username you gave it) and press Start. If you don't start the conversation first, Telegram's API will block the bot from sending you messages - you'll get an error in the logs saying the chat was not initiated.
Connect Telegram to OpenClaw
The onboarding wizard walks you through connecting your LLM provider and Telegram bot. If you skipped it during install, run it manually - it will prompt for your bot token interactively:
if its asking for options use space to select that check box
openclaw onboard
Prompt 1 - Security warning
I understand this is personal-by-default and shared/multi-user
use requires lock-down. Continue?
● Yes / ○ No
Info. Select Yes. The wizard shows a full security advisory before proceeding - OpenClaw is beta, it has shell access, a bad prompt can trick it. This prompt just asks you to acknowledge you've read it. Yes = confirm and continue. No = stops setup.
Prompt 2 - Onboarding mode
● QuickStart (Configure details later via openclaw configure.)
○ Manual
Info. Select QuickStart - already highlighted, hit Enter. The wizard confirms your gateway settings (port 18789, loopback bind, token auth) and moves on.
Prompt 3 - Model/auth provider
◇  Model/auth provider
│  Google
◇  Google auth method
│  Google Gemini API key
◇  How do you want to provide this API key?
│  Paste API key now
◇  Enter Gemini API key
│  AIzaSy...your key here...
Info. Select Google → Google Gemini API key → Paste API key now and paste your key from aistudio.google.com/apikey. The wizard will then auto-select gemini-3.1-pro-preview as default - override it in the next prompt.
Prompt 4 - Default model
◇  Default model
│  ● Keep current (google/gemini-3.1-pro-preview)   ← DO NOT keep this
│  ○ google/gemini-2.5-flash                        ← SELECT THIS
│  ○ google/gemini-2.5-flash-lite
│  ○ google/gemini-2.5-pro
│    ...
Info. Do not keep the default. The wizard pre-selects gemini-3.1-pro-preview - this hits free tier rate limits within minutes. Arrow down to google/gemini-2.5-flash and select it. It's fast, capable, and has the most generous free quota.
Prompt 5 - Select channel
◇  Channel status
│  Telegram: needs token
│  WhatsApp: not linked
│  Discord: needs token
│  ...20+ other channels...

◇  Select channel (QuickStart)
│  Telegram (Bot API)
Info. The wizard lists every supported platform - Telegram, WhatsApp, Discord, Slack, Signal, Matrix, and more. Select Telegram (Bot API). It then shows instructions to get your token from @BotFather and prompts you to paste it.
Prompt 6 - Enter Telegram bot token
◇  How do you want to provide this Telegram bot token?
│  Enter Telegram bot token
◇  Enter Telegram bot token
│  876xxxxxx:AAFxxxxxxxxxxxxxxxxxxxxxxxx
Info. Paste your BotFather token here. The wizard saves it to ~/.openclaw/openclaw.json and confirms Telegram: ok (@yourbotname) when it successfully connects.
Prompt 7 - Web search provider
◇  Search provider
│  Gemini (Google Search)
Info. Select Gemini (Google Search) and paste your same Google API key again. This enables your agent to search the web when answering questions.
Prompts 8-9 - Skills and hooks
◇  Configure skills now? → Yes
◇  Install missing skill dependencies → Skip for now
◇  Set GOOGLE_PLACES_API_KEY for goplaces? → No
◇  Set GEMINI_API_KEY for nano-banana-pro? → No
◇  Set NOTION_API_KEY for notion? → No
◇  Set OPENAI_API_KEY for openai-image-gen? → No
◇  Enable hooks? → Skip for now
Info. Say Yes to configure skills, then Skip / No to everything that asks for additional API keys you don't have. Say Skip for now for hooks. None of these are required to get the basic Telegram bot working.
Systemd + linger - handled automatically
◇ Systemd
│ Enabled systemd lingering for ubuntu.
◇ Gateway service installed.
/home/ubuntu/.config/systemd/user/openclaw-gateway.service
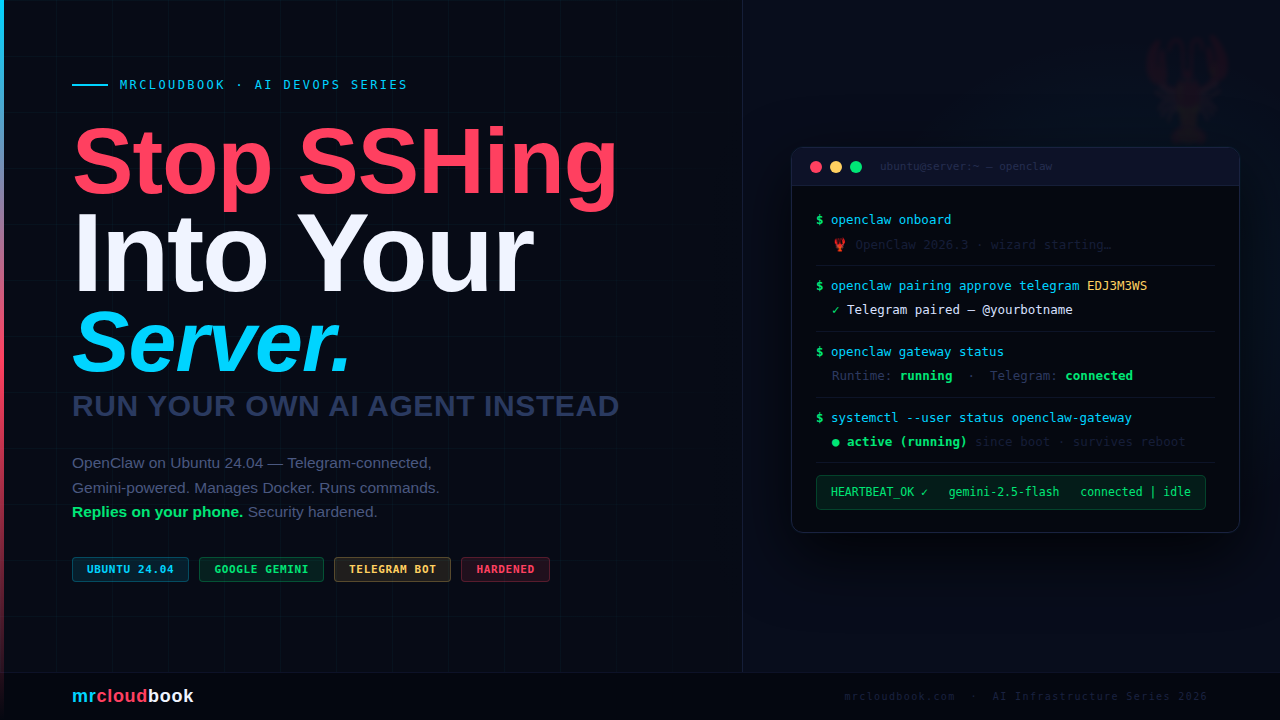
Telegram: ok (@yourbotname) (4068ms)
Info. The wizard handles linger and daemon install automatically. Unlike what older docs suggest, you do not need to run loginctl enable-linger or openclaw daemon install manually - QuickStart does both. Confirm with systemctl --user status openclaw-gateway after onboarding completes.
Prompt 10 - Hatch the bot
◇  How do you want to hatch your bot?
│  ● Hatch in TUI (recommended)
│  ○ Open the Web UI
│  ○ Do this later
Info. Select "Hatch in TUI" - already highlighted, hit Enter. This opens the terminal chat UI so you can verify the agent responds before testing Telegram.
You should see this in the TUI:
openclaw tui - ws://127.0.0.1:18789 - agent main - session main
 session agent:main:main
 Wake up, my friend!
 HEARTBEAT_OK
 connected | idle
 agent main | session main (openclaw-tui) | google/gemini-2.5-flash | think low | tokens 10k/1.0m (1%)
HEARTBEAT_OK + connected = agent is live. You can type a message to test it right here in the TUI. Press Ctrl+C when done - the agent keeps running in the background.
Pair Your Telegram Account
The first time you message your bot from Telegram, OpenClaw replies with a pairing code because your user ID isn’t approved yet:
OpenClaw: access not configured.
Your Telegram user id: 39645669959
Pairing code: EDJ3M3WS
Ask the bot owner to approve with:
openclaw pairing approve telegram EDJ3M3WS
Copy that command and run it on your server:
openclaw pairing approve telegram EDJ3M3WS
# Replace EDJ3M3WS with your actual pairing code
Go back to Telegram and send a message. The bot should now respond normally.
Fix Docker Permissions
By default the ubuntu user isn’t in the docker group - OpenClaw will hit “permission denied” when you ask it to run docker commands. Fix it:
# Add ubuntu user to the docker group
sudo usermod -aG docker ubuntu

# Group changes only take effect after a full re-login
# On a server the cleanest way is a reboot:
sudo reboot

# After SSH back in - verify the group is there:
groups
# Expected: ubuntu adm cdrom sudo dip lxd docker

# Verify docker works without sudo:
docker ps

# Start the gateway again after reboot:
systemctl --user start openclaw-gateway
systemctl --user status openclaw-gateway
Warning. Do not skip the reboot. Running newgrp docker or restarting the gateway without a full session reset will not propagate the group to the daemon process. The agent will still see "permission denied". Reboot is the only reliable fix on a server.
Switch Model if You Hit Rate Limits
Free tier Gemini models have per-minute quotas. If OpenClaw stops responding or you see rate limit errors in the logs, switch to a lighter model:
openclaw configure
# Navigate to model → switch to google/gemini-2.5-flash-lite
nano ~/.openclaw/openclaw.json
# Find the model line and change it to:
# "model": "google/gemini-2.5-flash-lite"

# Save, then restart:
openclaw gateway restart

Verify Everything is Working
On server
# Docker group applied
groups
# Must include: docker

# Docker accessible without sudo
docker ps

# Gateway is running
systemctl --user status openclaw-gateway
# Must show: active (running)

# Full openclaw health check
openclaw doctor

# Gateway details
openclaw gateway status

# Live logs
openclaw logs --follow
Systemd Service - Auto-Start on Boot
OpenClaw manages its own user systemd service - you do not need to write a unit file manually. The openclaw daemon install command handled in Step 4 created the service at ~/.config/systemd/user/openclaw-gateway.service.
Info. The service is named openclaw-gateway - not openclaw. All status/start/stop commands use that name. sudo systemctl status openclaw will say "not found" - that's expected.
# Status
systemctl --user status openclaw-gateway

# Start / Stop / Restart
systemctl --user start openclaw-gateway
systemctl --user stop openclaw-gateway
systemctl --user restart openclaw-gateway

# Or via openclaw CLI
openclaw gateway restart
openclaw gateway status

# Live logs via journalctl
journalctl --user -u openclaw-gateway -f

# Last 50 lines
journalctl --user -u openclaw-gateway -n 50
Info. Remember loginctl enable-linger ubuntu from Step 4. Without it, systemctl --user services stop the moment you disconnect your SSH session. Run it once and the service stays alive permanently.
Running Docker Tasks via OpenClaw
Once OpenClaw is connected to your Telegram bot, you can manage containers by simply sending a message. Here are the kinds of tasks it handles - and the exact commands it runs under the hood.
Info. For OpenClaw to run docker commands, your user must be in the docker group: sudo usermod -aG docker $USER - then log out and back in.
Time for test runs from telegram
List and Inspect Containers
What OpenClaw runs when you ask “show me running containers”
# List all running containers
docker ps

# List all containers including stopped ones
docker ps -a

# See container resource usage
docker stats --no-stream

# Inspect a specific container
docker inspect my-container
Got error because not added ubuntu to docker group


Got rate limit since using free key
I asked to create Nginx container with port 80

You can try List and Inspect Containers, Start, Stop, Restart Containers,Pull and Update Images
Server Management Commands
OpenClaw makes a great ops assistant for routine server health checks. Here are the typical commands you’d have it run - and what to look for in the output.
How's my server doing?

What Happens When You Skip Security
Let me be direct. I’ve been doing this for a decade, and I’ve seen what happens when people set up powerful agents, skip the hardening section, and assume “it’s fine, it’s on a private VPS.”
It’s not fine. OpenClaw is not just a chatbot. It is a long-running, network-accessible process with shell access on your server. If you’ve left the door open, the question isn’t whether it will be exploited - it’s when, and by whom.
Here’s what the attack surface looks like from where I sit as an AI researcher and infrastructure engineer:

Server Hardening - Full Stack
Firewall - UFW Setup
# Enable UFW
sudo ufw default deny incoming
sudo ufw default allow outgoing

# Allow SSH (change 22 to your actual SSH port)
sudo ufw allow 22/tcp

# Allow HTTP/HTTPS if you're running a web service
sudo ufw allow 80/tcp
sudo ufw allow 443/tcp

# NEVER expose OpenClaw's port 18789 to the public internet
# It should ONLY be accessible on localhost (127.0.0.1)
# Access the dashboard via SSH tunnel:
# ssh -L 18789:127.0.0.1:18789 user@your-server

sudo ufw enable
sudo ufw status verbose
SSH Hardening
# Disable root SSH login
sudo sed -i 's/#PermitRootLogin yes/PermitRootLogin no/' /etc/ssh/sshd_config

# Disable password authentication (use SSH keys only)
sudo sed -i 's/#PasswordAuthentication yes/PasswordAuthentication no/' /etc/ssh/sshd_config

# Change SSH port (optional, reduces noise from bots)
# sudo sed -i 's/#Port 22/Port 2222/' /etc/ssh/sshd_config

# Reload SSH
sudo systemctl reload ssh

# Verify you can still SSH in a NEW terminal before closing this session!
Fail2ban - Block Brute Force
# Install fail2ban (if not already done in prerequisites)
sudo apt install -y fail2ban

# Create local config (don't edit jail.conf directly)
sudo cp /etc/fail2ban/jail.conf /etc/fail2ban/jail.local
sudo nano /etc/fail2ban/jail.local

# Set under [sshd]:
# enabled = true
# maxretry = 3
# bantime = 1h

sudo systemctl enable fail2ban
sudo systemctl start fail2ban

# Check banned IPs
sudo fail2ban-client status sshd
Secure the OpenClaw Config Directory
# Your API keys and tokens live here - lock it down
chmod 700 ~/.openclaw
chmod 600 ~/.openclaw/config.yaml
chmod 600 ~/.openclaw/*.json 2>/dev/null

# Verify permissions
ls -la ~/.openclaw/
# Expected: drwx------ (700) on directory
# Expected: -rw------- (600) on all files
OpenClaw Config Hardening
# In ~/.openclaw/config.yaml

exec:
  ask: "on"                   # Require confirmation for EVERY command
  allowed_commands:           # Whitelist only what you need
    - docker ps
    - docker logs
    - docker stats
    - systemctl status
    - df
    - free
    - uptime

channels:
  telegram:
    allowed_users:            # Only your Telegram user ID - check via @userinfobot
      - 123456789

server:
  host: "127.0.0.1"           # localhost ONLY - access via SSH tunnel
  port: 18789
Automatic Security Updates
# Install unattended-upgrades
sudo apt install -y unattended-upgrades

# Enable automatic security patches
sudo dpkg-reconfigure --priority=low unattended-upgrades

# Verify it's running
sudo systemctl status unattended-upgrades

# Check the log
cat /var/log/unattended-upgrades/unattended-upgrades.log
Rotate API Keys Immediately if Suspected Exposure
# If you suspect your API key was exposed:

# 1. Immediately revoke the key at the provider dashboard
#    Google: aistudio.google.com → API Keys → Delete
#    Anthropic: console.anthropic.com → API Keys
#    OpenAI: platform.openai.com → API keys

# 2. Generate a new key and update the config
openclaw configure

# 3. Rotate your Telegram bot token if needed
#    /mybots → your bot → API Token → Revoke current token

# 4. Check audit logs for unauthorized usage
journalctl --user -u openclaw-gateway --since "24 hours ago"
Deleting the Bot and Cleaning Up
If you want to decommission OpenClaw entirely, here’s the correct order. Deleting the bot via @BotFather is enough to kill access - the token dies with the bot instantly. The server cleanup below is only needed if you want to fully uninstall.
# Open @BotFather in Telegram and send:
/mybots

# → Select your bot
# → Delete Bot
# → Confirm

# That's it - token is dead, bot is gone.
# No one can use it anymore, including you.
Info. Just deleting the bot is enough. You don't need to touch the server. When the bot is deleted, the token is revoked instantly and permanently. If you only want to temporarily pause the bot - use Revoke current token instead of Delete, then generate a fresh one later.
# Stop and disable the service
systemctl --user stop openclaw-gateway
systemctl --user disable openclaw-gateway

# Remove all config, credentials, and memory
rm -rf ~/.openclaw

# Uninstall the package
npm uninstall -g openclaw

# Verify it's gone
which openclaw
# Expected: openclaw not found
The Full Hardening Checklist
- OpenClaw runs as a non-root user
- UFW firewall enabled - default deny incoming, SSH only + your services
- Port 18789 (Control UI) bound to 127.0.0.1 NOT 0.0.0.0
- Accessed the dashboard only via SSH tunnel, never direct public exposure
- SSH password authentication disabled - key-based only
- Root SSH login disabled
- Fail2ban installed and protecting SSH
~/.openclaw/directory permissions set to 700- Config file permissions set to 600
- Telegram bot has allowed_users
set- only your numeric user ID exec.ask: "on"consent mode active for shell commands- Docker command allowlist defined - not wildcard
- Unattended security upgrades enabled
- API keys stored only in config - not in shell history, not in logs
- Rotation procedure documented and tested

Comments (0)
No comments yet. Be the first to share your thoughts.
Leave a comment