
Self-Host Open-WebUI with Groq, Docker, and HTTPS on Ubuntu 24.04
This guide will walk you through setting up your own instance of Open-WebUI, a user-friendly web interface for LLMs. We will use the fast Groq API as the AI backend and secure the connection with HTTPS using a custom domain.
What Are We Actually Building?
You want a ChatGPT-style interface that you own. Not a SaaS subscription. Not someone else’s server storing your conversations. Your own instance, on your own VPS, with your own domain, locked behind HTTPS like a proper production service — not HTTP running on port 3000 that you swore you’d “secure later.”
The stack is three moving parts and they compose together cleanly:

Open-WebUI is the chat interface — think ChatGPT UI but open source, self-hosted, and configurable. It supports multiple backends including OpenAI, Ollama, and anything OpenAI-compatible. Groq qualifies.
Groq provides the LLM inference — ludicrously fast, free tier available, and serves models like Llama 3, Mixtral, and Gemma through an OpenAI-compatible API. We’re essentially tricking Open-WebUI into thinking it’s talking to OpenAI, but it’s actually hitting Groq’s infrastructure at speeds that’ll make you question whether it’s actually thinking.
Traefik is the reverse proxy that handles HTTPS. It watches your Docker containers via labels, automatically requests Let’s Encrypt certificates, renews them before they expire, and redirects HTTP to HTTPS. You configure it once and forget it exists. After a decade of hand-managing nginx SSL configs and cert renewal cron jobs, Traefik is one of those tools that genuinely improves your quality of life.
Why Traefik over nginx? For this exact use case — Docker Compose with automatic SSL — Traefik wins on simplicity. You don't write a separate config file for each service; you add Docker labels. Certificate renewal is automatic. HTTP-to-HTTPS redirect is two lines. If you already have nginx running on this server, that's a different conversation - but for a fresh VPS, Traefik is the right call.
Prerequisites — What You Need Before Line One
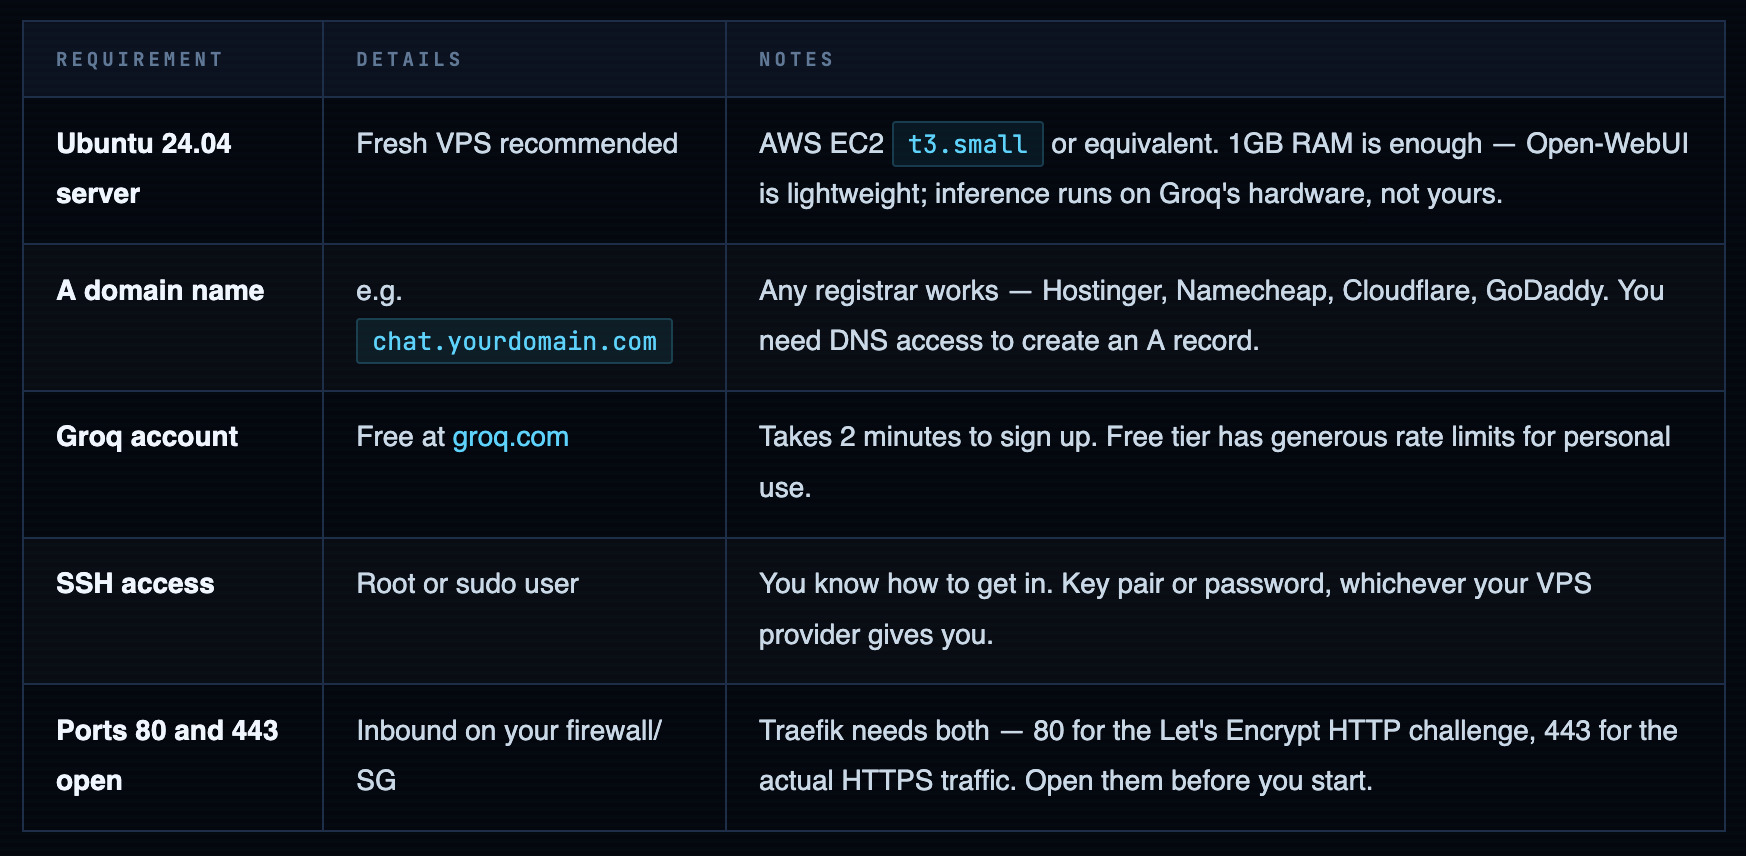
Open ports 80 and 443 before you launch anything. Let's Encrypt validates your domain by hitting port 80 during certificate issuance. If it's blocked, Traefik will fail silently and you'll spend 20 minutes wondering why HTTPS isn't working. If you're on AWS EC2, add both to your security group inbound rules right now, before you install a single thing.
Point Your Domain to the Server
Before anything else, create the DNS record. SSL certificate issuance requires DNS to be resolving correctly — and DNS propagation can take anywhere from 2 minutes to 2 hours depending on your registrar and TTL settings. Start this now, work on the server setup while it propagates.
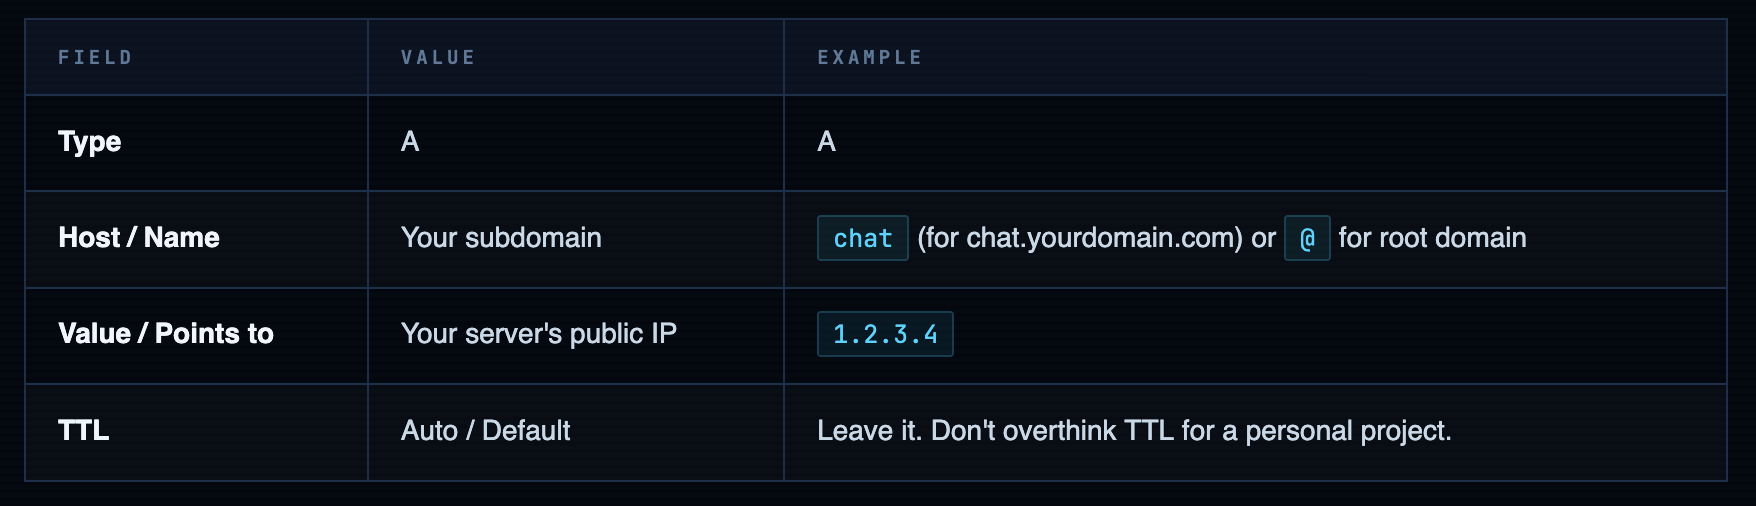
Create an A Record at Your DNS Provider
Log into your domain registrar (Hostinger, Namecheap, Cloudflare, whoever has your domain) and navigate to the DNS management section. Create a new A record:
Verify Propagation Before Proceeding
DNS propagation is not instant. Check from your terminal before you get to the Traefik step — if DNS isn’t resolving correctly when Let’s Encrypt tries to issue the cert, the whole thing fails.
# Check if your domain resolves to your server's IP
dig chat.yourdomain.com +short
# Should return your server's IP: 1.2.3.4

# Or use nslookup if dig isn't installed
nslookup chat.yourdomain.com
# Look for "Address: 1.2.3.4" in the output
If DNS isn't propagated yet — don't panic, don't skip ahead. Go do the Docker install and Groq API key steps. Come back to verify DNS before you run docker compose up. The cert issuance happens at startup. If DNS isn't ready, you'll get a failed certificate and a confusing error. Five minutes of patience here saves 20 minutes of debugging later.
Install Docker Engine on Ubuntu 24.04
The ritual. Same one I’ve done on probably a hundred fresh Ubuntu boxes at this point. Do it right: install from Docker’s own repository, not apt install docker.io (that’s the Ubuntu-packaged version, usually a major version behind, and it’ll bite you). Here’s the official way:
# Connect to your server
ssh -i ~/path/to/key.pem ubuntu@your-server-ip

# First thing, always
sudo apt update && sudo apt upgrade -y
# Install prerequisites
sudo apt-get install -y ca-certificates curl

# Create keyring directory and download Docker's GPG key
sudo install -m 0755 -d /etc/apt/keyrings
sudo curl -fsSL https://download.docker.com/linux/ubuntu/gpg \
  -o /etc/apt/keyrings/docker.asc
sudo chmod a+r /etc/apt/keyrings/docker.asc

# Add Docker's stable repository
echo \
  "deb [arch=$(dpkg --print-architecture) signed-by=/etc/apt/keyrings/docker.asc] \
  https://download.docker.com/linux/ubuntu \
  $(. /etc/os-release && echo "${UBUNTU_CODENAME:-$VERSION_CODENAME}") stable" | \
  sudo tee /etc/apt/sources.list.d/docker.list > /dev/null
sudo apt-get update
sudo apt-get install -y \
  docker-ce \
  docker-ce-cli \
  containerd.io \
  docker-buildx-plugin \
  docker-compose-plugin

# Verify both are installed correctly
docker --version
# Docker version 27.x.x, build xxxxxxx

docker compose version
# Docker Compose version v2.x.x
Running sudo docker every time is annoying and unnecessary. Add your user to the docker group - the newgrp command applies it to the current shell without requiring a logout:
sudo usermod -aG docker ${USER}
newgrp docker
Get Your Groq API Key
Groq gives you a free API key that’s fast enough to feel like the model isn’t actually thinking — it’s just responding instantly. This is because Groq runs inference on custom LPU (Language Processing Unit) hardware, not GPUs. The practical result: latency so low it feels like the model is finishing your sentence before you do.
The free tier is generous for personal use. You get rate limits, not a credit card bill. Perfect for a self-hosted chat UI you’re running for yourself or a small team.
- Go to console.groq.com
- Sign up or log in (Google OAuth works)
- Navigate to API Keys in the left sidebar
- Click Create API Key — give it a name like
open-webui-prod - Copy it immediately. Groq shows it once. If you close the dialog without copying, you’ll need to create a new key.
- Paste it somewhere safe temporarily — you’ll need it in the next step
Warning. The key is shown exactly once. This isn't a UI quirk — it's intentional. Groq, like most API providers, stores only the hash of the key after creation. If you lose it before adding it to your .env file, revoke it and create a new one. Takes 30 seconds. Not a big deal — just don't skip the copy step.
Info. Free tier model availability: Not all models are available on the free tier. The ones that are — Llama 3.1 8B, Llama 3.3 70B, Mixtral 8x7B, Gemma 2 9B — are more than capable for a personal chat interface. Check console.groq.com/docs/models for the current free tier list. It updates as Groq adds models.
Create Your .env and docker-compose.yml
Two files. That’s the entire deployment configuration. The .env holds your secrets and domain. The docker-compose.yml defines three services: Traefik (reverse proxy + SSL), Open-WebUI (the interface), and their shared network. Let’s build them.
Create a Working Directory
mkdir ~/open-webui && cd ~/open-webui
Create the .env File All the variables Compose needs, in one place. Never hardcode secrets in your docker-compose.yml — the .env file is the right home for them, and it stays out of version control (add it to .gitignore if you’re tracking this directory in git).
# Your full domain or subdomain for Open-WebUI
DOMAIN=chat.yourdomain.com

# Email for Let's Encrypt SSL certificate notifications
# (expiry warnings — Traefik auto-renews, but good to have)
ACME_EMAIL=you@youremail.com

# Your Groq API key — the one you just copied
OPENAI_API_KEY=gsk_your_groq_key_here

# Open-WebUI admin account credentials
ADMIN_EMAIL=you@youremail.com
ADMIN_PASSWORD=use_a_strong_password_not_this
Warning. Use a real password for ADMIN_PASSWORD. This is the admin account for your Open-WebUI instance - the one that can add users, change settings, and access all conversations. If your domain is public (and it will be - that's the whole point), anyone who finds the login page can attempt to brute-force this. Use a password manager. Generate something with 20+ characters. You only have to type it once to set up the account, after which sessions persist.
Create the docker-compose.yml
Three services. Traefik handles ingress and SSL. Open-WebUI is the application. A shared Docker network connects them. The Traefik labels on the Open-WebUI service are where the routing magic happens — they tell Traefik which hostnames to route to which container.
version: '3.8'

services:

  # ── TRAEFIK — reverse proxy + automatic SSL ──
  traefik:
    image: "traefik:v3.0"
    container_name: "traefik"
    restart: unless-stopped
    command:
      - "--log.level=INFO"
      - "--providers.docker=true"
      - "--providers.docker.exposedbydefault=false"
      - "--entrypoints.web.address=:80"
      - "--entrypoints.websecure.address=:443"
      # Redirect all HTTP → HTTPS automatically
      - "--entrypoints.web.http.redirections.entrypoint.to=websecure"
      - "--entrypoints.web.http.redirections.entrypoint.scheme=https"
      # Let's Encrypt via HTTP challenge
      - "--certificatesresolvers.myresolver.acme.httpchallenge=true"
      - "--certificatesresolvers.myresolver.acme.httpchallenge.entrypoint=web"
      - "--certificatesresolvers.myresolver.acme.email=${ACME_EMAIL}"
      - "--certificatesresolvers.myresolver.acme.storage=/letsencrypt/acme.json"
    ports:
      - "80:80"
      - "443:443"
      - "8080:8080"   # Traefik dashboard — optional, remove in production
    volumes:
      - "/var/run/docker.sock:/var/run/docker.sock:ro"
      - "traefik-data:/letsencrypt"
    networks:
      - web-proxy

  # ── OPEN-WEBUI — the chat interface ──
  open-webui:
    image: 'ghcr.io/open-webui/open-webui:main'
    container_name: open-webui
    restart: always
    environment:
      - OPENAI_API_KEY=${OPENAI_API_KEY}
      - 'OPENAI_API_BASE_URL=https://api.groq.com/openai/v1'
      - ADMIN_EMAIL=${ADMIN_EMAIL}
      - ADMIN_PASSWORD=${ADMIN_PASSWORD}
    volumes:
      - 'open-webui-data:/app/backend/data'
    networks:
      - web-proxy
    labels:
      - "traefik.enable=true"
      - "traefik.http.routers.open-webui.rule=Host(`${DOMAIN}`)"
      - "traefik.http.routers.open-webui.entrypoints=websecure"
      - "traefik.http.routers.open-webui.tls.certresolver=myresolver"
      - "traefik.http.services.open-webui.loadbalancer.server.port=8080"

volumes:
  traefik-data:
  open-webui-data:

networks:
  web-proxy:
Info. Why OPENAI_API_BASE_URL=https://api.groq.com/openai/v1? Groq's API is OpenAI-compatible — same endpoints, same request format, same response structure. By pointing Open-WebUI at Groq's base URL instead of OpenAI's, all API calls go to Groq's infrastructure. Open-WebUI never needs to know it's not talking to OpenAI. The OPENAI_API_KEY variable holds your Groq key. Elegant hack. Works perfectly.
SSL Setup & Launch
One step before you bring everything up. Traefik stores your SSL certificate data in a file called acme.json. It needs to exist before Traefik starts, and it needs strict file permissions — Let’s Encrypt will refuse to work with a cert file that’s world-readable. Two commands, not optional:
# Must be in your working directory (~/open-webui)
touch acme.json
chmod 600 acme.json

# Verify permissions — should show: -rw-------
ls -la acme.json
# -rw------- 1 ubuntu ubuntu 0 Mar 13 10:00 acme.json
Warning. chmod 600 is not optional. Traefik will refuse to write certificates to a file with looser permissions. If you skip this step and just run touch acme.json, it'll be created with default permissions (usually 644), and Traefik will either fail to start or fail to obtain the certificate. Both outcomes result in the same debugging session. Do the chmod.
DNS is pointing to your server. Ports 80 and 443 are open. acme.json exists with the right permissions. The .env and docker-compose.yml are ready. You can now launch:
# Launch in detached mode — runs in background
docker compose up -d

# Watch the logs to see Traefik request the SSL cert
# (the interesting bit happens in the first 30-60 seconds)
docker compose logs -f traefik

# Look for lines like:
time="..." level=info msg="... Obtaining a new certificate..."
time="..." level=info msg="... Certificate renewed successfully."
Watch the Traefik logs on first launch. Certificate issuance happens automatically but it takes 15–60 seconds. The logs tell you exactly what's happening. If you see certificate errors, the most common causes are: DNS not propagated yet (wait and retry), port 80 blocked (check security group / UFW), or wrong domain in .env (typo check). Fix the underlying issue and run docker compose restart traefik.
Verify Everything Is Working
Check Container Status
docker compose ps

# Both containers should show "running" status:
NAME           IMAGE                              STATUS
traefik        traefik:v3.0                       running
open-webui     ghcr.io/open-webui/open-webui:...  running
Open the Interface in Your Browser
Navigate to https://chat.yourdomain.com. You should see the Open-WebUI login page over a valid HTTPS connection — no certificate warnings, padlock in the browser bar. Log in with the ADMIN_EMAIL and ADMIN_PASSWORD you set in your .env.
From the interface, select a model from the dropdown at the top. The models listed will be the ones available through your Groq API key. Pick one (Llama 3.1 8B is a solid starting point), type a message, and watch how fast it responds. That response speed is Groq’s LPU hardware doing its thing. It’s genuinely impressive the first time you see it.
Teardown & Cleanup
When you’re done experimenting — or if you’re spinning down a lab environment that was never meant to run forever — here’s how to clean it up properly. Don’t just terminate the EC2 instance and forget the DNS record pointing at a dead IP. That’s how you end up with orphaned DNS records and a mild sense of technical debt anxiety six months later.
# Stop containers and remove them, networks, and default volumes
docker compose down

# If you also want to remove the named volumes (chat history, certs)
# WARNING: this deletes all Open-WebUI data permanently
docker compose down -v

# Verify nothing is still running
docker ps
-
Log back into your DNS provider and delete the A record you created in Step 1. If you’re terminating the server, remove the DNS record first — or immediately after. A record pointing at a dead IP wastes nothing significant, but it’s messy and will confuse you if you reuse the same subdomain later.
-
If you spun up a fresh VPS just for this: terminate it, or stop it if you want to preserve the disk. On AWS EC2: EC2 console → Instances → select your instance → Instance State → Terminate. On a VPS provider: their control panel will have an equivalent “Destroy” or “Delete” action.
Your Open-WebUI data is in Docker volumes, not on the server filesystem. If you ran docker compose down without -v, the volumes still exist on the server. If you want to preserve your conversation history before terminating, export it from the Open-WebUI settings panel first - it has a JSON export option under Settings → Data.
What comes next: lock down the Traefik dashboard (close port 8080 or add BasicAuth), add more users through the Open-WebUI admin panel if you want to share it with your team, and explore the model settings - you can configure system prompts, switch between Groq models, and adjust temperature per conversation.
The Groq free tier will cover personal use comfortably. If you hit the rate limits - congrats, you’re using it enough that a paid tier starts making sense.


Comments (0)
No comments yet. Be the first to share your thoughts.
Leave a comment