Kubermatic KubeOne automate cluster operations on all your cloud, on-prem, edge, and IoT environments.
watch video here :
Used github: https://github.com/kubermatic/kubeone.git
Ubuntu 24.04 server on AWS
Step 1 - Downloading KubeOne
The easiest way to download KubeOne is to use our installation script. The following command will download and run the script:
sudo apt update && sudo apt install unzip -y
curl -sfL https://get.kubeone.io | sh
The script downloads the latest version of KubeOne from GitHub, and unpacks it in the /usr/local/bin directory.
Step 2 - Downloading Terraform
As described in the How KubeOne Works section, we’ll use Terraform to manage the infrastructure for the control plane, therefore we need to install it. Terraform has several installation methods: manually, using a package manager such as apt, using Homebrew (for macOS users).
HashiCorp’s GPG signature and install HashiCorp’s Debian package repository.
sudo apt-get update && sudo apt-get install -y gnupg software-properties-common
Install the HashiCorp GPG key.
wget -O- https://apt.releases.hashicorp.com/gpg | \
gpg --dearmor | \
sudo tee /usr/share/keyrings/hashicorp-archive-keyring.gpg > /dev/null
Verify the key’s fingerprint.
gpg --no-default-keyring \
--keyring /usr/share/keyrings/hashicorp-archive-keyring.gpg \
--fingerprint
Add the official HashiCorp repository to your system. The lsb_release -cs
command finds the distribution release codename for your current system, such as
buster, groovy, or sid.
echo "deb [signed-by=/usr/share/keyrings/hashicorp-archive-keyring.gpg] \
https://apt.releases.hashicorp.com $(lsb_release -cs) main" | \
sudo tee /etc/apt/sources.list.d/hashicorp.list
Download the package information from HashiCorp.
sudo apt update
Install Terraform from the new repository.
sudo apt-get install terraform -y
Step 3 - Configuring The Environment
Download The AWS CLI
sudo apt install unzip -y
curl "https://awscli.amazonaws.com/awscli-exe-linux-x86_64.zip" -o "awscliv2.zip"
unzip awscliv2.zip
sudo ./aws/install
KubeOne and Terraform require you to have the cloud provider credentials exported as the environment variables.You need an IAM account with the appropriate permissions for Terraform to create the infrastructure and for the machine-controller to create worker nodes.
Create an IAM user
Navigate to the AWS console
Click the “Search” field.
Search for IAM
Click “Users”
Click “Add users”
Click the “User name” field.
Type “Docmost” or as you wish about the name
Click Next
Click “Attach policies directly”
Click this checkbox with Administrator access or Give only S3 access
Click “Next”
Click “Create user”
Click newly created user in my case Ajay
Click “Security credentials”
Click “Create access key”
Click this radio button with the CLI
Agree to terms
Click Next
Click “Create access key”
Download .csv file
To set the environment variable, use the export command such as:
export =
export =AWS_ACCESS_KEY_ID
export =AWS_SECRET_ACCESS_KEY
Or use Aws configure
aws configure
Step 4 - Creating The Infrastructure
Create a key pair on server
ssh-keygen -t rsa -b 4096
First, move to the directory with the example Terraform configs that has been created while installing KubeOne in the Step 1. For example (the directory name depends on the latest KubeOne version):
cd ./kubeone_1.9.0_linux_amd64/examples/terraform/aws/
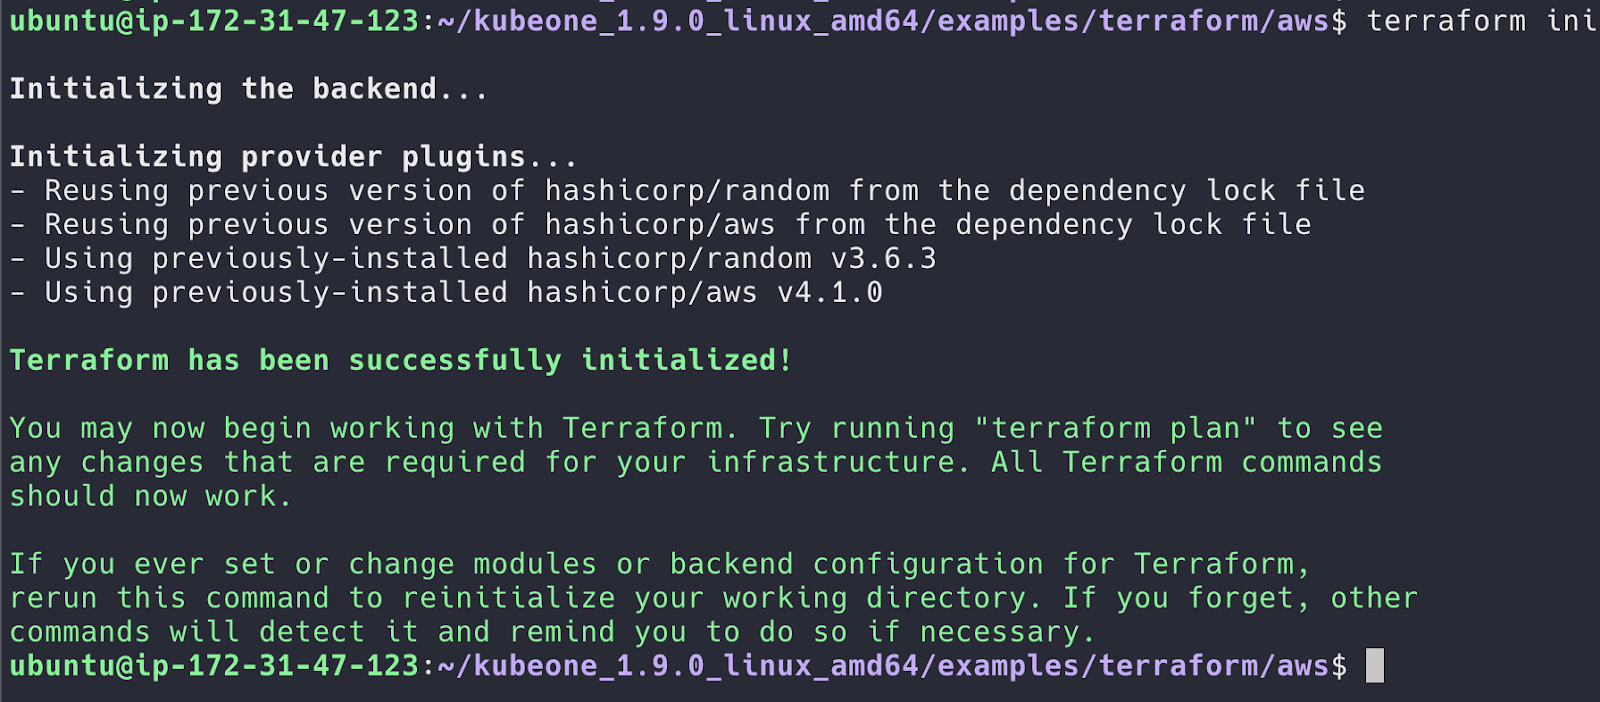
Before we can use Terraform, we need to initialize the directory structure and download the required plugins. This is done by using the init command
terraform init
In the same directory, create a file called terraform.tfvars which will contain Terraform variables used to customize the infrastructure creation process. We’ll set the following two variables
vi terraform.tfvars
Add these
cluster_name = "kubeone-cluster"
ssh_public_key_file = "~/.ssh/id_rsa.pub"
The cluster_name variable is used as a prefix for cloud resources. The ssh_public_key_file is a path to a SSH public key that will be deployed on instances. KubeOne connects to instances over SSH to provision and configure them. If you don’t have an SSH key, you can generate one by running ssh-keygen.
The terraform.tfvars files can also be used to customize properties such as instances size.
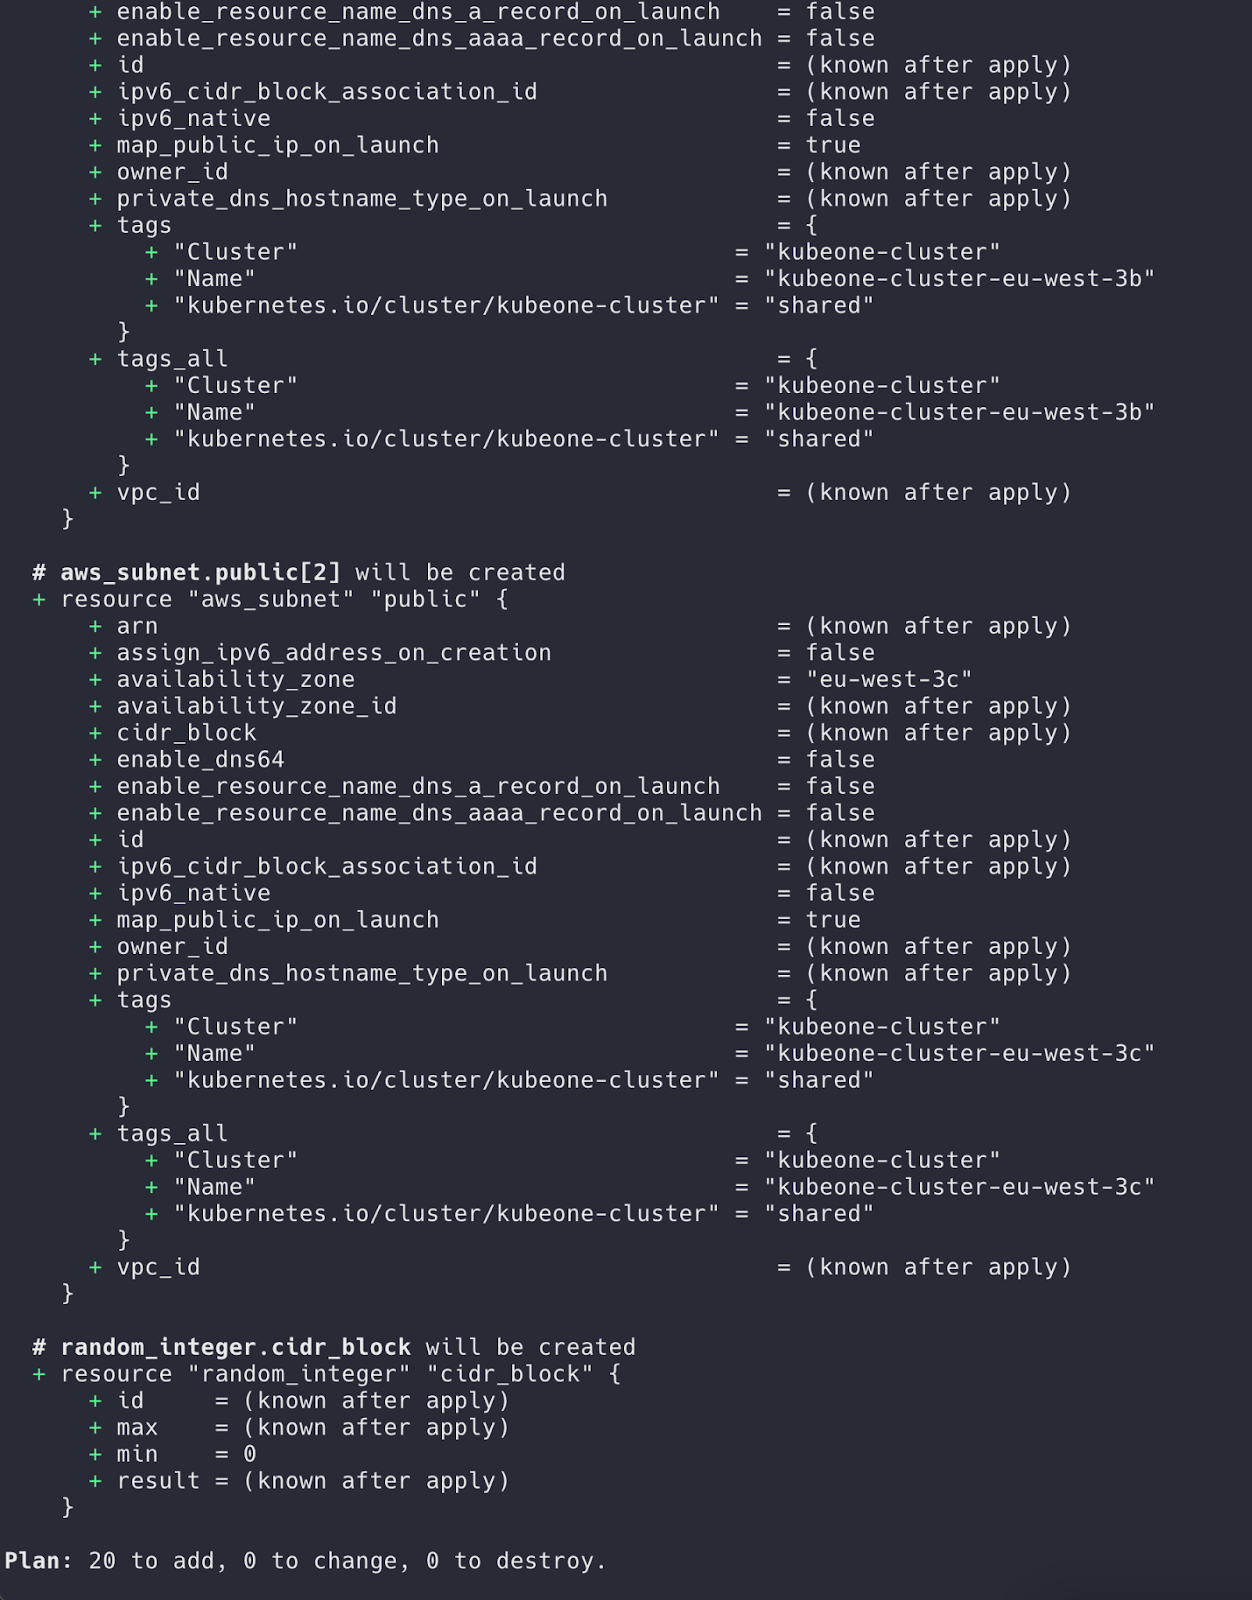
Once the terraform.tfvars file is created, run the plan command to see what changes will be made.
terraform plan
if you agree with the proposed changes, you can apply them by running the apply command. You’ll be asked to confirm your intention by typing yes
terraform apply
This command will create all the infrastructure needed to get started. This might take up to several minutes, depending on the cloud provider.


Finally, we need to save the Terraform state in a format that can be parsed by KubeOne for information about the infrastructure (security groups, IAM roles, etc.), instances, and load balancer. That information will be used for accessing the instances, provisioning the cluster, and later for creating the worker nodes. The format is already defined in a file called output.tf and everything you need to do is to run the output command
terraform output -json > tf.json

This command will create a file called tf.json with JSON representation of the Terraform state that can be parsed by KubeOne. With that done, we’re ready to provision our cluster which will do in the next step.
Step 5 - Provisioning The Cluster
Now that we have the infrastructure, we can use KubeOne to provision a Kubernetes cluster.
The first step is to create a KubeOne configuration manifest that describes how the cluster will be provisioned, which Kubernetes version will be used, and more. The manifest can be saved in a file called kubeone.yaml. In the following table you can find example configuration manifest for each supported provider.
vi kubeone.yaml
Add this
apiVersion: kubeone.k8c.io/v1beta2
kind: KubeOneCluster
versions:
  kubernetes: '1.30.0'
cloudProvider:
  aws: {}
  external: true
Before proceeding, make sure to select the Kubernetes version that you want to use, and replace the placeholder values with real values where applicable. In the following table, you can find a list of supported Kubernetes versions for latest KubeOne versions (you can run kubeone version to find the version that you’re running).
kubeone apply -m kubeone.yaml -t tf.json
If you face this issue
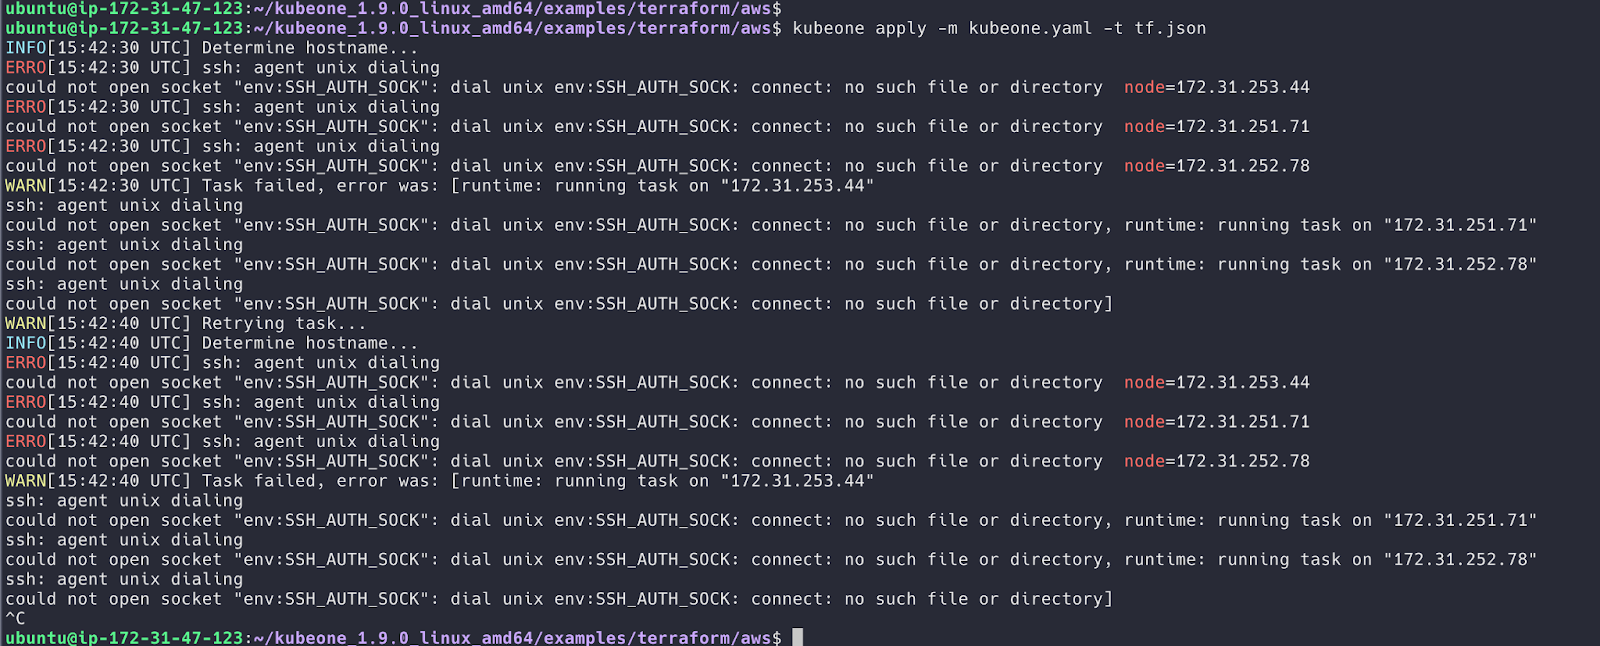
Run these Commands
Start fresh agent
# Start SSH agent correctly
eval "$(ssh-agent)"

# Verify the environment variables
echo $SSH_AUTH_SOCK
echo $SSH_AGENT_PID
Add ssh keys
# Add your private key
ssh-add ~/.ssh/id_rsa

# Verify keys are added
ssh-add -l
Set Correct Permissions
# Fix SSH directory permissions
chmod 700 ~/.ssh
chmod 600 ~/.ssh/id_rsa
chmod 644 ~/.ssh/id_rsa.pub
Run again
kubeone apply -m kubeone.yaml -t tf.json
This will create cluster
Step 6 - Install Kubectl
curl -LO "https://dl.k8s.io/release/$(curl -L -s https://dl.k8s.io/release/stable.txt)/bin/linux/amd64/kubectl"
curl -LO "https://dl.k8s.io/release/$(curl -L -s https://dl.k8s.io/release/stable.txt)/bin/linux/amd64/kubectl.sha256"
echo "$(cat kubectl.sha256)  kubectl" | sha256sum --check
sudo install -o root -g root -m 0755 kubectl /usr/local/bin/kubectl
chmod +x kubectl
mkdir -p ~/.local/bin
mv ./kubectl ~/.local/bin/kubectl
Step 7 - Configuring The Cluster Access
KubeOne automatically downloads the Kubeconfig file for the cluster. It’s named as
kubectl --kubeconfig=-kubeconfig
kubectl get nodes --kubeconfig=kubeone-cluster-kubeconfig

Copy the config to .kube folder
cp kubeone-cluster-kubeconfig ~/.kube/config
Try now without --kubeconfig
kubectl get nodes
Unprovision Cluster ( Removal )
The goal of the unprovisioning process is to destroy the cluster. It should be used only if you don’t need the cluster anymore and want to free up the cloud resources.You can revert the provision process using the reset command, such as
kubeone reset --manifest kubeone.yaml -t tf.json
Removing Infrastructure Using Terraform
If you use Terraform to manage the infrastructure, you can simply destroy all resources using the destroy command. Terraform will show what resources will be destroyed and will ask you to confirm your intentions by typing yes.If you’re running cluster on GCP, you will be required to manually remove Routes created by kube-controller-manager using cloud console before running terraform destroy.
terraform destroy
Remove Server and IAM user at end.

Comments (0)
No comments yet. Be the first to share your thoughts.
Leave a comment